Affiliate Disclosure: We earn a commission if you purchase through one of our links at no additional cost to you.
Looking for ways to improve photoshop performance? Do you find yourself waiting for Photoshop to process a command or redraw an image? For those of us doing more than entry-level editing, we need to optimize Photoshop performance.
What Can I Do to Improve Photoshop Performance?
As it happens, there are some very simple things you can do to make Photoshop run more smoothly. Some cost money, but many options are within your grasp without any expense at all. The first thing you need to do is visit your Performance Preferences.
Use More RAM to Optimize Photoshop Performance
This is the view of my main system, a 5K iMac with 24 GB RAM.
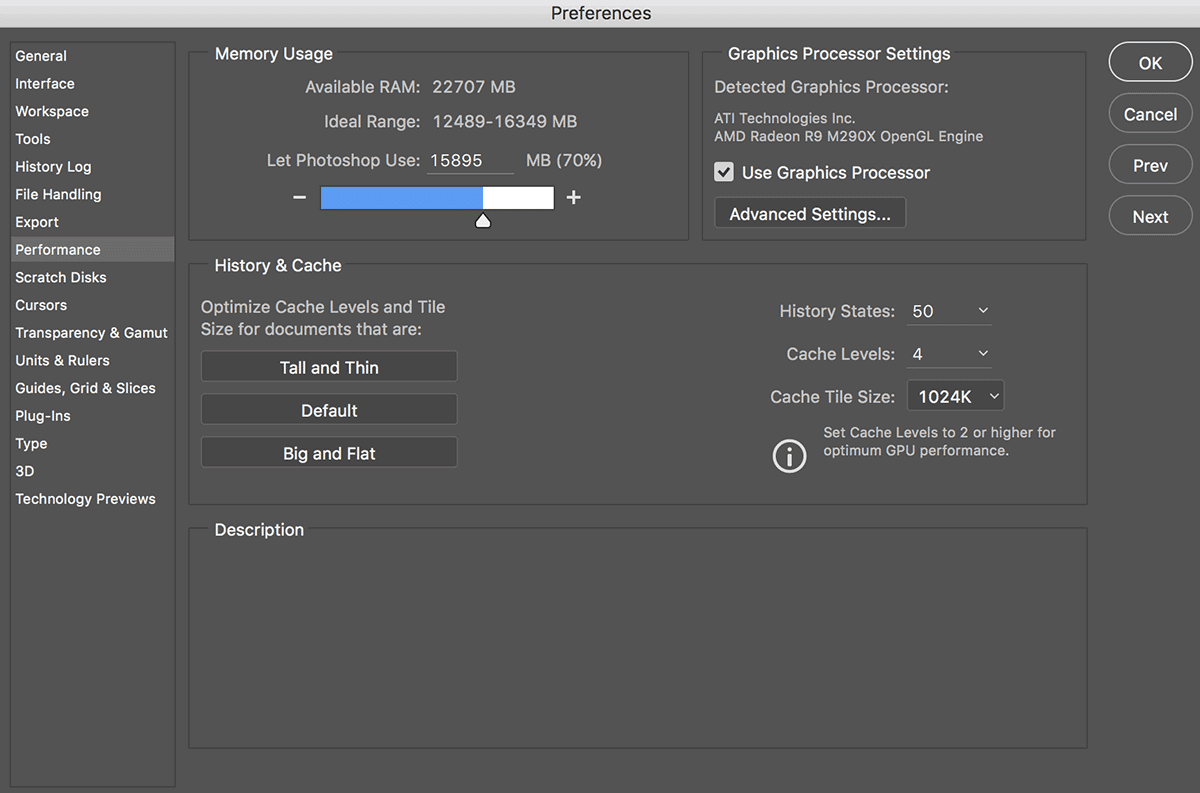
A few simple changes here can improve your performance. Let’s start with your Memory Usage. Use the slider to determine what percentage of your total RAM gets allocated to Photoshop.
By default, it’s set to use up to 70% of your RAM. Adobe claims that you can use up to 100% with no performance degradation if you’re running Photoshop in 64-bit mode and not running any other applications. Personally, I keep mine at 70% even though I have it running in 64-bit mode. There’s never a time when I’m not running another application. I generally quit other major applications, but I need my iTunes music playing while I process.
Here’s the fun thing about percentages. You can change the reality of those percentages by adding more physical RAM to your computer. Remember, RAM is faster than any disk, even SSD. The more Photoshop can do by loading into RAM, the faster it can perform.
Surprisingly, too much RAM yields worse results. 24 GB seems to be the sweet spot, but 16 GB will do nicely. Even if you have a laptop or older system that won’t accept that much RAM, add what you can.
Get a Fast Scratch Disk
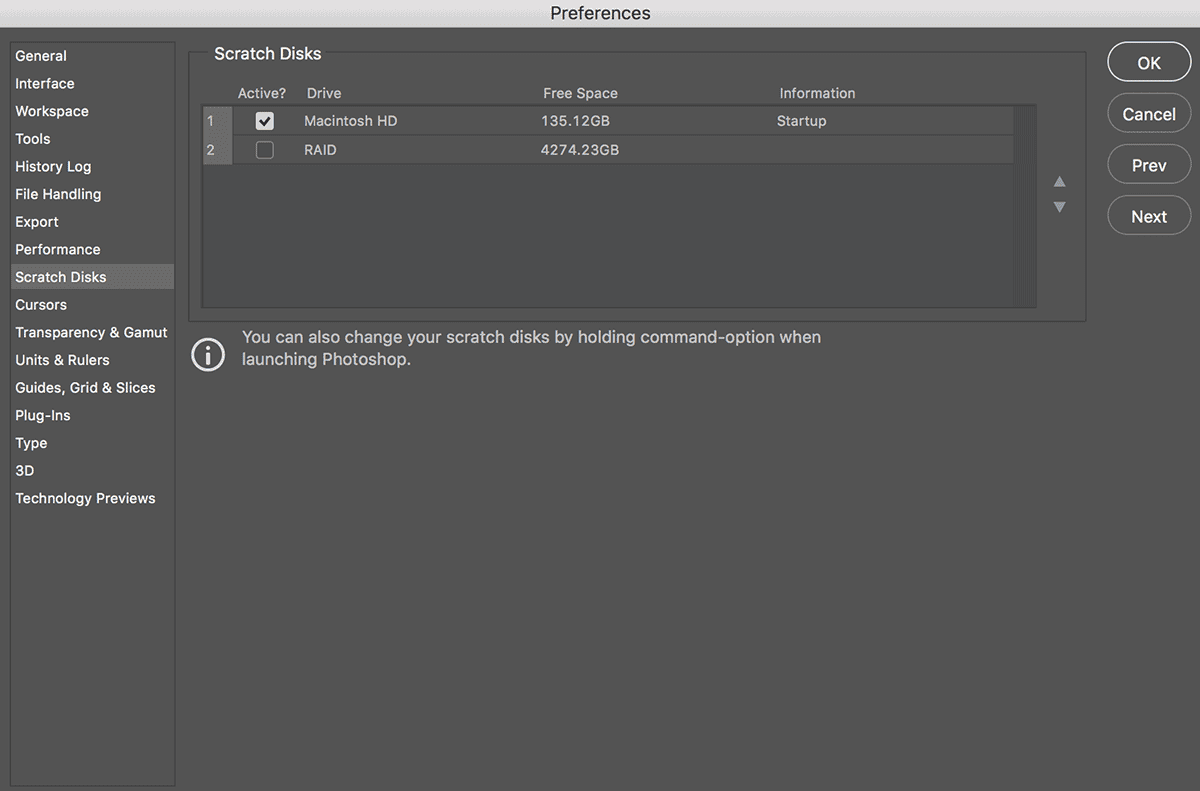
There are two disks on my iMac. The internal disk, Macintosh HD, is a Solid State Drive (SSD). The RAID system is an OWC Thunderbolt RAID Array.
If you can’t add enough RAM to prevent Photoshop from needing to use a Scratch Disk, then make sure it’s using the fastest scratch disk you have. There are some factors to consider when choosing your scratch disk.
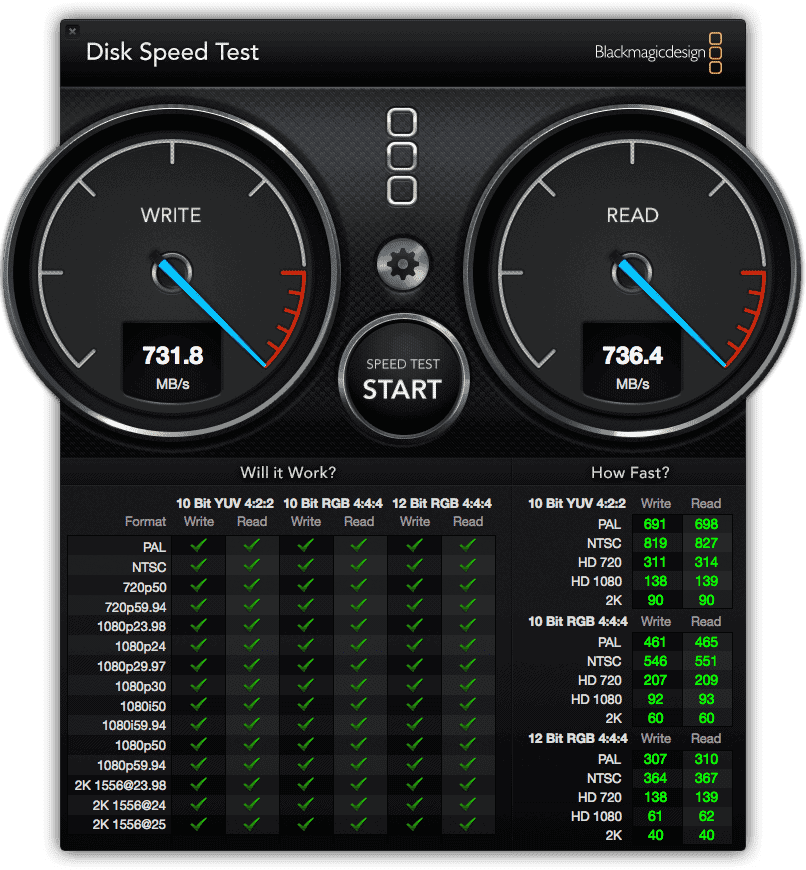
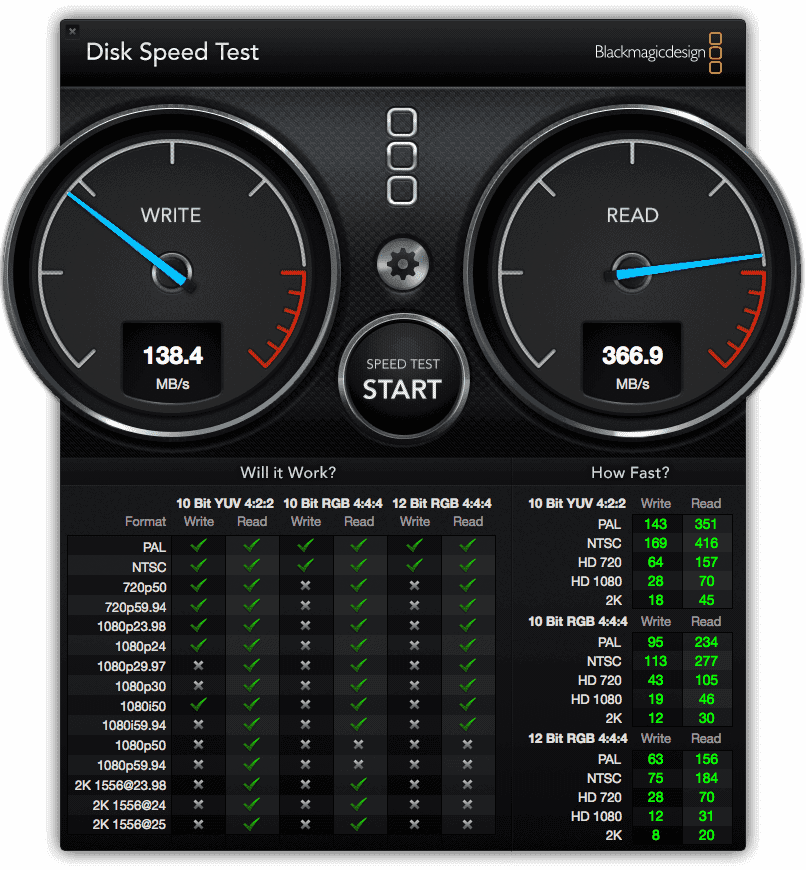
The four drives in my RAID array are faster than a single SATA drive. Thunderbolt 2 is also fast. However, the SSD is faster. You can use a program like BlackMagic Disk Speed Test to find out which of your disks would be the best option for a Scratch Disk. Here are my results.
SSD
RAID
It’s very clear that the internal SSD blows the RAID away.
Adobe’s own advice to improve Photoshop performance conflicts with my experience when it comes to Scratch Disk setup, at least in part.
The article states “For best performance, scratch disks should be on a different drive than any large files you are editing.” I agree with this part. Better to have the drive head-on different drives operating independently to have your Scratch and Data operations working simultaneously, rather than in sequence.
However, it also says “RAID disks/disk arrays are good choices for dedicated scratch disk volumes.” Clearly, this isn’t the case for my machine. Your results may be different if you aren’t using an SSD.
The last thing I want to cover is some good advice from Adobe. “Scratch disks should be on a different drive than the one your operating system uses for virtual memory.” That’s because Photoshop isn’t the only thing accessing the drive. Your Scratch disk in Photoshop may be competing with your operating system to write to the disk.
If you have a slower system drive, this is something to keep in mind. Considering the speed of my SSD, I think the benefit it provides far outweighs the concern of sharing my Scratch Disk operations with the OS on the same drive. The thing works lickety-split (advanced IT terminology meaning it’s pretty fast).
Evaluate Your Free Disk Space
While you’re doing that, check how much usage is on that disk. Hard drives give their best performance when they are less than 50% full. If your fastest drive is 80% full, it may not yield your fastest results. Better to move some of those files elsewhere to get your best performance.
What About Your History and Cache Settings
Let’s go back and take a look at the Performance Preferences.
The History & Cache section has three buttons with presets to change the fields below them. Ignore them. These are presets. You can figure out the best settings by yourself.
History States are basically the number of times you can Undo changes while editing in Photoshop. The default is 20, but it can go up to 1,000.
Keep in mind that every one of those states takes up resources – reducing the amount of RAM you have available for other actions. Use that RAM for 1,000 history states and you increase the likelihood that Photoshop will use your scratch disk – which is much slower than RAM.
Cache Levels also use resources, but it can help speed up redraw times. Think of it as an investment. If your resource is holding something that you’re working on at the moment, Photoshop doesn’t have to go back to load something from the disk to redraw it. According to Adobe’s Tech Note to Optimize Performance, this setting should be greater than the default value (4) for images over 50 Megapixels.
Cache Tile Size comes with the lowest default setting (128K), which is almost certainly the worst choice for Photoshop. Think of your Cache Tile Size as a bucket that fetches bits from your Cache Levels. A smaller bucket means the system has to make more trips to get everything it needs. Help it out. Give it a bigger bucket and select 1028K.
Use Your Graphics Processor
In the Performance Preferences, check to see if Photoshop detected a graphics processor on your computer. If it did, check that little box next to Use Graphics Processor.
That box allows Photoshop to offload the burden on your CPU and let the GPU do what it does best. This may not help you in all aspects of your work in Photoshop, but it will help in graphically intensive operations that use Blur and Warp tools.
Keep An Eye On Your Photoshop Efficiency
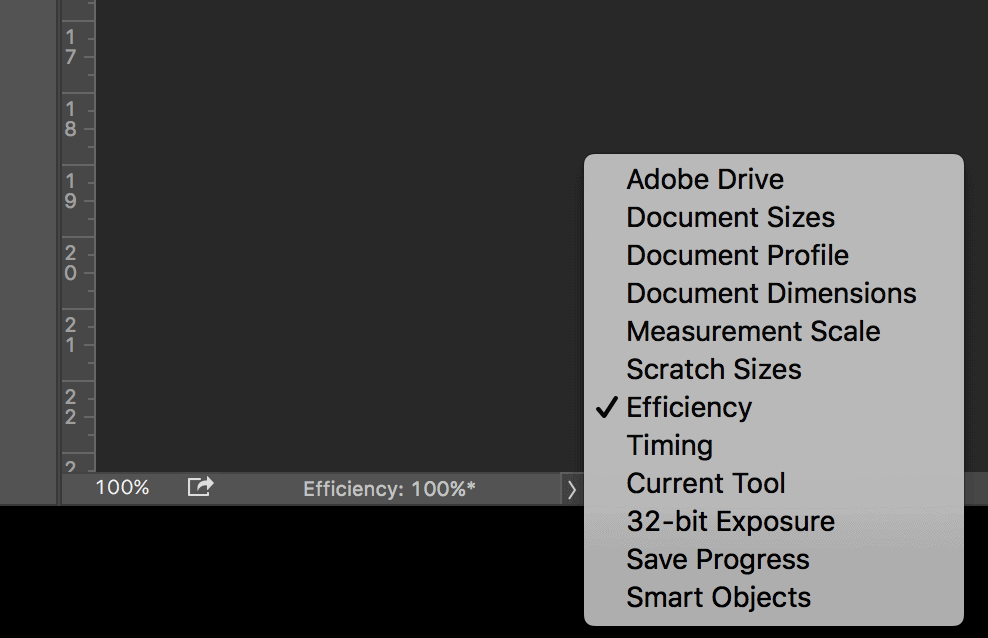
This is one of those little tools that may go unnoticed. Photoshop has a built-in efficiency monitor located at the bottom of the application.
If you’re running at 100%, things are great. If not, check some of your resources. You may be able to improve your efficiency by getting rid of unnecessary brushes. Closing some open files, eliminating layers, and otherwise reducing things that put a drain on your resources.
Upgrade Photoshop To The Latest Release
Adobe makes improvements to the algorithms that process your images. One of the changes in Photoshop CC 2015 improved the way Adobe Camera Raw used CPU resources to process RAW files.
In the past, a 4 core iMac could actually run faster than a 12 core Mac Pro. Not anymore. Now ACR uses all available cores for RAW conversion. If you’re converting multiple RAW images, ACR (and presumably Lightroom CC 2015, since it shares the same engine) can use a separate core for each conversion.
If you want to take advantage of Adobe’s optimization of Photoshop, then upgrade your software. The new stuff runs faster than the old stuff.
Resources to Optimize Photoshop
These are just a few tips, but they can give you some interesting improvements. You should check out the Adobe Optimize Performance note and the other recommendations from Mac Performance Guide for more ideas, even if you run on a Windows machine.
Happy Photoshopping.
Want to learn more about Photography software? Click below to check out articles about Adobe, ON1, Skylum, and more.
Photography Software Articles






It was an amazing post.Thanks for sharing this useful post with us
Raster to vector convertion