Affiliate Disclosure: We earn a commission if you purchase through one of our links at no additional cost to you.
You can dramatically improve your photography by avoiding these 10 photography mistakes. These are common errors and I’ve made every single one of them.
10 Photography Mistakes You Can Easily Fix
All of these photography mistakes have something in common. They are easy mistakes to make, and they are all easily preventable.
Why do we make such common mistakes over and over again? Either we’ve never been told why these issues are mistakes, or we simply forget when we’re excited about taking photos.
The easiest way to prevent mistakes is to slow down, pay attention and make deliberate captures. No more spray and pray.
I can’t help you if your forget, but I can at least lay out some common errors and how you can prevent them. Let’s get started.
1: Wrong White Balance
Let’s start with an easy one. Forgetting to set your white balance causes color casts on your photos. They may be too blue or too orange. Skin tones look awful.
We’re often reminded that you can easily fix this if you shoot in RAW, and that’s mostly true. Of course, that doesn’t mean it’s always easy.
The easiest way to fix white balance in post-processing is if you have a photograph with a neutral grey color in the same light. Then you must grab the eyedropper tool in Lightroom or Photoshop boom – you fix your white balance.
Of course, not every photo has a perfectly neutral grey color in it. So we click something that we think looks close to a neutral color and then that’s close enough. Maybe.
It’s much easier if you just set the correct white balance before you start taking photos. That gets you in the range.

Is your camera giving you weird, inaccurate colors in your photos? Avoid that issue entirely by using the Lastolite 12-Inch Ezybalance Card.
This helpful tool lets you set your camera's white balance perfectly, so you'll never have to worry about poor coloration again. Not only that, but the Ezybalance Card is also great for exposure control and creating accurate color rendition. It's collapsible and durable, so you can take it wherever you go, and it's easily cleanable too. Plus, it's double-sided with grey and white tones to suit your needs.
If you want to be more specific, start carrying a grey card. I use the Lastolite 12-inch EzyBalance Card. It has a nice white target printed in the center so you have some contrast to lock focus.
You can create a custom white balance in-camera using this grey card, or at least use it in post-processing with the eyedropper. Just remember to set your white balance or take a photo of this grey card when you change lighting conditions.
2: Bad Horizon Lines
Nothing can ruin a travel, landscape or architecture photo faster than a horizon line that isn’t level.
It doesn’t matter whether you place your horizon high or low in the photo, but having a horizon that dips down to one side or another just screams amateur snapshot.
Your DSLR should have a mode to turn on an overlay inside the viewfinder. Most people use these for the Rule of Thirds. These lines give you a ruler to use for your horizon. Line it up. Make sure the horizon is level.
If you don’t have the guidelines enabled in your viewfinder, check your manual.
At the very least, use the top or bottom of your display or viewfinder to get the horizon level, and then lower the camera until you have the composition you want.
Can you fix this in post processing? Sure. Lightroom makes it very easy. However, that will also crop out part of your photo, so be prepared to lose some detail if you wait until after the shot to level your horizon.
We have a lot of great tools at our disposal. There’s no excuse for bad horizon lines. It’s the easiest of photography mistakes to avoid.
3: Failing to Pay Attention to the Direction of Light
There are three aspects about light that photographers should understand:
You can’t always change these attributes, but you can pay attention to them.
The Direction of Light ought to be the easiest one to recognize. You can tell if it’s coming from the left or right, above or (oddly) below. You can see how the light falls on your subject and where it casts shadows based upon the direction of light.
So please, use that knowledge and observation to make better photos.
It’s annoying for your viewer when you take a photo of a person and there is more light on an ear or shoulder than on their face. You can fix this by moving your subject a few inches to take advantage of the light.
Maybe you’re photographing something besides a portrait and you can’t move your subject. That’s fine.
Can you walk around your subject to get to better light? Can you wait for a time when the light looks best on your subject? Hint: there’s a reason why so many photographers like to shoot at sunrise or sunset. They’re waiting for great light on their subject.
What happens when you can’t move your subject and the light never moves into a good position for your subject?
Then bring some off-camera flash or lighting.
If that can’t happen, then you don’t have a decent photo. Without good lighting on your subject, you don’t have a good photo.
Pay attention to the direction of light and you can create much better photos. Don’t think that you have to shoot everything head-on form the light. It’s fine to get creative with backlight, sidelight, and different angles.
If you aren’t sure what angles look great, start studying photos that you like. Pay attention to where the source of light is relative to the subject. You’ll develop a feel for what works and what doesn’t.
4: Blurry Subjects or Poor Focus
I get it. Sometime you’re in a hurry and you don’t quite nail the focus. Maybe you’re shooting an event and there isn’t a chance to do it over. You got a shot, but the focus isn’t sharp.
What do you do?
Many people think they can fix it later in post-processing with some extra sharpening. You know what that does?
It creates a blurry photo with some crunchy bits around the edges. In other words, it sucks.
Despite what you see on TV, you cannot add detail to a photograph after you’ve taken the shot. You can remove it, such as by adding blur. You just can’t make it in-focus.
Sharpening is a process that adds blacks to the edges to provide more contrast, a pleasing effect that we think makes photos look sharper. The problem is that it only works if those edges are clear and in focus when you capture the photo.
Adding blacks, or sharpening, a blurry photo just makes it look crunchy. There’s no saving it. Throw it away.
In some cases, you may be able to fix this while you’re still taking photos. Trying to zoom in to a photo on the LCD screen of your camera is often misleading. More than once I thought I had a sharp photo, only to find out that I missed the focus on a subject’s eye, or some other critical part.
If you can’t be sure while you’re looking at your subject on the LCD, do what I do. Take another photo. And then another one. Take a few. Your odds of getting a usable photo increase and your photography mistakes decrease when you have more choices. Check your focus with each shot.
As for those fleeting moments, you either catch them or you don’t. If you’re trying to photograph a breaching whale and you didn’t get the focus, then you don’t have a shot. Delete it and try again, or pretend you never got anything in the first place.
Because you didn’t.
5: Busy Backgrounds
There are three elements you can combine to make a beautiful photograph:
Screw up any of those and you may have a snapshot, but you don’t have a photo that makes you proud.
The most common thing to screw up is the background. I don’t know why, but the average person doesn’t seem to pay attention to the background when taking a photo. It’s amazing what you can see in the background of a lot of photos.
Seriously, I saw an underwater portrait of a lovely woman snorkeling. A few feet behind her was a large shark smiling while it photo-bombed her shot.
Pay attention to your backgrounds and surroundings.
Distracting elements will draw the viewer’s eye away from the subject. You want to eliminate distractions and distilled your photo down to a little as possible. When there’s nothing left to remove, then you can take your shot.
Sometimes the easiest way to eliminate a distraction is to move. Change your position. Re-compose the photo. A few inches can provide surprising results.
When we go out to restaurants that we’re reviewing, Lee takes photos of our meal. Every little distraction on the table would ruin the shot. We have to eliminate napkins, straws, overhead lights that create hot spots, and anything else that isn’t part of the table or the plate of food.
Nobody wants to see a lot of junk around an appetizing meal. The same is true with your photos.
Get rid of the distractions in the background. Minimalism is your friend to avoid photography mistakes.
6: Bad Cropping
Bad cropping happens when you cut off part of your subject or an element in your photo at an awkward angle.
Let me give you an example. If you’re going to take a full-length portrait, don’t cut off your subject’s feet. I don’t care if it’s a person or a dog. Subjects need feet.
It just looks odd to crop someone at the ankles.
If you just can’t fit in the feet, then crop the person mid-thigh. Similarly, don’t crop off a hand at the wrist, or some other point that just looks awkward.
If you shoot a head and a neck, then give some more room and include the shoulders. A head and neck without a body is pretty creepy to me.
Not sure where to crop? Do your research and look at other photos and portraits. You’ll see what you like and what just seems awkward. The key here is to pay attention to the norms and avoid the awkward stuff.
What if you aren’t photographing a portrait?
The same rules still apply. A shot of a building just above the ground level is on the odd side, but you can get away with shooting up at a skyscraper from a low angle.
We have expectations of things that go together. Buildings don’t float, so we expect to see a sidewalk or something where you step inside. On the other hand, it’s not unusual to look up at a skyscraper without worrying that you can’t see the ground.
Include the things that you take for granted.
7: Poor Composition
Most of us see things in 3D, but our cameras can’t do that. So we have to use composition to add a sense of depth. Fake 3D.
The way you do this is to have elements in the foreground, middle, and background. You don’t have to go overboard for depth. It can be quite simple, as in the photo below.
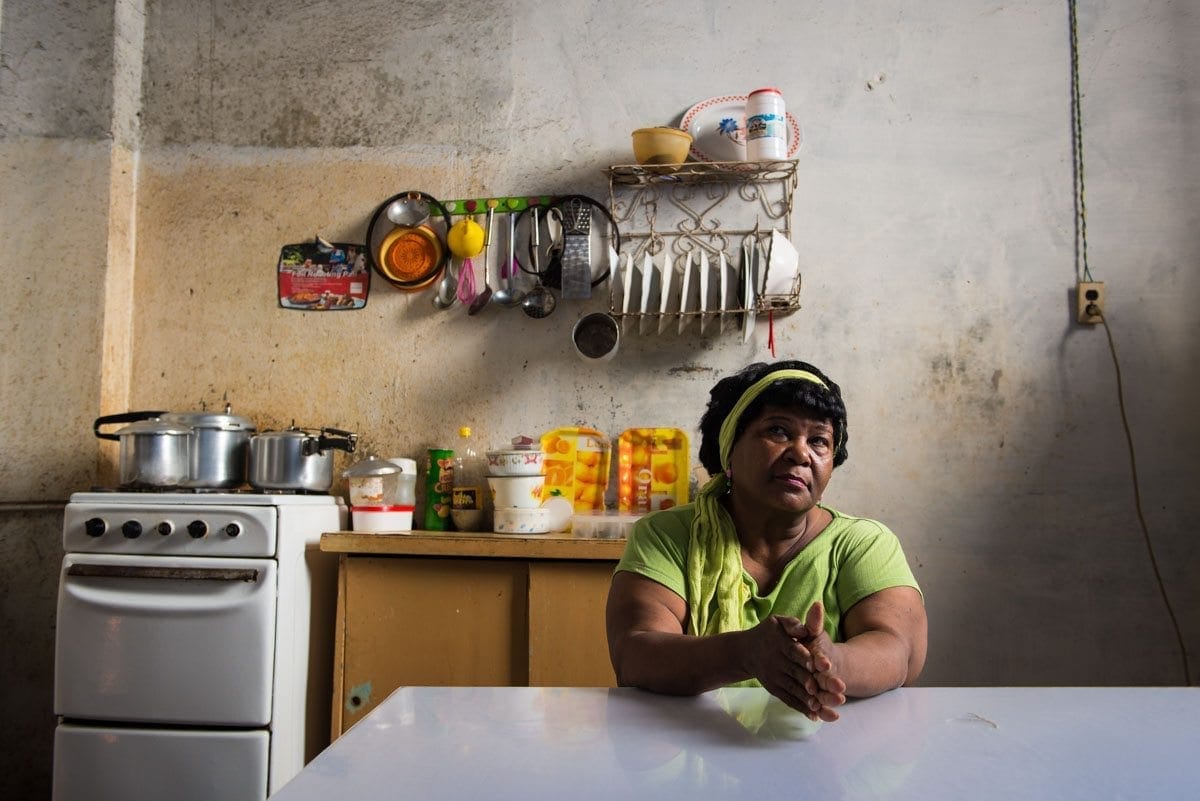
The table and reflection is my foreground. A wonderful Cuban woman who invited us into her home is the subject in the middle, and her kitchen appliances and utensils along the wall make up a background.
Simple and effective. The photo tells you who she is and delivers a sense of depth in a small space. She’s in a space where she belongs.
A few days ago, I was across the street from a group of people trying to force a photograph.
They were at P.F. Chang’s, which has an oversized statue of a horse out front. The group lined up close to the horse while the photographer was a few feet away trying to get it all in one shot.
It was never going to work.
The people are going to either be minuscule foreground elements in front of a great photo of a statue, or the statue won’t be recognizable in the shot.
They’re too close together to capture on an iPhone.
Sometimes showing depth means adding space. Large background objects need to be far away from your subjects, who are closer to your camera. Trying to compress both subject and large background together is a recipe for disaster.
Remember, your background is there to support your subject, not dominate it.
8: Bad Exposure
Exposure can be a matter of taste or style. Some images are supposed to be dark and others bright. Then there are times when you just screw up your exposure.
Don’t make a mistake and call it art.
Modern DSLRs have very good light meters inside these days. Trusting them to get a correct exposure generally works, and then it’s easy to tweak the exposure to your taste.
Poor exposure happens whether you use an automatic mode or manual exposure adjustment. It’s usually because you aren’t paying attention to the meter indicator built into your viewfinder.
Let’s say that you’re shooting in manual mode and you have your exposure just right for your location. Then there’s a change in the light, but you’re distracted by your subject or something else. Basically, you aren’t paying attention to your meter.
Maybe a cloud rolls over, or you move from outside to inside. Something changes the light and you keep on clicking.
Bad exposure.
OK, so you think the better way to go is with Aperture Priority or Shutter Priority. Set it and forget it.
Not always. Yes, you get more range using these modes, but you also open up other potential for exposure issues. Now you’re no longer using a consistent exposure from one shot to the next. Changing your metering by moving from a face to a dark shirt will change your exposure.
In other cases, you could move into different light beyond the automatic exposure triangle range. Maybe you need more or less ISO, or a change in shutter speed.
I’m not suggesting that there is a perfect mode. You just have to watch the meter reading to make sure you’re not allowing your exposure to go wonky.
As with focus, there are some things you can recover in post-processing and some things you can’t. When your exposure is so bad that you lose detail in the highlights or shadows, you’re not going to magically get it back. You can do a lot these days with a RAW photo to reduce highlights and raise shadows, but there are limits.
9: Boring Subject
Let me ask you a question.
Have you ever seen a photo of a person on vacation holding an object up to the camera because they thought it was interesting? If so, did you think it was an interesting photo?
Of course not. That’s because there is nothing interesting about someone holding a vase or a fish. Maybe the item was interesting to them and they wanted a snapshot memory, but it’s a crappy photo because it means nothing to anyone else.
On the other hand, let’s say the object actually is interesting in it’s environment. Would you rather see the dead fish in someone’s hands, or a shot of it as they’re reeling in the fish and it breaks the waterline? How about a shot of the person reeling in the fish, the rod bent into a curve while your subject expresses excitement on her face?
Now it’s no longer a boring subject.
Still photos of dead fish aren’t interesting, but an action shot grabs you and brings you into the photo. I don’t care if it’s when the fish jumps out of the water, your friend reels it in, or a great chef flips it in the pan while making dinner.
Action, motion and expression add interest to your photos.
Static objects mostly just seem boring. Especially if they aren’t even visually appealing static objects.
If you want to avoid boring photos, work on adding some emotion, action or sense of character into your subjects.
10: Failing to use Post Processing Software
Do you have a friend who gets excited showing you a photograph that’s “straight out of the camera?”
I don’t want to burst anyone’s bubble, because photography should be fun and exciting. However, let’s dispel the myth of “straight out of the camera” shots.
If they’re JPEG, then your camera applied some post-processing presets to tweak the colors and sharpen the images.
If they’re RAW, then it’s up to you to apply those post-processing tweaks and sharpening. RAW isn’t a photograph. It’s a database that’s used to generate an image. You can manipulate it in a lot of ways, but the default result is flat, boring and needs sharpening.
All RAW images need sharpening. If you do nothing else, sharpen your RAW photos before you share them.
As for color tweaks, that depends upon your taste. I have a post that explains my Lightroom essentials for every photo. There’s a video to go with it.
If you’re sharing or printing RAW photos without post-processing, then you’re not showing your photos at their best. This is one of those photography mistakes you can eliminate with a few seconds in Lightroom or other post-processing programs.
Avoiding Photography Mistakes Isn’t Difficult
I’ll say it again, I’ve made every mistake on this list and plenty more. These mistakes happen when you aren’t paying attention to some basic details.
The easiest way to avoid these 10 photography mistakes is to slow down. Take your time. Craft your shot. I hope this list helps.
Transcript
William: Welcome to the Photo Flunky Show, Episode 95
Today we are going to go over ten photography mistakes that will make your photos suck.
Hi, my name is William Beem.
Lee: Hi, my name is Lee Beem.
William: And I want to let you know that I have made all of these and more photo mistakes. I made some of my photos suck. But before we get to that I want to let you know that show notes are going to be available at williambeem.com/episode95 And you can get a transcript of the show there for free.
Of course there are links to subscribe to the show and you can do that on iTunes, Google Play Music and a few other sites. We have also got a player if you just want to listen on the website. Go to photoflunky.com and you can see it there.
Also, I want to let you know that I’ve got a free ebook for you. It’s called Creative Portraits and it’s about the emotional and creative side of portrait photography, not the technical things. So it’s not so much about lighting or gear or which lenses to choose. It’s about who your subject is and how you want to show them and what’s important to them and how you tell that story coming through with your portrait photography. So go to williambeem.com/freebook
As I said, it is absolutely free. You can share it with a friend and tell us what you think about it.
Ten photography mistakes that will make your photos suck. This is not really a criticism of people because I have made every single one of these mistakes and I am trying not to make them anymore but I just thought we need a list to help other people because a lot of people are making these mistakes on a regular basis and I really want them to stop it.
How cruel of me. Alright, let’s go ahead and start off with the first one and this is an easy one to pick. That is using the wrong white balance. If you ever get your photos back and you look at them and they are too blue or they are too orange or something is just wrong and it’s because you are out there taking your photos in the wrong white balance. Cameras are really good these days. You can set auto white balance and it will do a fairly decent job, but honestly, if you can choose your white balance before you get to your scene it’s really going to help and it’s very easy to forget this one too because you can go from indoors to outdoors and just keep taking pictures without thinking about changing your settings.
Lee: Yeah, I think the auto white balance also depends. There are some circumstances where it doesn’t work as well as others. For example I tend to take my photos after a run very early in the morning so it is just kind of getting light. There is a natural color cast. I don’t necessarily want to lose that so auto white balance strips it and almost exaggerates it to the other end of the spectrum. Then I have to go back and tweak it to suit.
William: There are a couple of easy ways to correct this. One is obviously with the setting that is on your camera or shoot in raw files. Let’s say you do mess up, if you don’t have a jpeg that is kind of locked in or baked in what the color temperature is going to be you can change it a little bit in jpeg, but if you are shooting in raw, in post processing you’ve got the whole range that you can change it.
Also if you are setting something up and you’ve got a gray card, it’s very easy. Put a gray card down, take a shot of it in the light that you are going to be doing and then when you go to post processing you can just touch that with the eye dropper and then you can adjust your photos afterwards.
One of the things I do with my camera is if I’ve got a gray card I will take a photo of that and set my white balance in camera so that way I don’t have to worry about it in post. Everything looks fine but not every camera is going to give you that option.
Horizon lines should not be going up and down. Mountains may go up and down but the horizon should be level. Whether it’s at the top, middle or bottom of your photos is kind of a creative choice. When I see a photo of an ocean and the ocean is leaning down to the left or the right, something about that just ain’t right.
Lee: Yes because the water is supposed to spill out, right?
William: Exactly. You should have all the water on the other end. No, keep your horizon lines straight. If you can’t do it in camera, which is obviously the best place to do it, at the very least, before you share the photo or before you print it, fix that in your post processing software. Bad horizon lines just ruin your photo right there.
Now there are times when you can get creative and cocky with doing off kilter kind of photographs, but for the most part you want to keep your horizon lines.
Lee: You need the right subject for that.
William: You can always break the rules but you need to make sure you understand how they work in the first place.
Alright, this is one of my favorites. Not paying attention to the direction of light. I have seen some photos that I don’t even understand why they were shared in the first place. The light is coming from one side and yet your subject is facing the opposite direction. You’ve got a nice hotspot on their ear and their face is in shadow. Sometimes you just need to get up and move around or if possible, change the way your subject is facing and it depends what it is. If you are doing something that is natural and is simply not going to move, then you need to get up and move, but the direction of light is important to how you are going to capture that subject and just taking a picture because you are too lazy to walk two feet or three feet over to the left or the right, is just bad photography. Pay attention to the direction of light.
Another one we have noticed is blurry subjects or bad focus and I’ve seen a lot of people do this and then try save the photo with over sharpening.
Lee: Yes and then you get that kind of weird outline on it and this grainy gritty look.
William; It’s kind of crunchy looking and look there is nothing wrong with having bokeh in your subject. In other words the subject is sharp and the background is defocused. It’s a wonderful way to highlight your subject. But if you don’t have the eyes sharpen and clear, if the details on a face aren’t sharp and clear or you just missed the focus somehow, don’t try to save it. You missed it. Throw it away.
Lee: It’s that simple.
William: One of my pet peeves is bad backgrounds. Basically busy photos.
Lee Or overflowing trashcans. Or a trashcan in the background, for heavens sake!
William: If you are going to take a photo, look at your background first. If it is too busy or there is something distracting, something that is going to take away from your subject, you need to move.
Lee: yes, or move the person or the thing or whatever it is.
William: Or if you can’t move it you’ve just got a bad photograph. I mean if that background is going to be part of the photo no matter what then yes, you can take the photo to document it, but you are not going to make a really nice photo if you’ve got a bad or distracting background.
Lee: And that’s not just for people either. You take a photo of a plate of food. You’ve seen me. Guys, move. Hand. Shadow. There’s something in the background. Somebody’s crumpled up wrapper from their straw or a napkin. I want that stuff out of my shot.
William: You want your viewer to concentrate on your subject. Anything that is not your subject or is not complementing your subject is a distraction. You want to remove and distill until you get down to the essence of what you are trying to show. Backgrounds play an important part of that. The color, the shape and the texture of the background can complement your subject or they can distract from it.
So what we are saying is really, having just busy bad backgrounds is not good for your photography at all.
The next one is poor cropping. I’m not talking about after the fact in post processing. I am talking about when you are taking the shot.
I’ve got this other pet peeve. I hate seeing photographs of people without feet. Just their ankles have been cut off or they’ve got an awkward spot on their leg.
Lee: Or they’re missing a hand.
William: Something that should be there isn’t there and they are just not cropped in the right places. Another problem with poor cropping sometimes is if you are taking a travel scene. This kind of goes with bad backgrounds, but there are distracting elements that really ought to be moved out of your shot.
Lee: I think another thing that happens going back to bad horizon lines is if you don’t leave yourself wiggle room to straighten, when you straighten you are going to have a crop as well and you’re going to lose some of the sides and up and down of it. And you are limited to your control once you level up so how that is going to be cropped depends on how much you need to level out. Don’t assume that your bad horizon line is going to be helped with good cropping. It’s just going to be a disaster on two counts.
William: Absolutely.
Or something that is on the edge of your photo as you shot it, when you do that cropping, is going to maybe only be halfway there. We had a wedding family photo and the way it was cropped eliminated a couple of members of the family.
Lee: Yeah, we noticed when we got the print. We thought, what is going on here?
William: Yeah, my aunt …
Lee: And half of your mom’s husband!
William: Yeah, her husband was gone. Mind you this photograph wasn’t one that we took. It was one the photographer took. It was something we were going to give my mother – our wedding photo – and there’s only half of her husband and her sister is not there. Something is not right. Bad cropping can really ruin a photograph.
Along with that is bad composition and by this I’m not talking about necessarily what you’ve got on the edges and what’s at the end but you need to have a foreground, a middle and a background. There has got to be some kind of depth to show what you are taking in your photos. Otherwise it is just going to look very flat.
Lee: There are some situations where that is what you need, but it’s not the rule in day to day photography.
William: I think if you are in a studio taking portraits there or you are doing product photography, that kind of depth is desirable but you can get away with showing a flat image. If you are taking travel photos, if you are doing architecture, if you are into street photography, you need to have something as a foreground a middle and a background. It will add a lot of depth to your photos. The composition will just really help you out a lot. And when I say foreground I don’t mean weeds. This is something I’ve seen with a lot of portrait photographers lately. They are going along a street and they think, I need to put my model here and I’ve got something behind her … what am I going to put in front of her? Oh, I know. There are some little weeds and brush or something. No! You don’t want to obscure your subject just to have a foreground element.
Lee: It doesn’t have to be down at ground level either. It can be framing the photo on the side, it could be anything and you know if there isn’t one then leave it. Then make the subject the foreground.
William: Don’t ruin your subject in order to have a foreground.
Lee: Don’t get too technical about checking all the boxes.
William: Here is a good example. The photograph I’ve seen taken many times is a lake up in Canada. You’ve got a rock, the lake goes out, there is a red canoe in the middle of the lake and there are the mountains behind it. It shows you from the shore to the lake, to the mountains.
You’ve got a sense of depth to the whole scene. That is an example of what we are talking about with composition to show your foreground, middle and background. Alright this is going to be Lee’s favorite. It’s called bad exposure.
Lee: There are so many ways this can happen!
William: Bad exposure can really do a number on your photographs and it doesn’t matter if you’ve gone much in either direction. Whether you’ve overexposed it and you’ve kind of killed all the detail … you’ve probably heard about clipping highlights a number of times. You can see they are called blinkies. You can see them on the back of your display on your camera and when they are blinking on there, then you know that you lost detail in either the highlights, typically, or possibly also in the shadows.
That’s not the only kind of bad exposure. The problem is I see things that are just way under exposed or way over exposed and it’s like the people who are taking these photos don’t understand how to use the meter inside of the camera.
Metering inside of DSLRs is really very good these days. It gives you a nice view of what should be an acceptable exposure. And that is without assuming any other external lighting or off camera flash lighting. You can make creative choices as to why you may want to darken an image or not. Sometimes those creative images aren’t really creative. If your exposure is off you are really not telling the story. Either it’s too bright and you are losing detail or it’s too dark and maybe you can’t open the shadows up. It could be a matter that you’ve taken something and not really paid attention to your metering and then not paid attention to any post processing to try and correct it. I think it’s always going to be in your best interests to get this right in camera. Trusting your aperture priority or your shutter priority doesn’t always get you a proper exposure. Simply because sometimes your camera cannot make the choice that you need whether it be a longer time for the shutter to stay open or raising the ISO, there are a number of settings that you can change as a person going there and thinking about what you are going to do.
That doesn’t mean you have to do manual exposure all the time, but you need to pay attention to the meter and if it can’t make the center line where you’ve got the correct exposure using the automatic settings, pay attention to that before you hit the shutter and then you may have to switch into manual mode and either open up your aperture, give the shutter more time to collect light, but these are very easy problems to fix. It’s not really all that scary to go in on manual mode either. I think it’s a good thing to practice now and then. You don’t want to do it all the time because if you’re not thinking about it when you just get into action shooting you may end up with under exposed or over exposed shots. That’s the beauty of aperture exposure or shutter priority exposure. Really it’s ultimately up to the photographer to choose the right mode and the right settings for the environment or the photograph that you need to take.
The next item on our list is a boring subject. Sometimes you are out, you are excited, you are taking photos and something that you think looks good when you get back it’s not that great. Just kill it. End it right there.
Lee: Or keep it for yourself. You don’t have to share everything that means something to you. You have to accept that you sometimes take a photo and it’s a nice memory but you really had to be there. That’s just the reality of it. When you show somebody else its greatness reduces to nil.
William: I made this mistake. I was looking at some of my photos from Cuba and there was a really wonderful sunrise coming through the trees. You could see the light coming through and there was a little bit of fog and having particulate matter in light just shows the rays of light. It’s really wonderful. And the only subject that I had was the little house – like a little lodge where each room was a separate building. The sunrise and sun rays were glorious. The building in itself was nothing. And I realized my subject was the light but everybody else looking at this would think it’s just a crappy little building sitting there with some nice light on it. I thought I’ve never shared those photos because there is no story to tell there.
Lee: It’s your memory.
William: Yeah. I remember having that wonderful light. I was trying to capture it and I just didn’t do it. That’s one of the things that you either keep for yourself or you throw away, but it’s not something that you want to put out and share because nobody really cares about a boring subject. We’ve seen plenty of boring subjects out there.
A memory is nice if you’re sharing it as a memory; I get it. It’s a snapshot. But if you are trying to build an audience and you are trying to do something for your art then you really need to be cautious about what you share and when you share it.
The last item on our list is not post processing your photos. Even on our iPhone we run them through some kind of software just to enhance them a little bit. It doesn’t have to be over the top but you want to make sure that there is some contrast, the colors are tweaked, there is a bit of sharpening … every single photograph you take with your DSLR need sharpening.
Lee: Also, I’ve noticed that the phone camera tends to under expose most of my photos. It is just the way it is. It needs to have the exposure increased, a tiny bit of sharpening. Those are the standard things. Maybe the shadows need to be lifted.
William: Sometimes you need to lift the shadows, sometimes you’ve got over exposure in an area that needs to be brought down with the highlights and shadows. Sometimes just adding a vignette and placing the center and maybe brightening the center can really make your subject jump out of the scene. But every photo needs post processing, even if it is just a matter of sharpening. Give it a bit of a look there. A few little levers inside of Photoshop or Lightroom or on some of our smartphone apps and you can really take a photo and make it look just wow!
Lee: It’s just 5-10 seconds. Two or three nudges on a slider, not even …
William: It doesn’t take that much to just make the difference between bland and spectacular. Those are the top ten things or mistakes we see people make that really make their photos look less than spectacular. I use the word suck. It’s direct, it’s honest. We think these are easy things to fix. Like I said, I’ve made every single one of these mistakes and once you have made them enough you realize you don’t want to make it any worse so I want to call them out and say look for these things in your photos. Make the fixes where you can, think ahead of time where you can and take all the pictures. I would never tell you not to take the photo. but evaluate it when you’re done and don’t try to save something that is not worth saving. And with that I hope this helps you become a little bit of a better photographer.
William: Thank you very much for joining us on the Photo Flunky Show. Show notes will be available at williambeem.com/episode95
There’s going to be a transcript of the show there for free and we have links to subscribe on iTunes, Google Play Music and a few others. We’ll have a couple of links on here for you and hope you have a really nice day. We’ll see you again next week.