Affiliate Disclosure: We earn a commission if you purchase through one of our links at no additional cost to you.
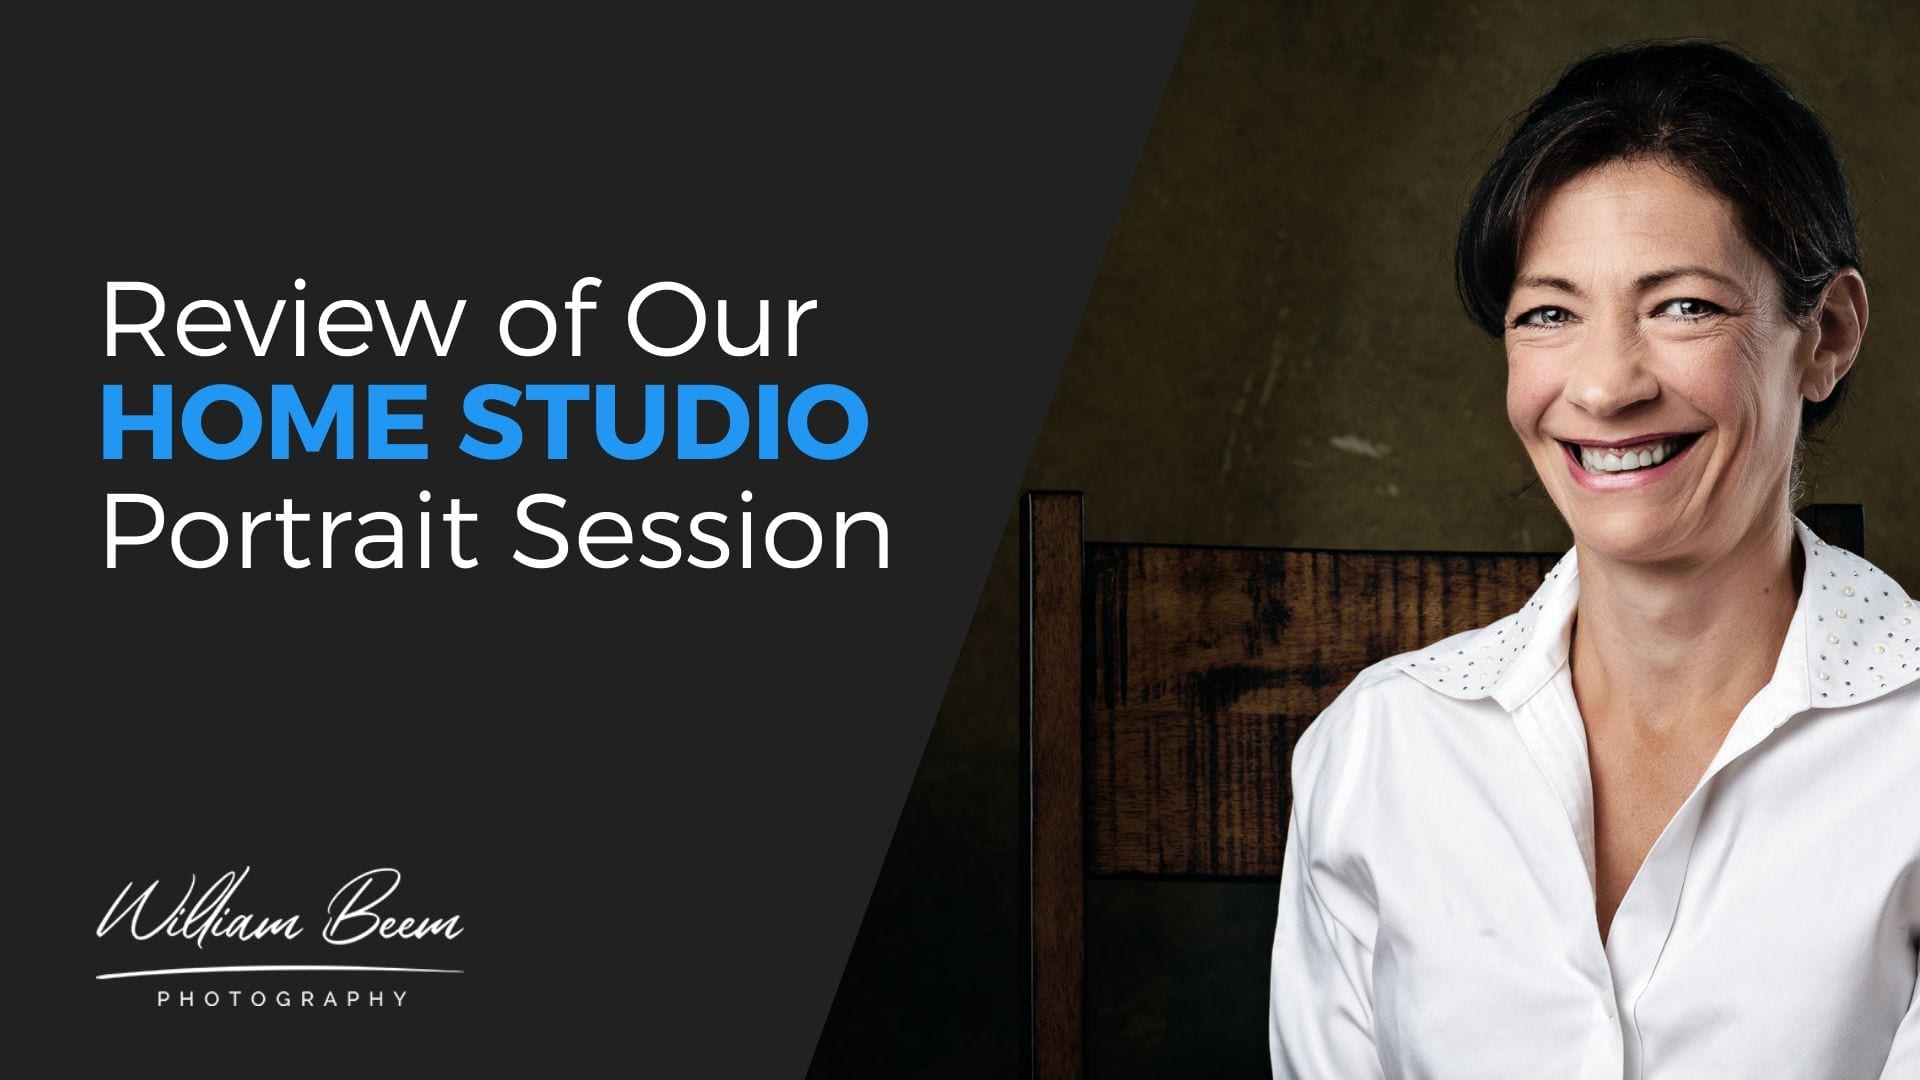
We’re reviewing our home studio portrait session. Check out our article to create a home studio setup of your own.
I’m happy to say that we didn’t waste a lot of time on this portrait session. We went in with a theme of keeping things simple. That worked for everything:
Not only did this approach save us a lot of time, it also provided us with flexibility within the confines of our concept. Lee changed wardrobe and hairstyle quickly. I changed through four different backgrounds during this portrait session.
Yet I don’t think we spent more than 15-20 minutes of portrait time after setting up the home studio.
Results from our Home Studio Portrait Session
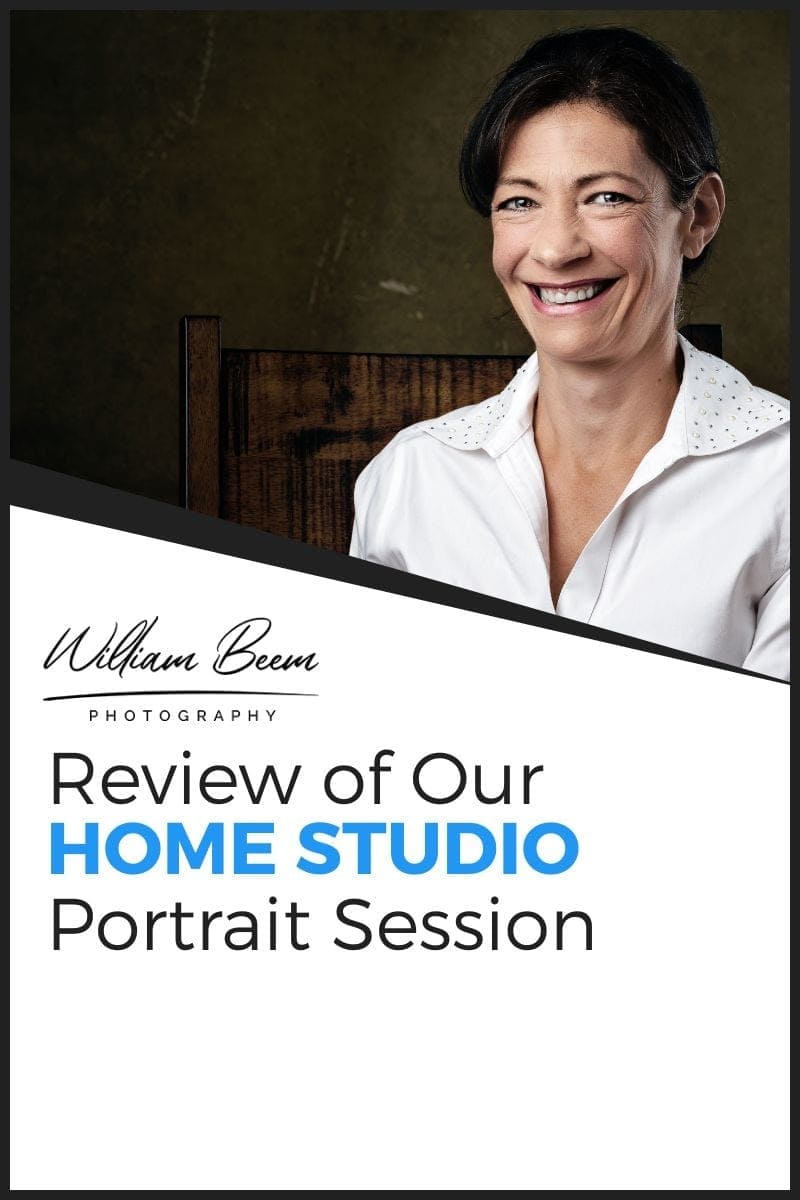
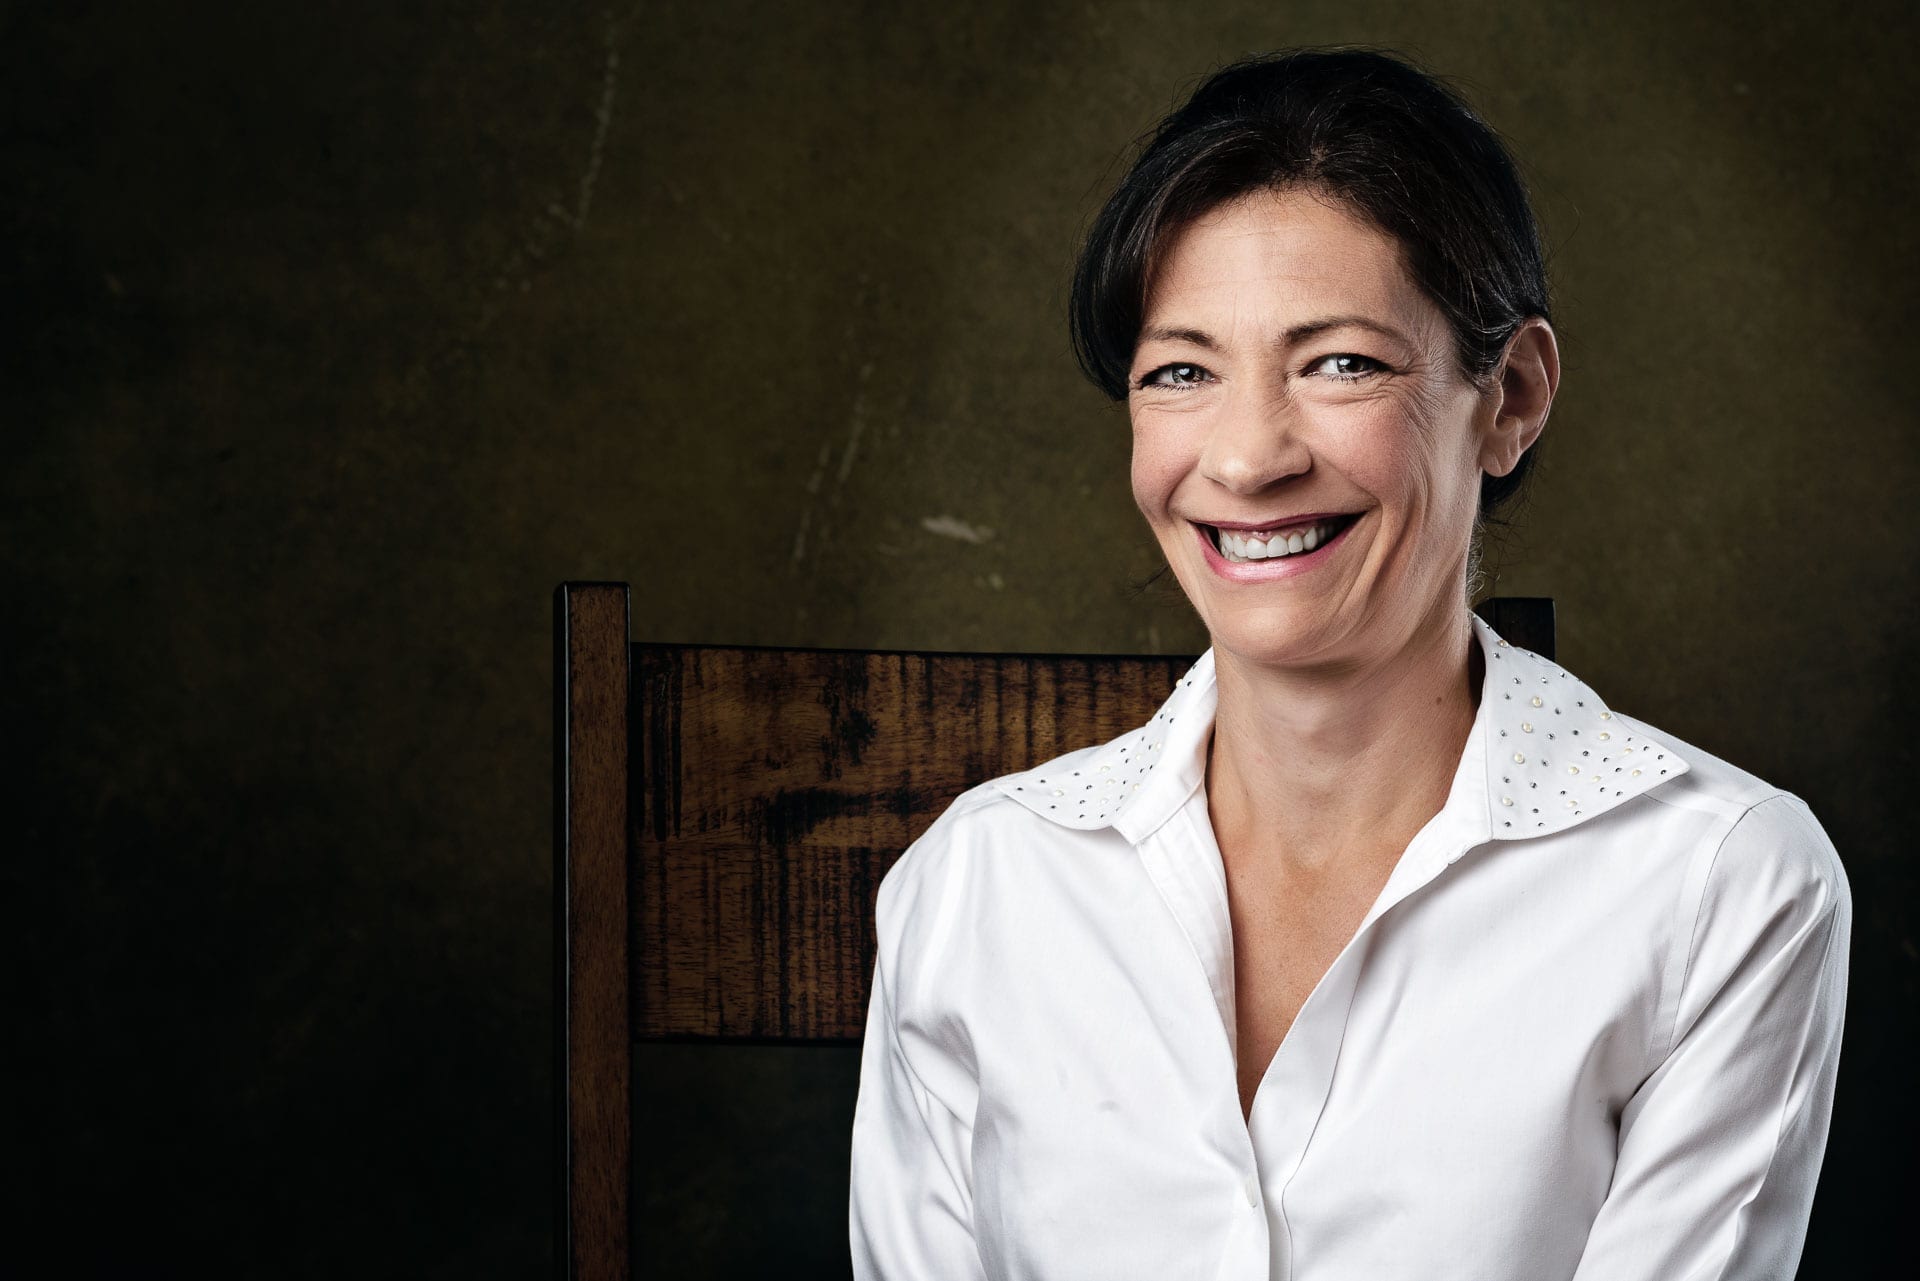
I promised to share a photo as a result of our home studio portrait session.
During the show, I mentioned that we took 95 clicks to get this result. Most of those clicks were lighting tests. When it came time for Lee to pose while I was taking shots, we had a very high ratio of potential keepers.
Everything we needed was in place. We had a great background, great lighting and I’m happy with my wife for a subject any day.
The decisions to find one photo out of the results came to the editing process to select your best photo. We were blessed with a LOT of great results.
However, I just had to look closer. Maybe I liked her eyes better in one photo than another. The same was true of her smile, body position, etc. They looked very similar from a distance, so the trick was to get closer to pull out the discrepancies and decide what I liked best.
Time Stamps
Last week's episode, that was episode 227. We talked about how to create a home studio for a portrait photography. And after doing that, I looked at Lee and said, what the hell? Why don't we go ahead and take some portraits? And that's what we're going to talk about today on I Like Your Picture. I'm William Beem. Welcome to
I Like Your Picture, the show that helps you improve your photography with visual storytelling. What is visual storytelling? It's a method of approaching your photography with a knowledge of who you're trying to serve with your photos and what emotion you want to make them feel. We encourage you to concentrate on your subject, light and background to create a photo your audience loves.
I'm glad you found us. Hi, I'm William Beem. And as I said, we wanted to talk about our experience using our home studio. So the things we hope you can take away from this is how to plan your portrait session. How much space do you really need and kind of how to set up and tear down. But we're also going to talk a little bit about the experience of using the portrait studio at home.
We started off with a very simple concept. And Lee, this was just really, you were the subject. I wanted to set up a background. We used some of our Lastolite collapsible backgrounds. I think we looked at two of them. One had concrete and smoke. So they were kind of like black and gray background. The other one was tobacco
and olive. And we started off thinking that the first one, the concrete and smoke was going to work best. Before we even get into that. Let me ask you, since you were going to be the subject, what were you going through trying to come up with how you wanted to present yourself for the portraits? I asked you what types of top,
because I wanted to know, because it was your vision. If this was the portrait session, because it was my vision and I needed the photos, then you would ask me what I needed. In this case, you had a vision. I said, yeah, I'm game to play. So I wanted to know, what do you want? I think my first question was long sleeve or short sleeve
top, plain colors or not. Yeah, I think we just took it from there. I kind of like having solid plain colors. I don't want the clothing to interfere with the portrait. Now, if you're doing fashion photography, then that's different. You're featuring the clothes. But in this case I wanted to feature you. So I didn't want you wearing something that was competing with your face.
I didn't know what backgrounds you are going to use. So I just pulled out some light and dark colors and decided, we'd see what works. We ended up with two. One of them was a sweater, it was kind of a dark blue. And then the other one was just a white button up shirt. Yeah. And then your hairstyle changed in both of them.
One of them, you wanted... you wear your hair down and then after that you put your hair up and that was simply a matter of comfort for you. Right? I hate having hair in my face and I've got kind of wild hair. So it just, it tends to get flyaways and start curling up and frizzing up quite quickly, no matter what I do to it.
So I kind of realized that, just knowing that my hair was down, made me tense and I just clipped it back behind me and that I could relax and enjoy. And I kind of wanted to bring that up because it's an important thing. Your subject needs to be comfortable and you were not comfortable for the first few shots that we did simply because your hair was down.
It was in my way, it was in my neck. We can see the difference in the results of the photos for the portrait that we took. Your expression was different. You were much more relaxed as we got on with it. And then after you pinned your hair up, rather than trying to pose you, I told you to be yourself. That's when we really got the shots that we were looking for.
Yeah. Cause I think we first looked for something a little more serious and that's another thing. Look, I'm not a model. I'm not really one to put on a look, or a kind of mood or something for a photo. It's just, that's not what I do. I'm kind of very serious person. I'm always smiling.
For me it made sense. And once when you said, look, just be yourself. And I just relaxed and smiles. We're talking and laughing that just let the shoot flow. The other part of the concept was I did not want to be hiding behind my camera. So I pulled out a tripod. You were kind of surprised by that, but I put the tripod,
you know, down and I got my composition, my focus, but when we were going through the portraits, whether it was testing the lights or when I was actually asking you to, you know, to be ready for the portraits, I was looking you straight in the face. I wasn't hiding behind. Did that make a difference to you? Yeah,
I did. And I mean, if you wanted to make me laugh, you could just make faces that me, so. And there was some of that, but the whole idea was I wanted to be able to engage with my subject. It's easier to do when you're not behind the hunk of glass and plastic and rubber or whatever else your camera's made out of. Also have made it very consistent.
There were a couple of other reasons why that was important is because the way we did the lighting on this one, I had an Elinchrom 53 inch Octa box. On the opposite side, I had an Elinchrom strip box. One of the smaller ones, that thing is like 14 inches long. And we also had a V flat with white to try and kind of bounce some fill light back into your opposite side from where the Octa box to my camera left and the fill from the V flat on,
on the opposite side. But I don't think with the way we set up, it was really getting that much bounce back. No, I think that was one of the problems was the shadows. Yeah, there were, there was too much shadow on your left side or more the camera right side. And that's why I wanted to fill. But the problem was that the space that we were using with that big soft box,
I just couldn't angle it. So the light was going at you. And also there was room to get some bounce. It was basically, that's why I needed to have the Crosslight on the opposite side. Probably like from the camera position, it was probably like two o'clock I'd say for the strip box and maybe eight o'clock for the Octa box. And then the V flat was probably about four or five o'clock overall.
We got a very nice quality of light out of that. And once we got that locked in, all I had to do is just stand there, make faces at her, tell her certain things. And then I started getting engagement and the portrait went well. Yeah, I still look, I'm not going to engage with a lens because it's not something that I do.
It's not something I've ever been comfortable doing, but I can engage with the person. And that's all we really needed. We just needed to create the set. Once that was done, and then we got our lighting cause she had to be my test dummy for lighting as well as my subject. And, and, and once that was out of the way,
it was just literally click, you know, go through things. We changed the background, I think four different sides. So there were two sides with each collapsible backdrops. So we tried all of them. And surprisingly, we thought that the, the more neutral colors with the black and concrete and gray stuff would work best, but I think I liked the tobacco and olive the best. And the olive color just really worked with your skin tone the best.
Yeah. I can see that. The nice part about that kind of backdrop. It was really easy to swap it out. I mean, these things just spring, open, you put them on that little magnetic piece that I talked about last week and you're done. There was not a matter of changing a roll of paper up and down, cutting something off or changing a canvas backdrop.
These collapsible backdrops are magnetic. They hold onto an arm at the top of a light stand. And it was just really very easy to change the look of the portraits going from there. There was one other piece that we had a problem with and of all things. It was a wooden chair. Yeah. It's always the stuff you never think is going to be a problem.
This is what portrait photography is about. It's about solving little problems and we just took one of our kitchen chairs. We wanted to do seated portraits. I noticed that there was a really reflective piece of the edge of the chair, you know, on the back rest. And I thought, okay, that's it looked almost white. This is the dark wooden chair.
And I thought that's we can't do that. Move your chair the other way. So then the other side had reflectivity. Yeah. You must remind me not to polish furniture before a photo shoot. And I thought this is just dark wood. Why is it reflecting so much? I don't know the answer to that. All I know is it was a matter of just little gentle tweaks until we got it.
So where we didn't have the reflective stuff coming off the chair. But to me, that one thing ruined the entire portrait. Totally bothered him. And he showed it to me, honestly, I looked and I thought, I didn't care. So this is another thing where you need to be happy with your photos. Look, it's not supposed to have this bright,
vertical strip of white in the photograph. To me that takes away from the subject. And that's why it bothered me so much is because it's not supposed to be there. It's a distracting element because it is bright. I expect people to look at the person who's in the portrait, not, wow, look how bright and shiny that chair is. We tried a couple of things.
We adjusted the chair, we adjusted the light, but mostly it was just a matter of adjusting the chair slightly so that we didn't have reflectivity coming from the lights. And once that was done, we, again, we got back into a taking our portraits. Once we got adjusted, how much time did we spend really just taking the portraits? Maybe 15 minutes.
15 minutes. It didn't take that long. We spent more time setting up and tearing down than we actually did with the portrait session. That's because we had a plan about how to go about it. Yeah. And also like, as far as setting up and tearing down, this one was really quick. More so than our other home studio portraits. Yeah,
I would say so. And why do you think that was, You knew exactly what you needed and what you wanted to do and where it was. You know what I think it really was? I wanted one thing. Me! Well, yeah, I was always want you around, but I wanted one portrait. I wasn't trying to see how many different kinds of shots can I get. I thought,
I had a vision of what the portrait would look like. And we did mix things up by changing the background a little bit. We adjusted the lighting a little bit, but mostly I wanted one portrait. And, and I guess the other thing we changed up, you know, it was your hair and your top. You know, we did some of the long hair on the sweater.
We did some with the hair pinned up in the white button up shirt, but the concept was still the same and that's really all I wanted to do. And we didn't have to spend a lot of time to really get that to where we looked at the shots and said, okay, we've got it. We tweaked things down to get the photograph that we wanted,
but we only wanted one photograph. Yeah. It took us 95 clicks to get that one photograph. But the idea was, it's much easier to get the result that you want. If you can visualize it, come up with what you want, what you don't want. And don't try to cram too much into a session. All right. So as far as space,
we did something a little bit different this time. And this was one of Lee's suggestions. Usually I try to go the length of our living room. And so I'll put the background at what I call the back of our living room. It's where the sliding glass door, as it goes out on the patio and where the dogs like to live.
And then I will move furniture, a couch and shoot from the other end. And that gives a pretty good length of space. I could use my 70 to 200 that way. This time we did it kind of halfway through the middle of the living room. So the background was up against our fireplace. Lee was in the middle of the living room and I was actually standing back in the kitchen.
There's an archway there and taking photographs that way. I think if I had to do it again, I'd go back the way we did before, simply because I had less space to move the lighting around and to move you away from the background. The reason that was important to me is I don't necessarily want my subject right up against the background because I don't want the light to hit the background at the same level that it hits you.
So as a matter of control, if you have a longer space, I think that's better than having a wider space. Yeah. But then the size of your background also matters because you can, Hey, you've got to make sure that you've filled up the spots in the frame behind your subject. Obviously, if your background's not vague and you've got a lot of space between the subject and background.
Yeah. It's not going to. Yeah. And the collapsible backgrounds, I think are five by seven. So we had a seven foot wide background. We didn't have any problems because all this was was just a, kind of like a half body portrait shot of you sitting in a chair. The other thing that was a little bit fun to work with was trying to pose you.
And when I say fun, it was interesting because I'm going to pick on her just a little bit. I remember she was kind of leaning down into her left shoulder at an angle and I said, straighten up. And you asked me which way. And I thought up. I couldn't see which way I was leaning., cause we have this Octa box in my like sitting like right run the side,
like in my vision. So my one, um, you know, my right eye, I couldn't not see it. It was really close to me. And honestly, because of all the angles on that thing... and I was, I think I was turned slightly to the side. I couldn't tell which way he wanted me to lean it. Wasn't about sit up,
you said straighten up. And I wasn't sure which way to lean. I really had no idea. It's almost like I'd lost my sort of horizon level. And it was one of those just little communication issues when she asked which way I thought well up, Well, that was the answer to the first part of the question. Then you carried on, sit up straight.
If you ever worry that you're not communicating well with your subject, you're probably right. But that just means that you need to make sure that you come across. Whatever the communication gap is. Now I've seen different portrait photographers use different methods. I mean, some will use their hand to try and say, you know, imagine I'm grabbing your nose and then they'll
twist their hand and move it back and forth as if, as if they were positioning the person's face. That works for some people. It's not something that I've done because people just look at me. It's like, what are you doing with your hand? Yeah, I would do that. And it's just a matter of, you need to work out the communication with your subject.
We eventually got it right. I just confused her a little bit when I said straighten up and she was trying to think, well, what do you, what exactly do you mean? It, it just didn't make sense the way I said it. Well, the other thing is like, when someone's to you straighten up and you sitting or posing for a portrait and you're not facing dead on,
does that mean, you know, is my head leaning or is it the whole body that's leaning and you were talking about my shoulder. So it's like, what part do you want me to straighten up? Or do I, am I slouching forward? Am I slouching backwards? But you know what I mean? You know what, and I'm not against slouching in a portrait.
I've seen some really wonderful portraits for people just sitting there looking bored and slouched. And I think it still comes across as a nice portrait. This wasn't what we were going for with this portrait. At least not what I was going for. I didn't necessarily need you to be sitting straight up, like you're a school student, but I just didn't think that the angle that your shoulders were at were flattering you.
And that was my concern. So the, it was to help you. I'm very helpful. So other than that, I think the only other direction I gave you was about one time you moved your arm and it was kind of your left arm was moving off the side. And I asked you to put it back up, I think, in your lap,
because he was creating a gap in your shirt. So between where your shirt was, there was a gap and then your arm was out there, whereas that wasn't the case with your other arm. And I thought that gap was just a little bit distracting. That I think was really the only guidance that, that we ended up with is making sure that you didn't have any distracting pose to you.
And we weren't looking for a range of different things. I mean, because we're just looking for, you know, one thing, it didn't matter how many little minor movements or, or anything went on in, you know, trying to get that. And after that we got our shots. I'd say our tear down time was probably 15, 20 minutes.
Maybe. Yeah. The only problem I had was with Elinchrom Rotalux 53 inch. I'm giving you all these little things in case you want to look at them, I've got them on my resources page. You can go to Williambeem.com/resources. It's the 53 inch Octa box. It creates a beautiful, soft light. And I wanted a relatively flat light on this particular portrait.
It wasn't something where I was looking to have it overhead creating a lot of deep shadows because that's not a flattering look for a portrait. You know, if you're going for a musculature, look, I get that. If you're looking for, you know, this is my wife, look that overhead shot wasn't the one I wanted to make. So I had it kind of flat lighting at her and a little bit of rim lighting on the side. In order to get the light where I wanted it to,
I had to bring that soft box in. So it was actually in my shot covering up I'd say the upper diagonal corner of the left side. And that's where Lee was saying she couldn't see because it was kind of in her way as well too. But this is the thing I wanted to get her. I can go back and Photoshop and I can replace that area where it was,
you know, coming over. Yeah. That's actually pretty simple to do with the content aware of stuff these days, but I was more concerned, like get the right lighting. I don't care if the back of the soft box is in the way, but it was the little persnickety. Usually this things are pretty easy to open up and put the rods in place.
It was kind of slowing me down a little bit this time. I think it was complaining. Maybe he didn't like the weather. Most probably, who does right now? But that was it. That was really all it took was setting aside a little bit of time, setting up two lights, a V flat, a background and a chair. Once we had that done, I put my camera on a tripod.
I got the composition I wanted. Lee, you know, we chose her clothing and her look. And then we just got our photographs. Portrait photography doesn't have to be really complicated. In fact, I'd say some of the best portraits that we look back in history are really rather simple ones. Kind of like these. Yeah. Just show the face.
I mean, with the portrait, you want to see the face, I've got a canvas backdrop in the background. I didn't want to go with that for this one because we wanted to keep it simple. We wanted to make it kind of fast. So the collapsible backdrops were really good for that. And I'd say the tobacco and olive ones kind of give you that look of what a painted canvas backdrop would look like.
We've got a painted canvas backdrop out in our garage. It just would have been a little bit more of a pain to set up because it is so long. And it would take both of us to set up on a crossbar. And we just decided we don't need to do that. Quick, simple backdrop was definitely one where the model has to help in this case.
Yeah. Because the daughter was off with her friends and wasn't going to help. No, he was not. And if you're curious what this is going to look like, please come visit the show notes. I'll have a photograph there so you can see what our final result looks like after post-processing and we'll welcome any questions you've got. Thank you so much for joining us on.
I Like Your Picture. Show notes, and the picture I just mentioned are going to be at Williambeem.com/episode228. So you can go there and of course you can leave a comment, ask questions. Tell us anything you want to say about it. Let us know if you've got a different way of doing your home studio portraits. And that'll be a fun
little thing to share with everybody else. Thanks so much for listening to you. We'll see you again next week.
Related Links
These are affiliate links to our products during this home studio portrait session. Check out the previous episode or my Resources page for links to other products we use for portraits.
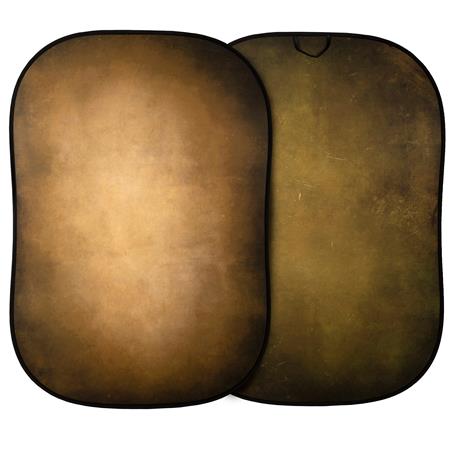
The double-sided Manfrotto 5x7' Vintage Collapsible Reversible Background in Tobacco/Olive is a great way to add a touch of class and sophistication to your portraits, fashion, and product photography. The Tobacco surface offers a range of brown/ochre tones with a slight hint of green, while the Olive surface features a range of deep greens with a touch of ochre. Both sides also feature a dark vignette to the edges. The durable and practical no-wrinkle material ensures that your background will always look its best.

The Manfrotto 5x7' Vintage Collapsible Background in Smoke & Concrete offers a timeless look perfect for portraits, fashion, and product photography. This versatile, reversible background features a dark "Smoke" side with grey tones, a hint of green, and a vignette effect. The other side is "Concrete," which offers an evenly distributed grey tonal texture. When you're finished shooting, the background collapses for easy storage.

The Manfrotto Magnetic Background Support Kit is perfect for quickly and easily attaching collapsible backgrounds with a steel rim to a traditional lighting stand. The magnetic background support ensures that your backgrounds are securely attached, while the included lighting stand provides stability needed to support your background. This complete kit offers everything you need to get started using collapsible backgrounds in your photography and is an essential tool for any photographer who wants to experiment with new creative background possibilities.

The Manfrotto 1005BAC light stand is a must-have for any photographer or videographer. Its lightweight, compact design makes it perfect for on-the-go shoots, while its Quick Stack System allows you to connect multiple stands for easy storage. With a pack of three, you'll always have a spare stand on hand when you need it.

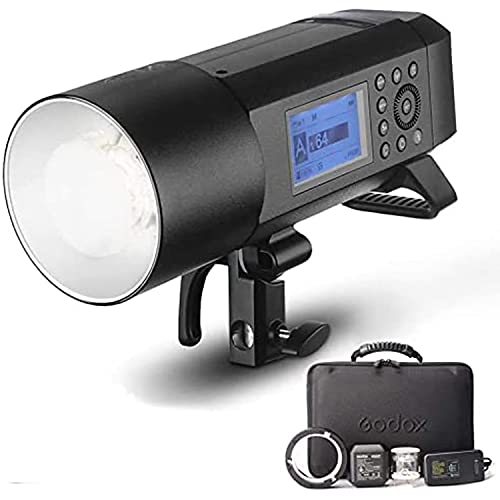
The Godox AD600Pro is built-in with the Godox 2.4G Wireless X System. This system allows you to use the flash with other Godox products like TTL camera flashes and TTL outdoor flashes. With this system, you'll be able to create fantastic lighting effects that will make your photos pop.
Another great feature of the Godox AD600Pro is its compatibility with Bowens mount accessories. This gives you a lot of flexibility regarding accessories and allows you to find the perfect setup for your needs.
Finally, the Godox AD600Pro has two power supply methods for added convenience. You can use the professional lithium battery pack, which provides 360 full power flashes, or the AC26 AC power source. Either way, you'll be able to get excellent performance out of this flash.
The Godox AD400Pro is a powerful flash with a whopping 400Ws of power, making it perfect for everything from portraits to product photography.
With a recycle time of just 0.01-1 seconds and 12 continuous flashes at 1/16 power output, the AD400Pro is perfect for high-speed shooting. And with a built-in 30W LED modeling lamp, you can easily see what your final image will look like before you even take the shot.
Best of all, the AD400Pro is compatible with TTL auto flash systems of multiple camera brands, making it an excellent choice for photographers who use multiple cameras.
Note: I own two of these.

If you're looking for a softbox that will give you beautiful, round catch lights, then the Elinchrom Rotalux Octabox 135cm is a perfect choice. This innovative softbox features a lightweight dedicated speed ring, which makes it quick and easy to set up. The 53" (135 cm) Octa shape provides a large surface area, making it ideal for close-up portraiture or fashion photography.
Note: For Godox strobes, use the Bowens mount speedring from Elinchrom

The Elinchrom Rotalux Stripbox 35x90cm is an excellent softbox for product photography, especially bottles and other round reflective items. They can also be used for narrower ¾ length portraits and are also widely used to light backgrounds where the length helps avoid fall-off from top to bottom.
The 14x35" Rotalux Strip comes standard with a silver interior and a flush front face. The flush-mounted front face provides a wider spread of light than a box with a recessed front. It may be used as a side light without as much wrap-around as a conventional rectangular softbox.
Note: For Godox strobes, use the Bowens mount speedring from Elinchrom
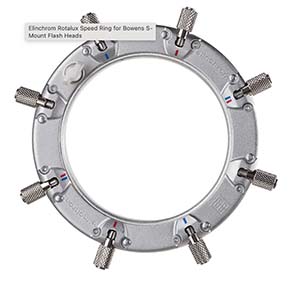
Do you love your Bowens S-Mount flash heads but wish you could use them with your Rotalux softboxes? Well, now you can with the Elinchrom Rotalux Speed Ring for Bowens S-Mount Flash Heads. This speed ring is made of strong metal and features enhanced strength at critical points, making it durable and reliable. It's easy to set up, so you'll be up and running in no time.