Affiliate Disclosure: We earn a commission if you purchase through one of our links at no additional cost to you.
Sharing Timeless Photography Advice
Thank you for listening to The Photo Flunky Show, episode 33. We appreciate you for taking the time to join us an listen.
Lee and I discuss some of the photography advice we’ve received and use on a regular basis. These are tips we’ve heard from photographers you probably know:
- Trey Ratcliff
- Joe McNally
- Scott Kelby
- Jay Maisel
- Zack Arias
The tips are timeless, meaning it doesn’t matter how technology changes or what brand you use. The photography advice on this show is the kind of wisdom that helps you be prepared to take great photos, no matter what genre of photography you prefer.
Related Links
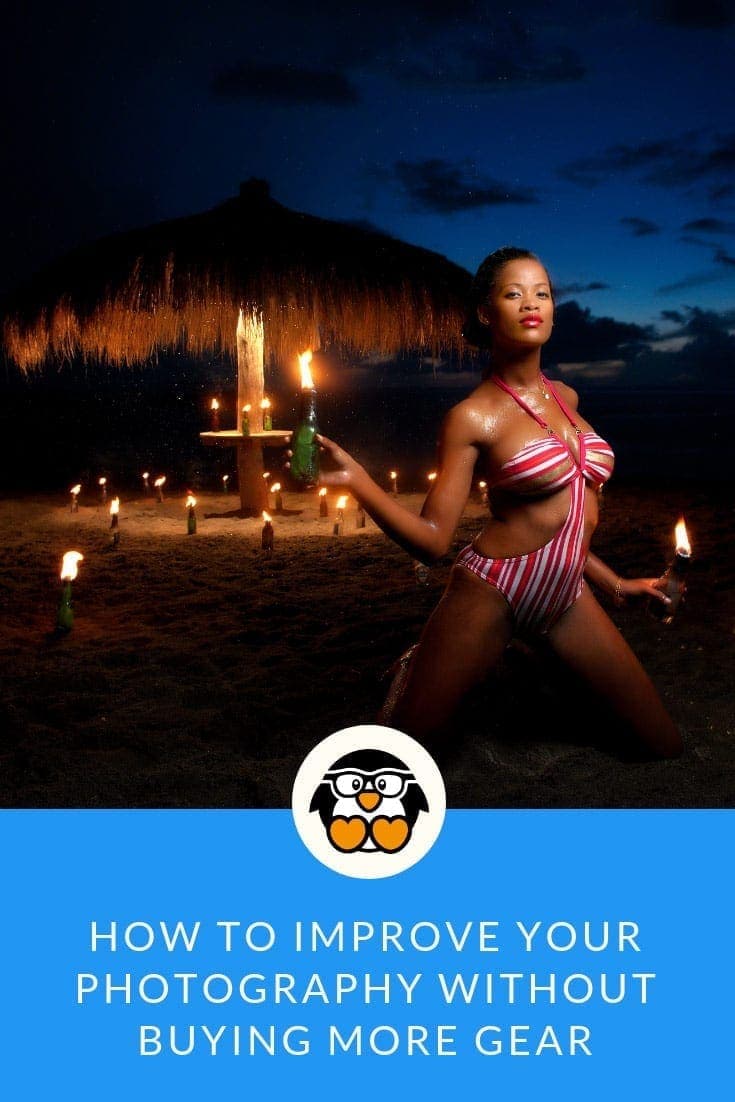
During the show, I mentioned an example of a photograph from my friend Geoff Livingston. Here’s a link to his gallery of photos from Cuba. The shot I had in mind is “SPEND A LITTLE TIME WITH YOUR FRIENDS.”
ON1 Coupon Code
Before getting into the photography advice part of the show, I mentioned that you can save 20% when you buy ON1 software using my coupon code. Write it down and don’t forget to use it when you check out. This is an affiliate link and I get a little something back, and you save 20% on the price. That’s not bad at all!
Just visit https://williambeem.com/on1 and use the code B when you check out.
Subscribe to The Photo Flunky Show
Thank you for listening to The Photo Flunky Show. Make sure you get every episode by subscribing.
iTunes – https://williambeem.com/itunes
Stitcher – https://williambeem.com/stitcher
Google Play – https://williambeem.com/googleplay
Blubrry – https://williambeem.com/blubrry
Transcript
THE PHOTO FLUNKY SHOW: Episode 33
Hi! Welcome to the Photo Flunky Show, Episode number thirty-three.
On today’s show we are going to be talking about timeless photography advice. Stick around.
William: Hi, thank you for joining us. My name is William Beem.
Lee: Hi, I’m Lee.
William: Today we are going to be talking about timeless photography advice or advice for when you’re out there shooting and taking your photos.
But before we get to that, I want to make sure that you know I’ve got a coupon code to save you money with OnOne software. You can go to williambeem.com/on1 and when you check out, use the code WBEEM16 and it will save you twenty per cent on OnOne Photo10.
It is a wonderful collection of programs. You’ve got a specific program just for portraiture. If you are into portraits this thing is really nice for retouching. One of the things I like about it is it identifies a face for you and you can kind of tweak where the eyes are, because sometimes it doesn’t matter who you are photographing. If their eyes are at an angle or their face is at an angle a little bit, you need to go back in there and just set things up a little.
But you can easily identify the face by the eyes and by the lips and the mouth and it will go in there and take care of all the little fine tuning that you want to do as far as retouching the skin, brightening the eyes, whitening the teeth, giving a little texture or help to the lips and you’ve got total control over that. You can move the sliders back and forth. It is just a wonderful tool for portrait retouching. It makes things go by rather quickly for you and it’s an excellent tool for anyone who is doing a portrait. So I really recommend that and I hope I can save you some money. Twenty per cent discount if you use the code WBEEM16.
Lee and I were talking about advice that has kind of stuck with us for a long time and who gave us the advice.
We came up with a list of things that we’ve heard from people and it’s not just a platitude that you put out there. These are things that we actually think about when we are going out and doing our shooting and it’s really helping us. It’s changed the way we have done our photography and we’ve come up with much better results.
Some of them might seem evident to you when you hear them, but if you’re not thinking about them and if you’re not preparing before you go out, it’s something that you just kind of need to put in the front of your mind instead of the back of your mind to help you out.
With that, we’ll start off with one of Lee’s items first.
Lee: Know your camera. It sounds like a no-brainer, but the advice that I was given I figured you need to know how to do what you need to do when you go out and take a photo. I learned the basics and I came unstuck for a good year afterwards.
I think this is advice that you hear from a number of people. It comes up from time to time, but it really sunk in when I was watching a video tutorial by Trey Ratcliff and he went through some basic things. It wasn’t camera specific, but there was some really good advice in there and I don’t recall exactly what the title of his video was, but everything came together in my mind with that.
I also learned and started paying attention there because I’d learned from mistakes, just thinking I knew my camera and realizing in the moment that I didn’t. Sometimes I couldn’t find something in the dark because I didn’t know which switch it was or where it was. And these are important little things.
William: Well, it can be the difference between getting a shot and missing a shot. If you don’t know how to change the adjustments on your camera, hopefully without even having to stop and look at it – maybe you do depending on what the settings are you’re trying to dial in – but you at least need to know where the knobs and wheels and buttons and things are so that you can make a difference.
So for example, on my camera I primarily shoot with a Nikon D800 and one of the things I’ve done is I’ve changed the autofocus button. Instead of being on the shutter where you kind of click down halfway and it focuses in, there is a button on the back for autofocus and it’s just a simple setting inside of the firmware, but I changed that so I can push the back button to do my focusing so my shutter is just a shutter. And the reason I wanted to do that is because sometimes I was taking pictures when I was trying to focus.
I don’t want a button to have dual purposes. It’s a simple thing, but knowing your camera when you look through those settings and you can say, Oh I didn’t know you could do that! Little things like that might be able to help you out in getting the shot that you need.
Lee: Or you upgrade your camera, which is where I came unstuck. I kind of felt like I knew what I was doing with my D90, I upgraded to a D7000 and some of the stuff was in different places. And I was reading all these things when it came out on the forums about it having back focus issues and all kinds of things and I thought, no. The settings are just in different places here.
William: Exactly. Sometimes people are reporting problems that aren’t problems; they are just configuration setups.
I’ve got a configuration setup that I like and the nice thing about the D800 and my D700 before that is you could have four different sets of settings. So if you want to do action, if you want to do portrait, if you want to do HDR, you can change the settings that you’ve got by category and just have presets of your settings that you want for a given type of photography.
That was incredible. That means I didn’t have to think about changing all these specific things for my exposure and my shutter speed and how I focus and bracketing and so forth. All I had to do was change from Group A to Group B and it would change the settings for me.
Lee: That’s helpful if you tend to do similar types of photography. I wouldn’t say regularly, but if you are expecting to do them on a continuous basis.
William: And something like autofocus on my camera, there are different types of autofocus that I can set up.
One of them is a very active focus so if you’re trying to shoot people going past you with a lot of motion, it has a really cool dynamic autofocus that will work for moving objects rather than you putting the dot on something and focusing in on it. Because you don’t have time to put the dot on something and focus in on it when you’ve got a car, a bicycle or a runner going past you at their full speed. You need to be able to trust the camera to get the focus for you.
Lee: The 3D tracking, yeah.
William: That tracking system works wonderfully well. It’s just one of those things where you have to know your camera has the tool to use it.
Lee: And where to find it! Because in a pinch, when you suddenly want to do it, if you don’t know where to reset those things .... and sometimes you’re in a situation. This was my problem. I was very interested in low light and night time photography when I started out. So it meant I was often working in the dark and sometimes when you are working in the dark you are in a situation where you are not supposed to use lights. And that means you need to feel your way.
So I might be able to see what I’m doing through the viewfinder, but I still needed to know where the buttons were and what to be hitting. And just a little bit of time with my camera and getting a feel for it literally, made a big difference.
William: That’s the thing. When you are in the field, and particularly if it’s dark and you’re trying to make changes then, you are already missing out. You’re missing on action; you’re missing on shots, whatever the case may be. You’re missing out if you have to be fiddling with your camera.
Being a photographer in a way is like being a musician or anything else; if you go to a concert and watch them, they are not looking at each note that they are playing. They know their tool; they know their instrument and they are able to go out there and just do it. You need to have the same kind of confidence with your camera that you know how to set it up and be prepared in advance.
You may still need to make changes while you are out there. That’s fine! But you have to have the confidence to know where those settings are and how you are going to make the changes.
Lee: Actually I think you can count on having to make changes. I mean even if you took some step by step how-to for something – like we spoke about it with fireworks – you get your stuff set up. Once you get into the situation it is not going to be absolutely perfect. You are going to have to tweak it so you need to know where to find those things, or even something simple like inserting the cabled shutter release!
William: Yes!
Lee: I could not for the life of me find the little slot to stick that thing in. It was driving me nuts. I think somebody with a lighter eventually came and helped me out.
William: Yeah and that’s the last thing you want is to have to be standing out there in the field wondering, where does this go? I should have looked at this before I got there.
But all those things really come back to preparation and that is, before you go shoot, know your camera. You might actually want to read the manual.
If nothing else, read through the settings and if you don’t know what it is, then go read the manual and find out. You might find there is a capability that you didn’t anticipate that could come in handy at some point.
Lee: Yeah.
William: The next one is one that I got from Joe McNally. I’ve gone on a few workshops with Joe and he is just a fountain of advice. As a matter of fact I’ve got another one from him later on in here.
But it was called “Think like a coffee table book.”
Lee: I love that.
William: I put that, actually, into one of the ebooks I wrote a few years ago, but the idea of a coffee table book was that you’re telling a story. When you are going out, it doesn’t necessarily have to be an event. I wrote it in an ebook about taking photographs at Walt Disney World’s Magic Kingdom. The idea was you don’t just go out there and take pictures of the big stuff. You think from larger to smaller. So the big thing when you go there, the first thing you’re going to see is Main Street USA, the train station, you’re going to see Cinderella’s Castle down there. Those are the big things.
As you go through it, you need to look at the details. You need to remember what are the little elements that you’re going to see along the way that tell a story as much as the big thing does.
Lee: Yeah. I just loved that because I used that ebook and it really changed the way that I took my photos. I was getting tired of going to the same places and coming back with the same photos year after year.
William: So what was different about it? I mean, what did you get before and then what did you find yourself capturing afterwards.
Lee: I think I’ve always liked my detail shots, but it was the way I was approaching them. I tended to zoom in and maybe get some detail shots, but there is a difference between getting in close and getting in tight and actually thinking about it in print in a book.
Now it doesn’t matter whether you have intentions to print it. I do print my stuff in photo books, so maybe for me it was easier to kind of relate to it in my mind’s eye. Just the way that I looked at things, the way I saw things completely changed. Little settings and displays and things that I’d see, I would get in close and eliminate distractions and focus on things just by the way I positioned myself for a close up. And it wasn’t necessarily always something completely tight, but it just changed the perspective.
William: The thing about thinking like a coffee table book was the way Joe explained it, the example he gave, was photographing the Kentucky Derby.
You go there and obviously the race is the big thing. But there are things throughout the day. A photographer goes to Kentucky Derby and he or she is not going to just shoot the race. They are going to shoot all the preparation.
They are going to go down the paddock, they are going to look at the crowd, they are going to look at the ladies wearing those big hats that they wear. They are going to take a picture of the mint julep that they are drinking. They are going to get shots of the saddle, they are going to get shots of the jockey getting ready and there are other people that are part of that event that are not the jockeys and racers. There are the officials that are working there, the fans attending, other people that are maybe selling hotdogs or something. All of it comes together to be part of a story.
Joe’s advice for that really was to think like a coffee table book and go from – kind of the journalistic thing – you are going from the large story down to the smaller stuff and all of those pieces come together to tell the story of that place, that time, that event; whatever it may be.
I wrote this like I said for going to Walt Disney World. Very different than shooting a specific event like a horse race, but there are things that happen through time at that park.
You might go in there in the morning and in the morning down on Main Street they are going to have a horse drawn carriage that goes there. They can’t run it later in the day because it gets too crowded, but at the beginning they are going to have that.
There is a little singing group out there called the Dapper Dans. They are part of the story. The Flag Ceremony that they have, the parades that they have at different times, the sunrise (you’re not going to be there for sunrise) but the sun throughout the day is going to have different lighting on the place. There are going to be fireworks at night and there are different parts of the park.
All these things come together to tell the story.
But one of the other things I brought up with “Think like a coffee table book” was to have something that anchors you to the place where you are. So in other words, you might be taking a photograph of the Dapper Dans, but it’s a good idea if you have Cinderella’s Castle in the background. Not only are you just taking a picture of people in strangely colored and striped suits, but if you put the castle in the background, you know that that puts them in a place that is part of your overall discussion.
Lee: Yeah, it’s like your little map in the background.
William: Yeah, so all those little things. If you want to take photos, you want to get better travel photos, think about the major elements of where you are, but also consider the little pieces that bring it together and then tie the major and the small pieces together in some of your photographs. That will really give you a better travel photo overall, I think.
Lee: Yes. I was also encouraged when I came back from that trip because people had kind of got bored with seeing my same photos the whole time and friends and family – not photographers – they are nice and they kind of flip through and they are done. But that year people were particularly interested and I got comments from people who just don’t care about photography, who said this is different! They noticed.
William: Well, exactly. Because after that, if you follow that little formula, you are telling a story rather than just taking random snapshots. And that is what made it – I think – better for you for the travel photography. So even though you got it from an ebook that I wrote, I got it from Joe McNally and I’m sure Joe probably got it from either his education or his experience from other folks as well.
But that is why I call this the timeless photography advice guide. It is not that I can say specifically who was the first one to come up with this, but Joe shared this with me, I was able to share it with you and I hope people can just share it with others as they go along and make better photos for all of us.
Lee: Yes. Try it, love it and pass it on.
William: The next one is one that Lee has really taken to heart and I got this from Scott Kelby at one of his workshops, but the advice was “Get closer.”
Of course, Scott has gotten this from other people as well, but it really makes a difference. If you are going to be taking a portrait of somebody, fill the frame. Get closer.
Here is something I see quite often. You go to a travel location and there is a big thing behind you that you want to have as part of the picture. You can barely see your subject or the person you are taking the photograph of, because someone is trying to get the whole thing in there. And that’s just not the way you do it.
Lee: I know. I’m always meddling with tourists when they want a shot.
William: Yeah, Lee’s gotten good with this, so go ahead and when people ask you to take their photo, tell them what you do.
Lee: I like to hang out at Disney World and I also know what it’s like from years ago. I used to travel as a parent. I was the only adult and I had a young child which meant we were never together in the photos. So I appreciate that sometimes people want to all be together in the shot.
If I see people taking turns I’ll actually offer, or sometimes they will come up and ask, if I can take a photo of them. They will be in front of a background or an icon or something that they like, for example and the first thing they do is they try and get closer there and they leave the camera or phone and they run away towards their background.
And I let them go for a while and when they turn around and make eye contact, I call them forward. Come closer. And it’s not me getting closer, it’s them getting closer. As long as I’ve got what they want as the background in the frame, I just confirm with them, is this what you want in the background? You want to prove that it’s you when you’re there, right? You want to be able to be recognized. And they always seem so surprised. But they are really happy.
William: Yeah and going with your example of what you talked about at Walt Disney World. Let’s say that you’re in Fantasyland and there is the Little Mermaid ride. There is like a huge ship and on the bow of the ship there is a wooden statue of the Little Mermaid. People love having their photograph taken in front of that.
Right next to that is a railing. Inevitably, everybody always goes and backs up to the railing. And that’s where they want to be. And unfortunately that is just not where the shot is.
Lee: No it’s not.
William: They go to the railing and when you get there you compose, and you’ve got the ship that they want just in place, but then they are too small. So the only solution for that is, you don’t move, the ship doesn’t move; they need to come forward and make themselves larger in the composition.
Lee: That’s right. And what also helps is if you confirm with the people what they want in the background, show them. This is how it’s framed. Is this the part that you want? Then you get them positioned.
Because, like you say, they are the moveable subjects.
William: But even if you look at this for portrait photography – let’s forget about travel and your snapshots where you’re going to say “I was here.” – if you’re going to go in there and take portraits, you want to see the person’s eyes. You want to basically look into their soul. And you can’t do that if they are very small in the frame.
Lee: No.
William: Sometimes you need full length shots. I get that. But if you want to capture the person, you need to do probably something head and shoulders at least.
Lee: Yes.
William: Some of the most interesting photographs I’ve seen are pretty much headshots, where you can look in the person’s eyes. You don’t necessarily have to have a floating head there. You need to get in close enough that within relationship, maybe their shoulders, depending on how they pose if their arms are up around their head or if they are lying down or something like that – you need to get in close and see their face and fill the frame with that.
Lee: Yes, you don’t need to see everyone’s legs in every shot.
William: No. But basically, fill the frame with your subject, get closer and that will help with number four. It’s not exactly the same thing, but this is also something I got from Joe McNally and that was, eliminate distractions from your composition.
And he talks about distilling down until you get to the most important thing. Eliminate stuff.
Getting closer is part of that. So when you get in close, obviously that is going to help you eliminate a lot of stuff. Look at your background. Look at things that might be sticking in. I’ve seen portraits taken where somebody wanted a foreground element so they’ve got the little sea oats or leaves or branches or something in the foreground. Get that crap out of the way.
Yes, it’s nice to have a foreground, a middle ground and a background. That’s great for a landscape. If you are taking a picture of a portrait subject, you don’t want something in front of the face of your subject.
Lee: No, that needs to be right in the front of the frame.
William: And you need to distill everything except for what you need. The only things you need in your photo are the elements that are necessary to tell the story. And that doesn’t mean necessarily that you have to get close on a subject’s face. It could be that you are taking a full length shot in the scene.
I’ve got a friend on Facebook, Geoff Livingston, who has recently gone to Cuba and he’s got a photo that I think really exemplifies this very well. It is a table of older men playing – I think – dominoes inside of a dilapidated old building. You see the building, you see the light coming down on the faces of these men and that tells a story. What you don’t see are trashcans or cars or anything else other than the men in that place playing their game.
Lee: I know there are some people who are just drawn to trash cans in a photo!
William: I don’t get that.
Lee: They don’t even notice it’s there, but the fact is, they don’t see it which is the problem.
William: This is the thing. Even though his photo wasn’t right up on them, it didn’t need to be. He didn’t have anything else in his composition that shouldn’t have been there to tell the story. Sometimes that means you get up and you go move something in order to make sure it’s not in your frame. Don’t wait until you get back home and think you can take that out in Photoshop. Do it right then and there.
If it’s in your way, if it doesn’t belong, move it. I don’t care if you have to go pick up a leaf or some feathers or something like that. If there is a bird that has flown into your composition that doesn’t belong there, chase it away.
Lee: Yep, I’ve moved a sign and a chain in a railway museum. I wanted a photo of the train and there was nothing I could do to get it out of the way. It wasn’t locked or anchored, so I moved it, took my photo and I put it back.
William: That’s what we are saying. Whatever your composition is, it doesn’t matter what type of photography it is, eliminate the distractions. You don’t want bright spots in a place that is going to draw the eye away from somebody. You don’t want to have things in the way of your photograph that are not helping to tell the story. If it’s not really the core of your story, get it out. Move it away.
Lee: Yes. And that goes for color as well. It’s not just physical elements of your photos. You can have color distractions as well in your composition.
William: Oh, absolutely. Any kind of distraction. It could be colors that don’t match, it could be lighting that doesn’t match. If it’s going to distract the viewer from your subject, it is a distraction so it needs to go.
Lee: Yes it does.
William: This next one comes from Jay Maisel and I’ve heard him say this at Photoshop, and probably a number of you – if you’ve been there – have heard the same thing. Jay has a unique way of saying it: Move your ass!
Lee: I love this one as well!
William: Too many photographers have got a zoom lens, they’ll find a spot, they’ll plant themselves there and they will only shoot from one vantage point. They might zoom in and out. Everything is from the same angle and it’s just not the way you take your photographs. If you want to cover a subject, you have got to move around it.
Lee: Yeah, you don’t get to get comfortable.
William: No you don’t. So you need to be moving up and down. You need to be moving back and forth, from side to side. Basically you need to move your ass to get different perspectives.
I also credit Frank Doorhof with this. One of the things he talks about is photographers who are doing portraits think that they set up their lighting and they can only shoot from one position. He said no. The lighting stays the same. You move around and shoot. That’s how he gets some of his shots. Whether it’s backlit or whether it’s flare or whatever he is looking for. You move around and let the lighting and the model stay in the same place and you get your shots that way.
Lee: I remember having – I think Tové was getting a photo taken by one of the Disney photographers at Epcot and I had a prime lens on so there was no zoom. And while he (the photographer) was doing his regular snapshots for Photopass, I was running around doing different photos with the prime. He actually called me over and was quite confused. He wanted to know if it was the only lens I had and I said no. He said, “Well why didn’t you bring a zoom lens?”
And I said to him, “Because you’ve got the zoom lens and you’re taking the photos that everybody gets with the zoom lens and I want something different.”
But to him it just looked like I was doing way too much running around for that shot.
William: It’s not just zooming in and out though. Imagine you have a zoom lens and you stay in one spot and you take all of your shots, whether it’s wide angle or telephoto and everything in between, but always from the same point of view. That’s not good photography. You need to look at your subject from multiple angles.
I know I’ve talked about Disney World way too much on this show and other shows in the past, but it’s one that I guess we photograph a lot and it comes to mind. Cinderella castle, again, you don’t just shoot it head on. There are views from either side. There are views from behind and even from further back in the park.
We’ll go on another one called the Peoplemover and we’ll get a shot of it through that little corridor of Tomorrowland and shoot down through there. There are a number of angles to shoot the same thing. You just don’t want to see it from the same spot over and over again. You get bored with it. And so will your viewers.
Lee: I think everybody wants their classic shot. Most people do. And that’s fine. It’s for people like us who keep going to the same place over and over – you need something different.
William: Sometimes the classic shot is not always the best shot, either. And that’s not just talking about Disney World. That’s going anywhere you can look. Classic shots, if you go to New York City, think about the classic shots that you’ve seen there over and over again. But think about the millions of angles that are less common that people might want to see.
One of the art buyers I’ve done business with would love to have more shots from New York City, but she wants abstract kind of photographs; something that says: this is New York, but isn’t necessarily just another cityscape. Not just another shot of Times Square. She might want Times Square, but she wants something that’s a bit more abstract. Maybe a reflection; maybe a column. Something.
But you’ve got to get out there and move around in order to find them.
Lee: Yes, you do.
William: And you’ve got to take chances. Some of those photos may not work out. For you, you may turn around and find a buyer for them who says, Oh this is exactly what I’ve been looking for!
Lee: Yes!
William: Anyways, thanks to Jay Maisel, praise be, move your ass!
Lee: We shall do so.
William: And the last one is really for portrait photographers. This is also one I heard at Photoshop World from Zach Arias and I remember at the end of his presentation, the last thing he yelled out was, “Light the eyes.”
It seems like such a common thing, but if you’ve got a portrait subject that’s got backlit rim lighting and you think that they are going to be having the light on their eyes, well what if they have got a hat? What if they have got their arm posed up on their forehead and it gets in the way? You need to make sure that you’ve got light in their eyes because the eyes are really the soul that we are looking at. You need to make sure that they are well lit and properly exposed.
I have seen a lot of photos, sometimes not because of the photographer; sometimes because of the model, but you’ve got a light source on one side and he or she will turn their head and look at it a different way because they are just going through poses. But you’ve got to work through the light source.
Lee: Well the eyes give you the light and emotion and the expression in the photo. So if you don’t have that you’re lacking something.
William: This is something you see with a lot of snapshots. You go to the beach and there’s a beautiful sunset behind you and someone is taking a photo and you can’t really see much of them. You need some light in the eyes. You need to make sure that the face and the eyes are well lit because your eye is drawn to the brightest thing when you’re looking at it. You want to make sure that you’re drawing people to the face of your subject.
So when Zach is yelling, light the eyes, he is really telling you to make sure that your viewer is going to pay attention to the eyes of your subject.
Lee: Yes.
William: That’s some of the advice that we’ve received. We think it is timeless. We think that no matter what kind of technology you’re going to run into and no matter what camera or brand you are going to go with, these are the things that stick with us and help us make better photographs.
Thank you very much for joining us on the Photo Flunky Show. If you like this and you want to see a transcript, you can get one for free. It’s available at williambeem.com/episode33. Of course you can also find links to subscribe to the show. We’d love to have you.
You can subscribe on iTunes, Google Play Music and Stitcher Radio, at that link or you can just go to photoflunky.com, find the links there and listen to our other shows as well.
Finally, if you’re out on iTunes and you’d like to give us a review, we would really appreciate it. Thank you very much for joining us. We appreciate you and look forward to seeing you next time around.