
Affiliate Disclosure: We earn a commission if you purchase through one of our links at no additional cost to you.
Last week, Adobe announced Lightroom CC and a smaller corner of the Internet exploded. For some it was a reason to complain. For others, it seemed orgasmic. All I see is another software upgrade and the same reasoning applies as with all the others.
Before You Upgrade Any Software, Read This
I know I’m too late for some of you. That’s OK. You’re the folks who wouldn’t listen to me in the first place.
For the rest of you, I want to give you some food for thought about software in general and particularly for upgrades. I don’t care if it’s Lightroom or anything else that holds, handles or transmogrifies your data.
There are simple and effective rules to consider before you make any change in software.
1: Consider the End Game
Before you put your data into any software tool, make sure you understand how to get your data out of that software tool.
Nothing lasts forever. Before committing to Lightroom, I used Aperture. Before that, I used iPhoto. There are accountants who’ve gone from VisiCalc to MultiPlan to Lotus 1-2-3 and into Excel.
Each tool has a different way of handling data. You may be able to export the raw data, but what about your manipulations? Think back to the spreadsheet example and consider tools inside of those programs that were different in the next spreadsheet. Macros, formulas, print ranges, export capabilities. Most of them lost as you transitioned from one program to the next.
If you’re upgrading one version of Lightroom to the next, the risk is less severe. If you’re migrating from Aperture to Lightroom, you have quite a bit more work to do. Don’t be lulled into a false sense of security by that little menu item in Lightroom CC that promises to import your Aperture Library.
Yes, it will work, but it creates an incredible mess of a date-based hierarchical file structure when it’s complete. That won’t be a problem until you’re ready to get your data out and use another tool. Then you’ll wonder just what the hell you did on 4/13/2012 when you look ed the sub-folder names.
If you’re going to put data into Lightroom CC, do it on your own terms so you know where and how your data resides.
2: Evaluate 3rd Party Support
Many people who use Lightroom have a few plugins. Those won’t automatically transfer to Lightroom CC. You’ll have to run your installation program again.
Chances are good that the installation program you saved doesn’t recognize this new version. You need to check with your vendor to see if they have a new installation program. In fact, they may not yet have support for Lightroom CC.
If your workflow relies upon using 3rd party plugins, make sure you have a version that works in Lightroom CC before you upgrade. Otherwise, you could find yourself without those tools until the vendor releases a new version.
3: Backup Your Catalog
Assuming you’re upgrading from one version of Lightroom to the latest, you’ll be prompted to upgrade your catalog.
That’s not unusual or a cause for concern, at least until you release that you can’t revert if something goes wrong or you change your mind. Your only protection is to have a version of your current catalog saved somewhere.
Then if you decide that you need to roll back to a previous version of Lightroom, you can do it with ease. Yes, you’ll lose any changes you made in the new Lightroom CC catalog.
4: Start With A Test Machine
Creative Cloud permits you to install two versions of Lightroom CC. Please don’t install it on your main machine first. If you have a second computer, install it there to try things out before you commit your main machine to the upgrade.
At the very least, create a test catalog and upgrade it to play around before you upgrade your main Lightroom catalog. There isn’t any reason you can’t continue to use an older version of Lightroom while you evaluate the latest release.
Getting The Most Out of Lightroom CC
While there are some new features in Lightroom CC that are getting attention, one of the biggest benefits is supposed to be a speed improvement. However, you can miss out on the speed bump if you don’t have your settings configured appropriately.
1: Make Sure You’re Using Your GPU
One of the ways Lightroom CC improves performance is by offloading calculations from the CPU to the GPU. In order for that to work, look in your Preferences to ensure that you enabled this feature.
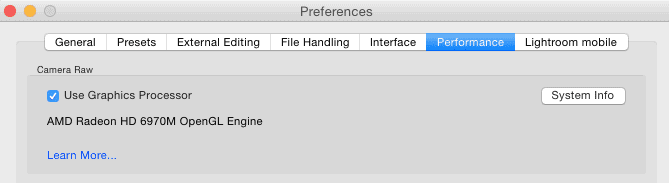
Select the Performance tab in your preferences. Check the box to Use Graphics Processor. You should see the name of your GPU below, and it may well be different than the one in my example.
2: Increase The Camera RAW Cache Size
Lightroom uses space on your hard drive to store temporary files. This cache can be your friend or enemy, depending upon how much space you allocate. By default, Lightroom CC sets the Camera RAW Cache to 1 GB.
Bigger is better. Bump up that cache space to gain performance improvements.

You can find this under the File Handling tab of your Preferences. I have mind set to 25 GB, but there are no diminished returns for making it larger. If you have free disk space (and you should always have free disk space), don’t skimp if you think more cache will give you better performance. Add more to this cache and evaluate your results.
Here’s another tip. Store this cache on a fast drive. Even better, store it on a separate drive than your Lightroom catalog.
If you look at my screenshot above, you’ll see that I store my cache in a folder called LR Cache on a backup volume. That drive is a Thunderbolt mirrored drive, while my Lightroom photos and catalog are on a Thunderbolt RAID array.
The reason this helps is because drive read and write process for the cache don’t have to compete with the same kind of operations of my Catalog or other work space on the RAID system.
My operating system is on a very fast SSD, but I didn’t want to put it there in case it’s tied up with operating system commands on the drive. Essentially, I’ve separated different disk actions so they can operate independently and avoid waiting on each other.
Don’t do this with a slow USB drive! At the very least, make sure you have USB 3.0 with a fast drive to make sure operations can happen quickly.
3: Turn Off XMP Writes
Unless you’re planning to import your files into another program that needs an associated XMP files, turn off this feature. It just wastes time writing data that you won’t use.
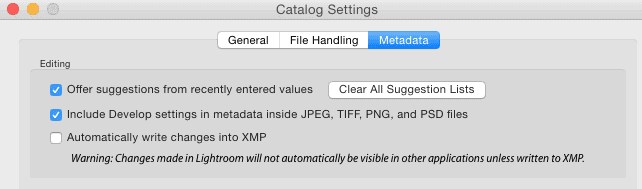
Not sure if you need XMP files or not? Then you don’t need them. If you did, you’d be sure and you’d know where they go when you need them. Turn this off to save time and space.
4: Turn Off Automatic Face Detection
When I started Lightroom CC on a catalog with portraits, my performance tanked. It was like a high dive into the Grand Canyon. Turns out that Lightroom CC likes to show off its Face Detection feature by default.
You may want to play with Face Detection, but do it on your own terms. Don’t like Lightroom CC automatically start processing faces or it will substantially drain your system performance.

You can find this setting under the Metadata tab of your Catalog Settings.
5: Optimize Preview Settings
This one is a matter of personal taste.
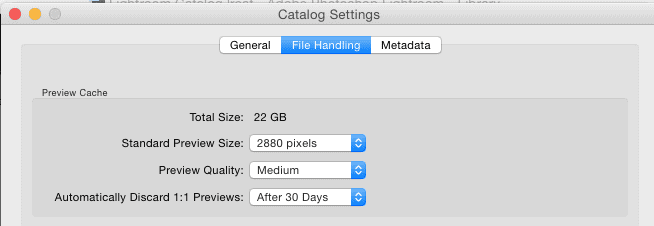
Writing previews takes time. The size and quality of your previews are variables that determine how much time it takes, and when you spend that time waiting. You’re also factoring in how long those previews last, which means you could spend more time re-writing them if you tell Lightroom to discard them after a number of days.
On the other hand, setting the Automatic Discard to Never can eventually eat up disk space unnecessarily, and Lightroom performs better when there is plenty of unused disk space.
What to do? What to do?
It’s your call. My decisions are above. In general, you get the best performance when you keep these numbers small. On the other hand, people with higher resolution monitors get a better preview when you generate larger results with higher quality.
Larger resolution and higher quality take longer calculations to determine and write the preview, but they look better. What’s your priority?
Adobe advises that you keep 1:1 previews as long as possible, as long as disk space permits. That’s because those puppies take a bit to generate.
On the other hand, you only need a 1:1 preview for the images that you’re going to review at full size and potentially process. Any photo you examine in the grid and discard clearly doesn’t need a 1:1 preview, so why generate one in the first place?
This is where performance becomes a matter of perception. Do you want to spend time generating and storing 1:1 previews for images when you may never use them?
I don’t. In fact, the majority of the photos I take will never see further editing. That means it’s a complete waste of time and space to generate a 1:1 preview for them, let alone keep them forever. If I’m not editing a photo within a month, I’m fine with deleting the 1:1 preview.
Getting Started With Lightroom CC As An Upgrade
The upgrade process from Lightroom 5 to Lightroom CC was quick and painless. When you start Lightroom, it will detect your catalog and prompt you to upgrade it. If you have multiple catalogs, you’ll need to select them with File | Open Catalog to upgrade each one individually.
I had no problems. Others have had some issues because of potential corruption in their catalog, defective sectors on their disk drive, or just bad juju. That’s why you want a backup before you begin. It wouldn’t hurt to Optimize your catalog to get rid of unnecessary data before upgrading. Then back up the catalog again.
Don’t let the hype of new software override good judgment. Regarding software upgrades, I never want to be the first kid on the block to play with it on my main system. New software generally has new bugs. Let the excited kids find them and scrape their knees.
Then you’ll know when it’s right for you to switch to Lightroom CC.
Want to learn more about Photography software? Click below to check out articles about Adobe, ON1, Skylum, and more.
Photography Software Articles