Affiliate Disclosure: We earn a commission if you purchase through one of our links at no additional cost to you.
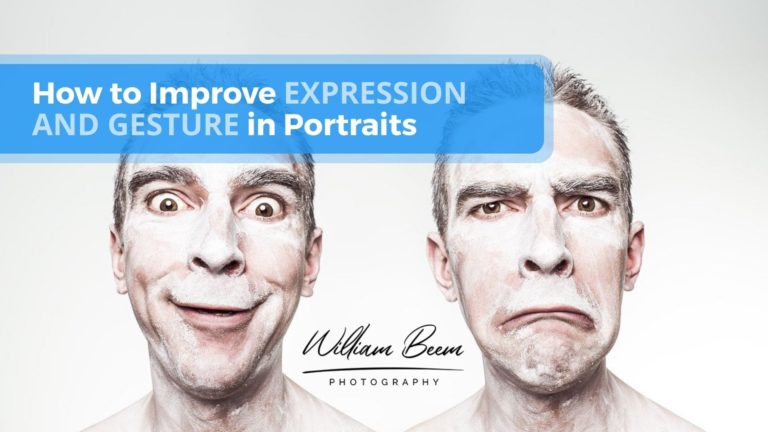
Rethinking My Retouching Software
I’ve been spending some time using Aperture 3.3 as portrait retouching software. The results look very promising. That means fewer round trips to use Photoshop or a plugin to retouch a portrait. It’s not just a matter of new features. Some of the existing features seem to work much better in the current release. Of course, there are also some killer new features. Here’s a quick overview:
White Balance from Skin Tone – This is a fascinating new feature that really enhances Aperture 3.3 as portrait retouching software. There are times when I didn’t have a grey card with me and nothing in the photo seemed appropriate to use as a measure of white balance. Now with Aperture 3.3, I have the option to use Natural Grey or Skin Tone with the eyedropper. All I have to do is select the Skin Tone option and click the eyedropper on the subject’s cheek. I compared these two options on my last shoot with my grey card. Both improved over the camera’s settings, but the Skin Tone white balance had a natural warmth that was far more pleasing than the grey card. There’s still an option to select Temperature & Tint to manually control white balance, but I’ve found using the Skin Tone to be an excellent tool for portraits. I’d like to see this feature in all retouching software.
Skin Softening – Previous versions of Aperture had a Skin Softening tool. Unfortunately, it was difficult to use. The tool sapped resources from my computer and was very sluggish. Apple gradually improved its algorithm for this tool. It’s no longer sluggish. More importantly, it yields some very nice results. Combined with Aperture’s brush settings to Detect Edges, you can very quickly use Skin Softening without overlapping onto over textures in the photo. You still see pores and other fine details, though there is the possibility to overdo the softening. Fortunately, you can easily correct it with one slider.
Contrast – This may seem like a basic tool, but the results have also greatly improved. I’ve found that Aperture 3.3 does an outstanding job of darkening my background without pushing my subject too far. It’s the slider for “make this subject pop!” It’s almost perfect for that job, but has the tendency to blow-out the skin on some subjects. My first option is to use the Recovery slider to bring back details. If that’s already pegged out, I can use Aperture’s selective editing brush to erase the Contrast. Even this isn’t always perfect. Bringing back the detail after a Contrast adjustment could result in some discoloration, but not always. Even with that caveat, it’s still a very useful improvement.
Highlights, Shadows & Mid Contrast – When brushing away the Contrast causes some discoloration, then it’s time to fall back on these settings. In the photo below, I used Mid Contrast to eliminate shine on the model’s forehead. Used globally, it flattens out the entire image. Fortunately, you can just use the adjustment brush to apply the change to the area that needs it.
Retouch Brush – I used to avoid this at all costs in past versions. Rather than remove a blemish, it was more likely to cause one. On top of that, it was very slow and cumbersome. That’s no longer the case. The Retouch brush does a wonderful job and is much faster than its prior incarnations. Where the problems with this brush used to always mean a trip to Photoshop for me, now I can comfortable rely upon the Retouch brush in Aperture 3.3.
Now that I can trust Aperture 3.3 as portrait retouching software, it’s become an incredible time saver for me. I’m still experimenting, though. Brightening the eyes will take some different techniques than the one I tried in this image. That’s OK. I like to dig in and play with the possibilities.
Meredith [pinit]

Want to learn more about Photography software? Click below to check out articles about Adobe, ON1, Skylum, and more.
Photography Software Articles

The latest update has been a Godsend for me due to the updated White Balance changes. For the life of me, with or without a grey card, I was never quite happy with the results. Especially with the skin tones out of camera with my Ricoh GXR.
The update has been magical for me. I even bought LR4 thinking this would solve my problem. But after a couple days trying to figure out the massive changes was futile. Fortunately Adobe refunded my money.
I’m very happy with this update and have begun using your label method in my “new” workflow.
I think Apple really stepped up with this latest release. It was free and added some very cool features. Yet some people thought it was a sign that Apple is abandoning Aperture. I don’t get that kind of logic.
Great article. I’ve found that both retouching and cloning in Aperture is both a lot easier, and the results are better, than what can be done in PS CS6.
I was doing some side by side work in both Aperture and LR4 last night on a couple of older portraits I took last year, just to see how both did as far as white balance. Aperture basically nailed it using the skin tone option, where it took a bit of tweaking to get LR4 right.
Thanks, Charles.
That kind of comparison is one of the things I want to do over at my Aperture vs Lightroom site. While I was making these adjustments, one thing I missed having in Aperture was an Exposure Adjustment brush, as Lightroom has. There were plenty of tools to do a similar job and I mentioned some in the article, but it would have been convenient to drop the exposure just on some of the skin after hitting the Contrast.
Overall, I’m still very pleased with the updates to Aperture.
A very good article. However, I must say that I was hopelessly distracted throughout — I LOVE me some redheads. And you’ve posted many articles where I was tempted to comment on the beauty of the models you’ve photographed, but didn’t. This time I just couldn’t resist!