Affiliate Disclosure: We earn a commission if you purchase through one of our links at no additional cost to you.
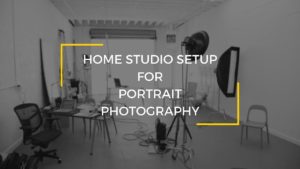
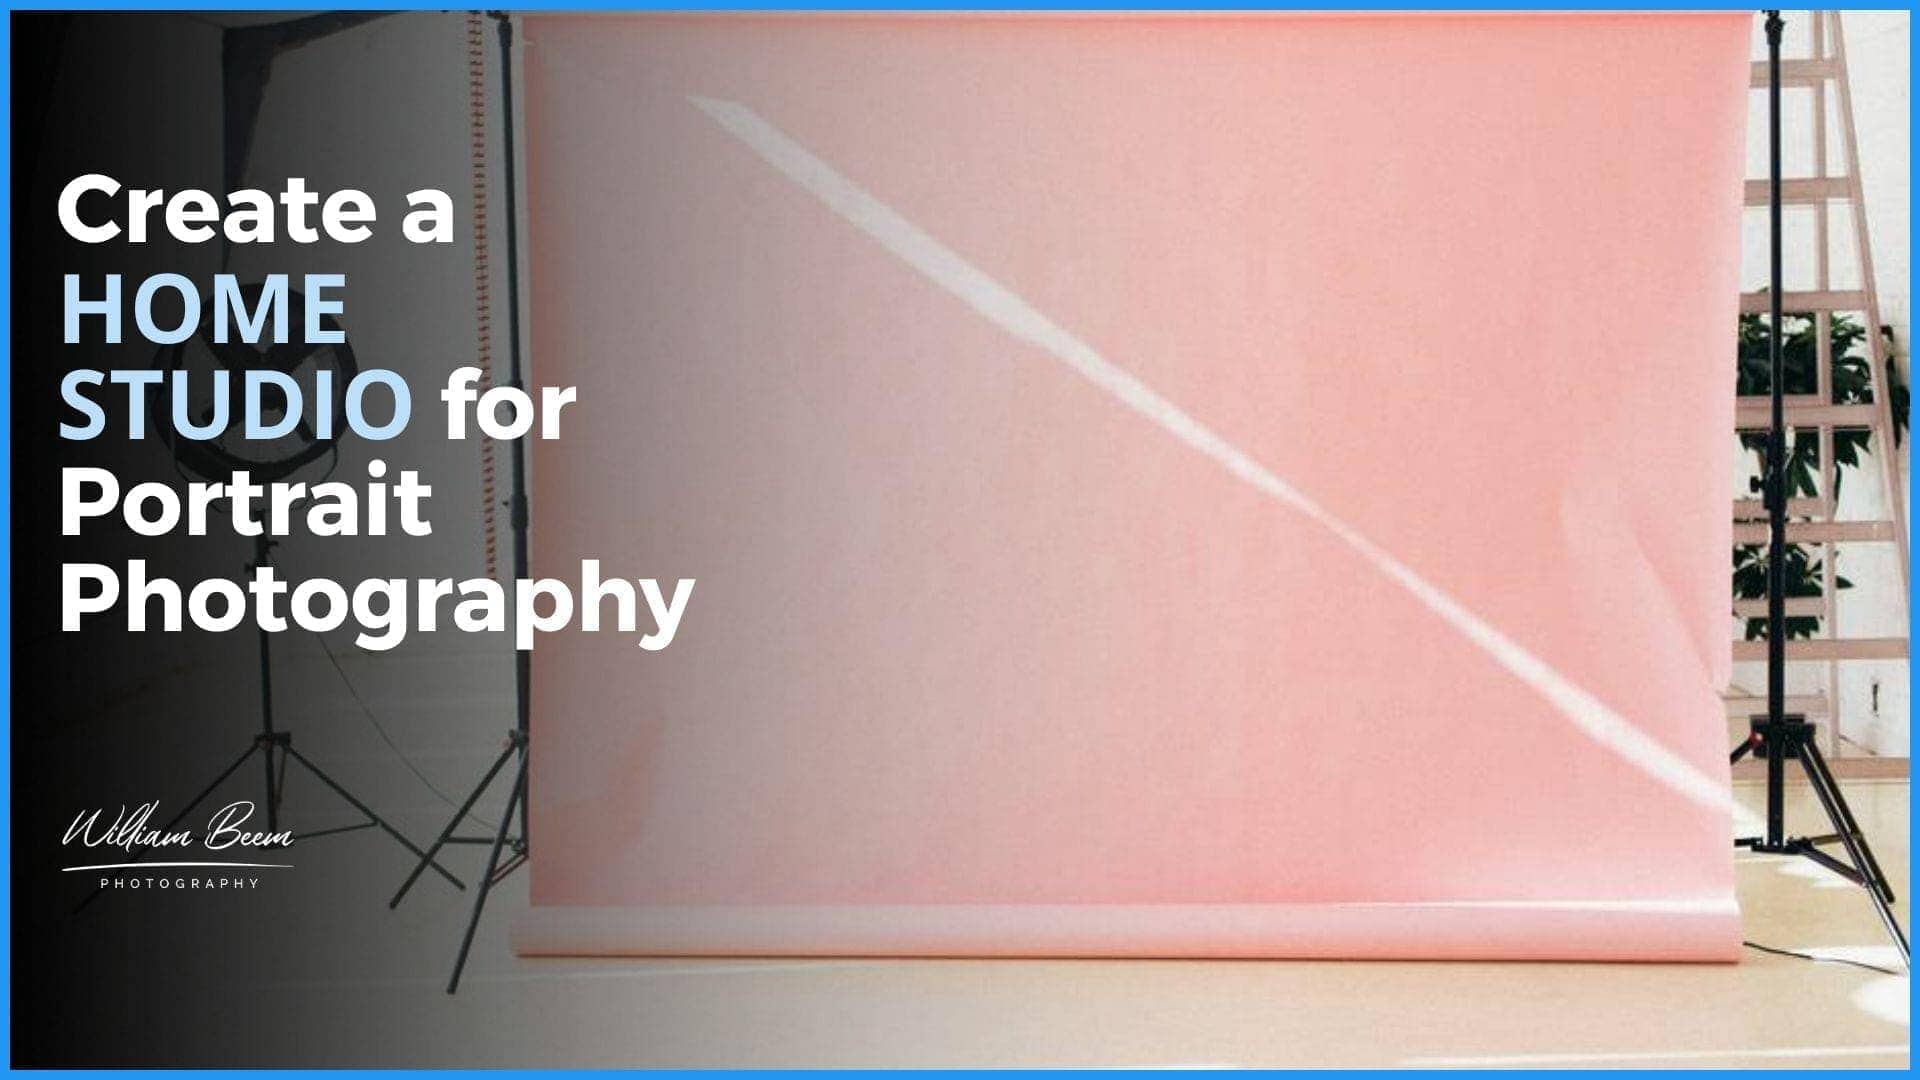
You can create a home studio for portrait photography on a budget. The key is to understand the elements you need to cover, and then start crafting portraits from the comfort of your home.
We’ll share the things you need, as well as some items we use in our home studio to create portraits, product photos, and more.
Elements to Create Your Home Studio
You need some basic things to create your home studio. Here are a few ideas to get you started. You’ll find some links to the items we mention at the bottom of the page.
Don’t think you need to have dedicated space to create your home studio. It’s nice if you have extra space, but that’s not what we do.
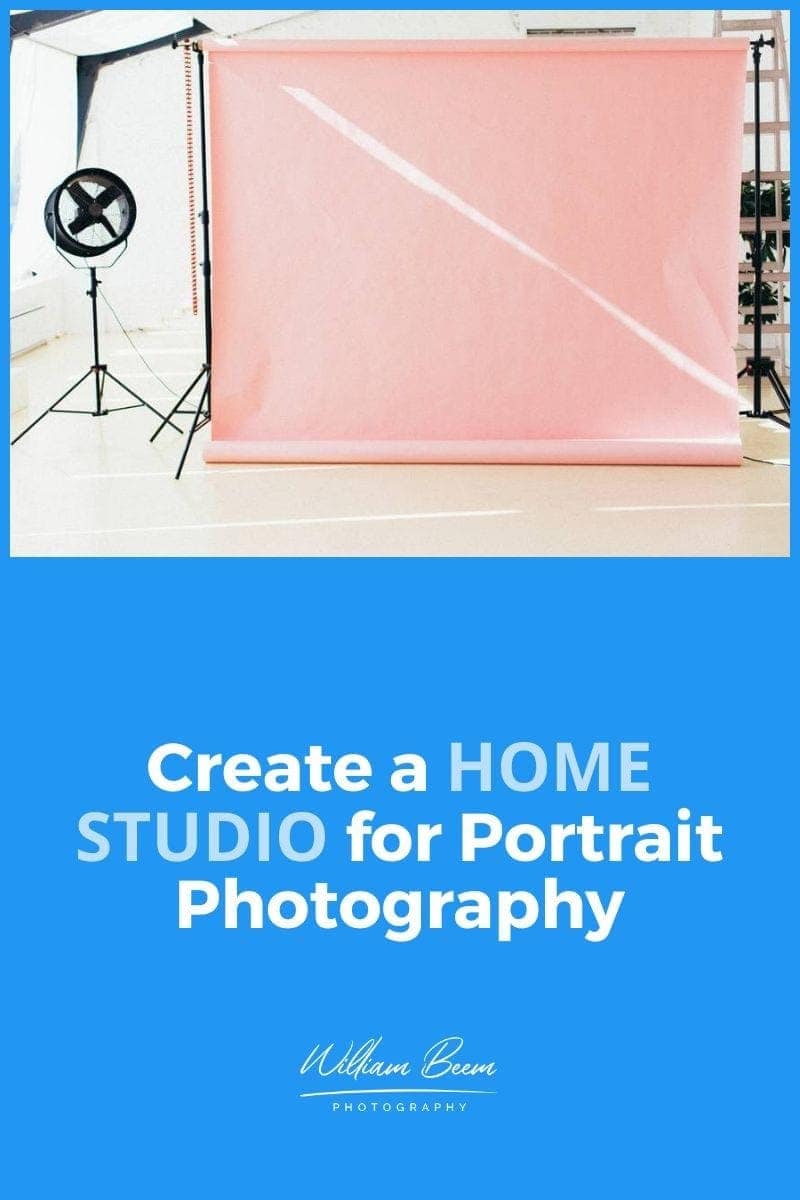
We use Savage Seamless Paper and collapsible backgrounds that we can easily set up and pack away when we’re done. That’s because our living room is the best space in our home to create a home studio.
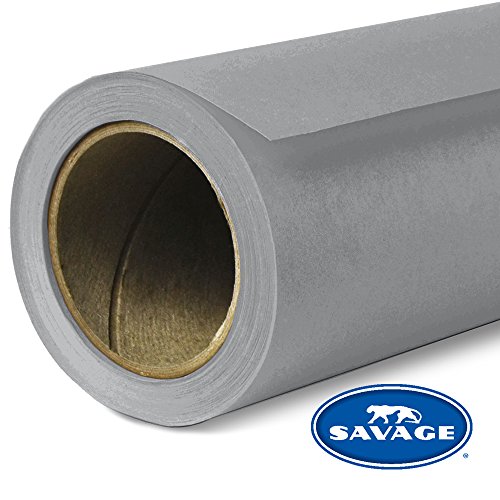
Savage Seamless Background Paper in Fashion Gray is a top-quality background paper that features a non-reflecting surface with an exquisite, fine-tooth feel that’s ideal for creating smooth and even backgrounds. It’s perfect for fashion photography, portrait photography, YouTube videos, interviews, and so much more.
It’s easy to use – just unroll what you need. If the end of the paper gets torn or dirty after a photo shoot, the used portion can be cut off and recycled. The 107” wide x 36ft roll gives you plenty of paper to work with, so you can create stunning backgrounds for all your projects.
We use a pair of Manfrotto 1005BAC 107″ light stands to hold up the seamless paper. These things are strong and sturdy, and they stack together for storage. I love them. They are the best light stands I’ve ever found, short of using a C-Stand.

The Manfrotto 1005BAC light stand is a must-have for any photographer or videographer. Its lightweight, compact design makes it perfect for on-the-go shoots, while its Quick Stack System allows you to connect multiple stands for easy storage. With a pack of three, you'll always have a spare stand on hand when you need it.
To hold the seamless roll, I use a Manfrotto 272B Black Aluminum Three-Section Background Support that extends through the roll and mounts on top of the light stands. It’s collapsible, so it’s easier to store than keeping a 12′ pipe around (which I used to do). Much more transportable if you need to take it on the road, too.

The Manfrotto 272B is a high-quality, three-section telescopic pole that extends from 3.7 to 9.8 feet (112 to 298cm). It's perfect for anyone needing a reliable background support system, and its black aluminum construction is both durable and professional-looking.
We also use and recommend the Lastolite collapsible backgrounds. There are plenty of options, but here are two of our favorites.

The Manfrotto 5x7' Vintage Collapsible Background in Smoke & Concrete offers a timeless look perfect for portraits, fashion, and product photography. This versatile, reversible background features a dark "Smoke" side with grey tones, a hint of green, and a vignette effect. The other side is "Concrete," which offers an evenly distributed grey tonal texture. When you're finished shooting, the background collapses for easy storage.
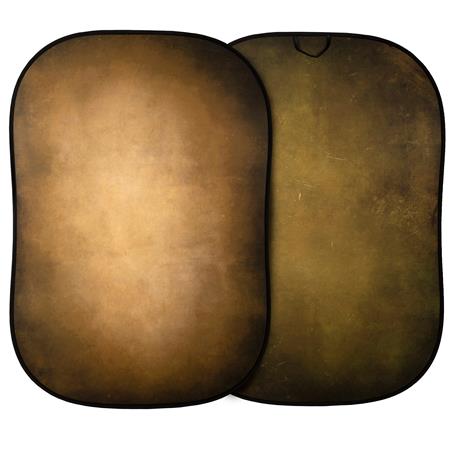
The double-sided Manfrotto 5x7' Vintage Collapsible Reversible Background in Tobacco/Olive is a great way to add a touch of class and sophistication to your portraits, fashion, and product photography. The Tobacco surface offers a range of brown/ochre tones with a slight hint of green, while the Olive surface features a range of deep greens with a touch of ochre. Both sides also feature a dark vignette to the edges. The durable and practical no-wrinkle material ensures that your background will always look its best.
If you go this route, I HIGHLY recommend getting the Lastolite Magnetic Background Support. It’s fast, easy, and will hold the background where it should be. Trust me; this is a time saver.

The Manfrotto Magnetic Background Support Kit is perfect for quickly and easily attaching collapsible backgrounds with a steel rim to a traditional lighting stand. The magnetic background support ensures that your backgrounds are securely attached, while the included lighting stand provides stability needed to support your background. This complete kit offers everything you need to get started using collapsible backgrounds in your photography and is an essential tool for any photographer who wants to experiment with new creative background possibilities.
Check our my Resources Page to find out more about the lighting options I use and recommend.
Home Studio Photos
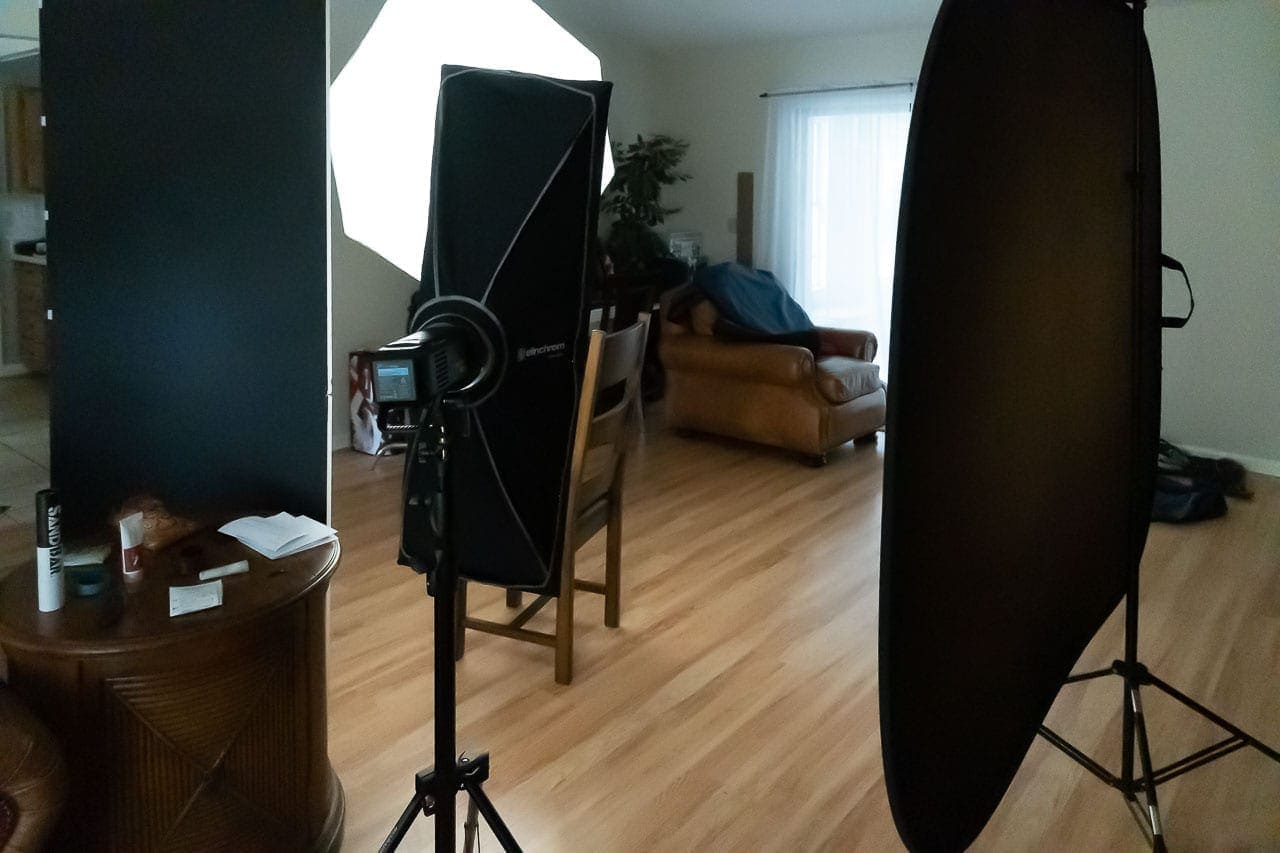
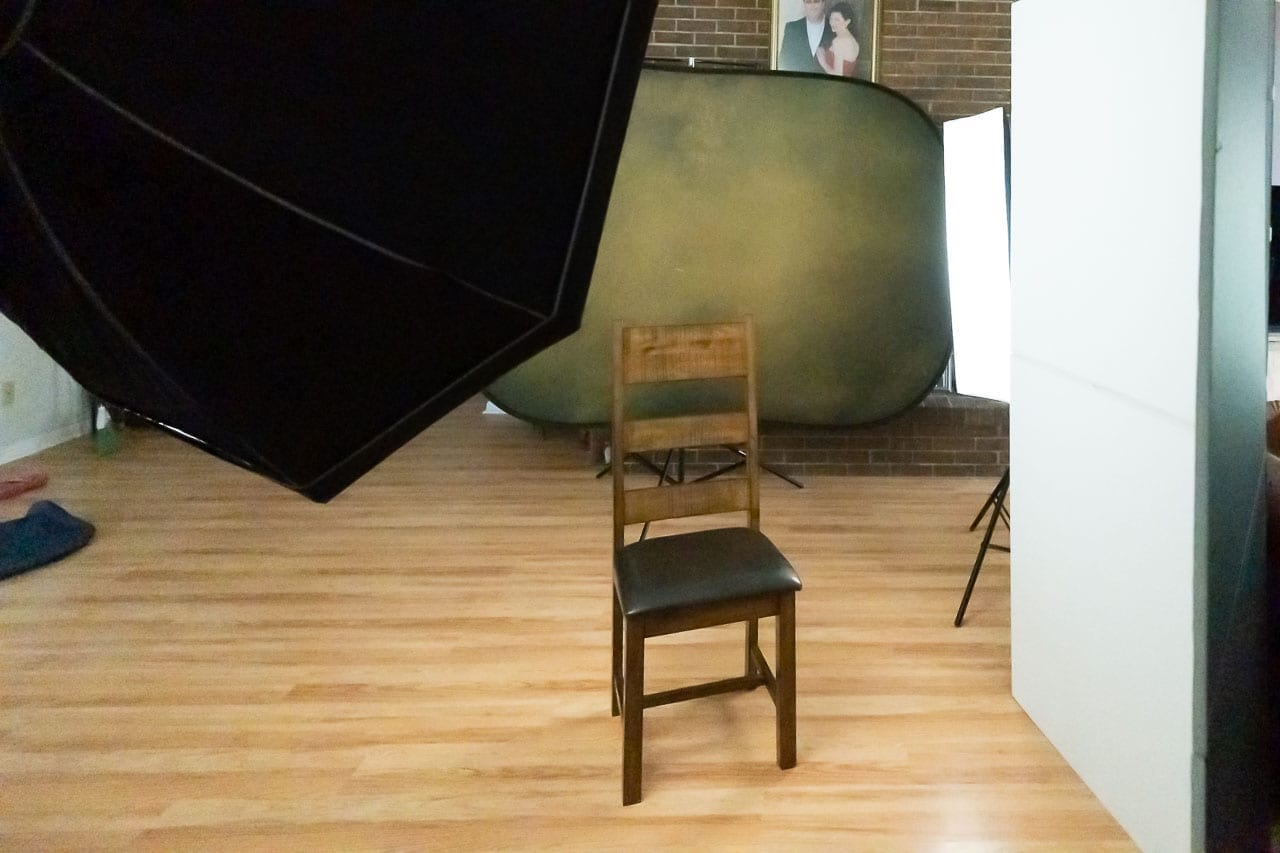
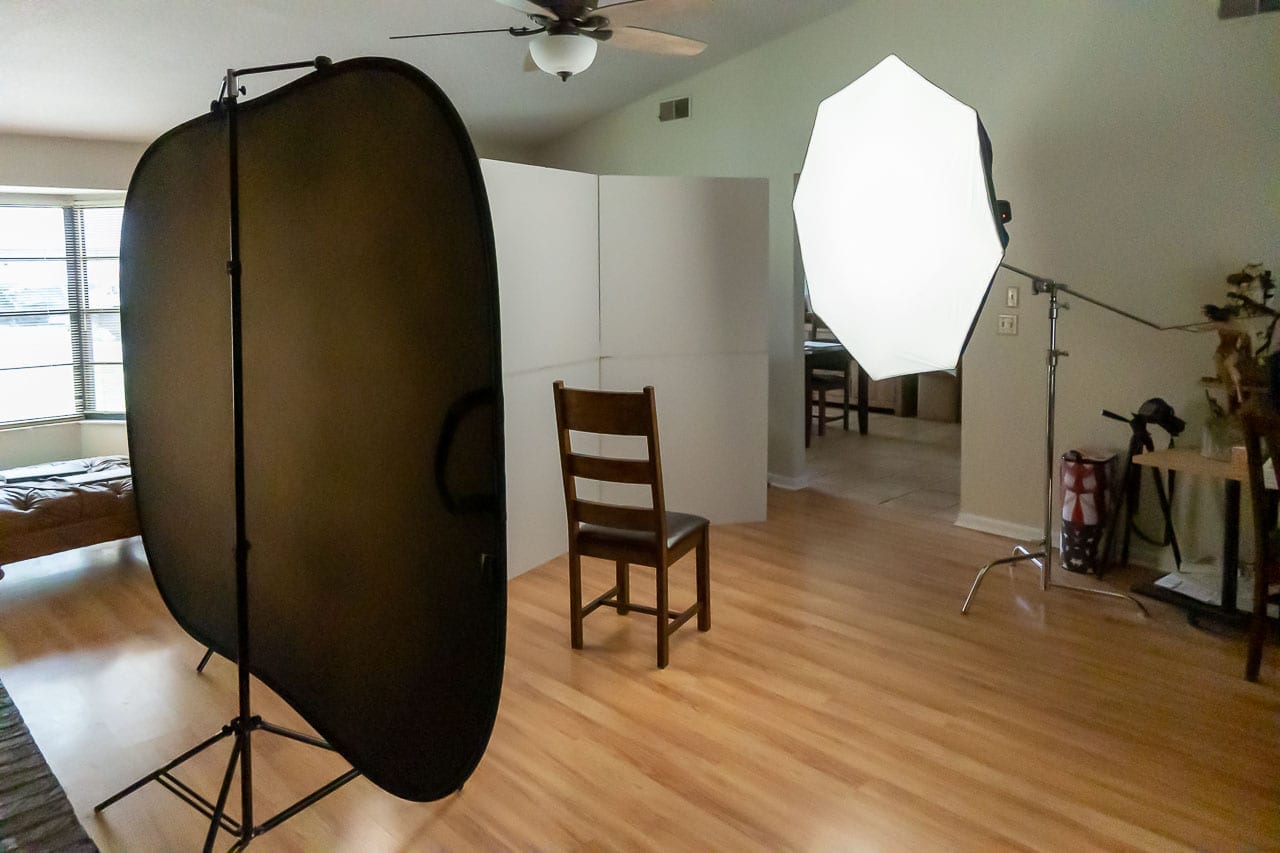
Lee and I recently did a quick portrait session in our living room. As I mentioned on the podcast, I pushed a chair out of the way. We setup a Lastolite collapsible background using both the Concrete/Smoke background and the Tobacco/Olive (shown here) for our background.
I put my camera on a tripod with the composition I wanted, which allowed me to engage with Lee for the light testing, posing and finally our portraits of her.
The photos of the home studio set were very grainy, as we had low light due to a thunderstorm. So they look slightly over-smoothed, but I think you can get the idea.
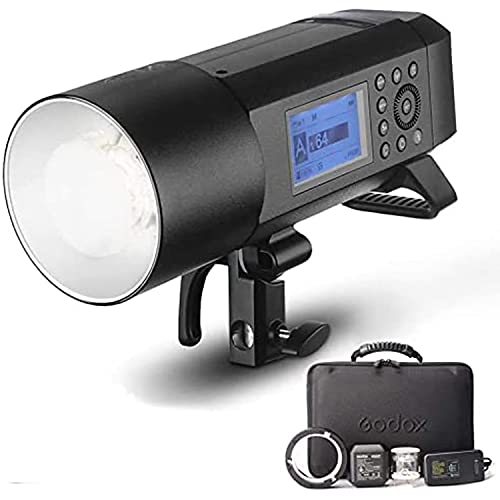
The key light is a Godox AD600 Pro using an Elinchrom 53″ octa box. The hair light in the background is a Godox AD400 400 Pro with an Elinchrom 14″ x 35″ strip box. We also have a V-Flat for a bit of bounce fill.

The Godox AD600Pro is built-in with the Godox 2.4G Wireless X System. This system allows you to use the flash with other Godox products like TTL camera flashes and TTL outdoor flashes. With this system, you'll be able to create fantastic lighting effects that will make your photos pop.
Another great feature of the Godox AD600Pro is its compatibility with Bowens mount accessories. This gives you a lot of flexibility regarding accessories and allows you to find the perfect setup for your needs.
Finally, the Godox AD600Pro has two power supply methods for added convenience. You can use the professional lithium battery pack, which provides 360 full power flashes, or the AC26 AC power source. Either way, you'll be able to get excellent performance out of this flash.
The Godox AD400Pro is a powerful flash with a whopping 400Ws of power, making it perfect for everything from portraits to product photography.
With a recycle time of just 0.01-1 seconds and 12 continuous flashes at 1/16 power output, the AD400Pro is perfect for high-speed shooting. And with a built-in 30W LED modeling lamp, you can easily see what your final image will look like before you even take the shot.
Best of all, the AD400Pro is compatible with TTL auto flash systems of multiple camera brands, making it an excellent choice for photographers who use multiple cameras.
Note: I own two of these.

If you're looking for a softbox that will give you beautiful, round catch lights, then the Elinchrom Rotalux Octabox 135cm is a perfect choice. This innovative softbox features a lightweight dedicated speed ring, which makes it quick and easy to set up. The 53" (135 cm) Octa shape provides a large surface area, making it ideal for close-up portraiture or fashion photography.
Note: For Godox strobes, use the Bowens mount speedring from Elinchrom

The Elinchrom Rotalux Stripbox 35x90cm is an excellent softbox for product photography, especially bottles and other round reflective items. They can also be used for narrower ¾ length portraits and are also widely used to light backgrounds where the length helps avoid fall-off from top to bottom.
The 14x35" Rotalux Strip comes standard with a silver interior and a flush front face. The flush-mounted front face provides a wider spread of light than a box with a recessed front. It may be used as a side light without as much wrap-around as a conventional rectangular softbox.
Note: For Godox strobes, use the Bowens mount speedring from Elinchrom

V-Flat World's Foldable V-Flat is a must-have for any photographer or videographer. This versatile modifier can reflect, block, or flag light, making it a versatile tool for any lighting situation. The black and white sides offer different options for creative control, while the foldable design makes it easy to transport and set up. With a weight of only 7lbs., the Foldable V-Flat is easy to carry and use, giving you total control of your lighting.
One important thing to note is if you decide to go with these lights and modifiers. Elinchrom Rotalux modifiers typically come with Elinchrom speed rings. I replaced mine with a Bowens speed ring for the Rotalux modifiers.
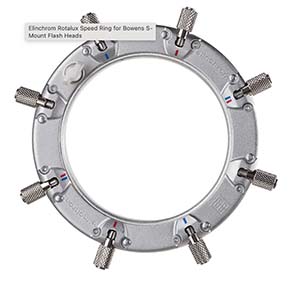
Do you love your Bowens S-Mount flash heads but wish you could use them with your Rotalux softboxes? Well, now you can with the Elinchrom Rotalux Speed Ring for Bowens S-Mount Flash Heads. This speed ring is made of strong metal and features enhanced strength at critical points, making it durable and reliable. It's easy to set up, so you'll be up and running in no time.
We got the chair from Wayfair.
Timestamps
On today's topic, we're going to talk about how to create a home studio for portrait photography. This is the question that came in from one of the email subscribers. Bob Arlen. Bob is a good guy. I've met at the Photoshop World years ago, and he actually sent in a few different questions. And I like this one. It's one that I've written about before,
but I don't know if we've covered it on the podcast. So that's what we're going to talk about today on I Like Your Picture. I'm William Beem. Welcome to I Like Your Picture. The show that helps you improve your photography with visual storytelling. What is visual storytelling? It's a method of approaching your photography with a knowledge of who you're trying to serve with your photos and what emotion you want to make them feel.
We encourage you to concentrate on your subject, light and background to create a photo your audience loves. I'm glad you found us. Hi, I'm William Beem and I am Lee Beem. And if you have a question that you'd like us to answer on the podcast or on a Facebook live, go to Williambeem.com/ask, and you can just put it in your name,
pose your question there, and we will get to it. Today's question, how to create a home studio. And this came about because of a discussion of portrait photography. So I'm going to assume portrait photography for Bob's purpose, but we're going to talk a little bit about home studio for other things, because Lee does home studio photography all the time for things that aren't portraits,
I guess you'd call them. Alright, so let's start off and just go for the basic things. Why use a home studio for portraits? You have options. You can go out on locations, you can rent a photo studio someplace, or you can try and take things out of your home. Lee. What's your reason? Why do you like to do home studio photography?
Oh, because I can set up my studio in my pajamas, spilling coffee as I walk and nobody knows. I actually just like being able to relax and get into my own space when I'm busy putting something together. And I'm just pointing out to here that I am always just like the solo person behind this. So I'm not relying or having to communicate with other people when I set up,
I think that's sometimes simplifies it. I kind of get what I'm about to take photos. My head gets into this little zone and all I see is the end vision for the photo. There are often missing steps from what I have from where I am now, to where I want to be. And as I'm kind of walking through the process my head is,
busy doing it. It just allows me the space not to have anything to kind of snap me out of my little bubble. I know what I have. I know what I don't have, what, I don't have something that I need. It's kind of cool to figure out how to overcome that. I like puzzles. Probably most people enjoy that situation,
but you know, it does put you in a, in a position where you try to change your way of thinking. And instead of looking at something and, Oh, well, wouldn't be able to do it because I'm missing this. I mean, unless it's the camera and the subject, you can pretty much overcome anything. And it's just changed the way that I look at what I don't have instead of saying,
well, instead I could use something else or I could slightly change what I was going to do with the picture. In my case, It comes down to this. All my cool stuff is here. Yes, I have light stands. I have C stands. I have, you know, different types of lights. I have many different light modifiers. I have backgrounds.
I have seamless rolls of paper. I've got a roll of canvas and any prop that I want to use. All of that stuff is here. If I want to go on location, I have to select a subset of that stuff. And maybe go out in the field someplace, which, which is fun. Sometimes it's nice to see something different or I have to rent a studio.
So there I'm paying. Now the thing about running a studio, if you've never used one before you rent a block of time. And so it may be, let's say they do it half a day, maybe four hours where they do it all day for eight hours. That is not all time that you get to spend photographing. That includes your setup and tear down time.
So you're paying for time just to move things in and out. And depending on how complicated you get, you're spending more time moving stuff into that box that is a studio. At home, I think all I have to do is in my living room. Um, we're lucky that we have like a, a high arched ceiling. I have to set up a background.
I maybe have to push a chair or a couch out of the way, and I'm ready to go. And call your wife. And well, I've got to set up the lights too, but now I'll call my wife because I am always missing something. And she knows where it is, or at least she can find it. There's a bit of disorganization somewhere in my life.
It's not actually so bad, but the nice thing about a home studio, it kind of goes beyond that in, I guess the 2020 timeframe. There are a lot of people that don't want to rent space. There are a lot of people that don't want to let you use their space, even if they would have been very courteous and allowed you to use the space in the past,
because they're worried about someone getting sick or someone bringing something in. And that is just an additional burden, this a reality of life in these days. But when you have your home studio, you can decide who comes in and who doesn't and how you want to treat the situation. So we won't get into all the details about whether you wear masks or not,
if you scrub everything down. Everybody's got their own opinions on things like that. But when you have a home studio, it's your home. Not only are you there, all of your favorite germs are there too. So someone's willing to put up with that without wearing a mask because taking a portrait with a mask on is not really it doesn't flip. That's specifically what you're going for.
Yeah. There's some people that are, I'm just, I'm starting to see portraits out there with people taking with a mask on, because that's part of what society is like right now. I'm hoping society moves past this because I like to see people's expressions. That's not the purpose of this is basically the home studio is all your cool stuff is here. You can set it up.
You can invite over your portrait subject. And you know what? It may not be that you're hiring a model or bringing somebody in like that. These could be family portraits. Yeah. Do you know what the other nice thing is? And this has happened to me where I've taken my photos and have torn everything down. And then I look at the pictures and something's wrong and it could be anything.
When your studio is at home, it is a royal pain in the butt, but you can look at your previous photos for reference to find out what you need to go in there. And you can re you can replicate it and do it again. It's horrible. But that option exists at home, which may not exist somewhere else. If you only see your photos once,
once you've left the look. Yeah, that's a good point. It's like, it's very easy to recreate your home studio. Now, some people have a space dedicated to being a home studio. I know of people who have taken like an outside garage or shed, or, you know, a separate building. Some people will do the work to transform a room inside of their house when they need to do it.
That's what we do. We have a living room. That's, it's got enough length to it. It's got a high ceiling so I can put the stands up. But the truth is the edge where I put the background is a typical height. What is that? Eight feet high. So even though I've got this large peak ceiling, I'm not really using that space.
It's just kind of nice to have that extra space above me. For some reason, must be psychological. But when you talk about home studio space, particularly for portraits, you don't need a lot of space. There are people who work in a home studio, the size of my office, which is just a spare bedroom. What would you say that Lee,
this is 10 feet across maybe, right? So we're going to, we're going to guess 10 to 12 feet across something, something like that. And yeah, maybe you're not going to go in with your, you know, 70 to 200 millimeter lens and do a full length portrait, but you can do some really nice portraits with a chair, a table,
and have someone sit down and light things up, maybe put a background behind them and you can make some incredible portraits that way. Don't let the idea that you have limited space talk you out of making a home studio work with... Especially if you're doing Head and shoulders. That mean you don't need a lot of space for that at all, No work with what you have. Then you can learn and grow.
Start off what you have and determine your needs. Then you decide if you want to do something else. And if you need to do it someplace else, but for home studio, be creative, maybe a hallway will work because all you really need, if you're doing a standup portrait, is length. That's just some ideas. Now, as far as doing other types of photography,
Lee's studio space is our dining room table. Because what she's working on is much smaller than a portrait, but the same concepts apply. Yeah. I mean, I've got all my stuff. It's just, mine is easy because the props and things that I use are kind of smaller. Also some of my props form part of our home decor and it's kind of long short story,
but when the weather's nice and the wind's not blowing, I've also used outdoor space on the patio when the sunlight's not too harsh, or sometimes when I've wanted some particularly harsh light on something, there are options. I mean the dining room table just works because hidden behind the sideboard, I have many flat things that form backgrounds. She just mentioned outdoor light, available light.
We just talked about this on a previous episode, if you go to Williambeem.com/episode226, we talked about doing product photography by merely opening up the door, letting the available light come in. And it's not too harsh. If you're inside the door and you can put down a white background and maybe some white foam core bounce cards,
you can do some lovely product photography that way. Just be aware of if you have blinds or your window, or like little bars and frames and things, just make sure that you may need a diffuser or you may need to do something with that. If you're using window light that comes through because sometimes he gets some shadow from that, that's something I think there was a time where the light was in a different place.
When I was shooting at a different time, I was like, Oh man, what is those marks? That's the problem with using available light is that it moves. It's a nuisance. I wish you would just stay where I put it. We'll talk about that a little bit later, but let's assume that you've identified your studio space, whether it's permanent or something that you just have to move and set up.
Setting up really doesn't take too terribly long. If you're organized, which we've already established that I'm not. The first thing you want to look at is what is your background? And remember when I talk about subject, light and background, so let's start with a background. If you have a beautiful wall or a beautiful background in your home, that's perfect. You don't have to set anything up.
Yeah. I don't have that. What I do is I will set up a background and there's a couple of ways that we do it. The first one is with a roll of seamless paper. Savage seamless paper is what I use. You can get it on Amazon. You can also get an Adorama or B&H. The difference is if you get it on Amazon and you have Prime,
you don't pay for shipping. And I like the fact that I don't have to pay for shipping. So that's why I buy from Amazon. No other reason, just saving a little bit of money. And you can get these in different lengths. I tend to like getting them to think about 107 inches, because if I'm going to be working with somebody I want to have width
with my background, you can get them maybe five feet across and shoot in portrait mode and that'll work out as well too. You just don't have as much room on the, on the side. If somebody spreads their arms out, it probably goes across the width of what you can shoot on. Just depends. If you're doing, you know, kind of full length or something else,
if you're doing something else, you can definitely go smaller. And if you're doing headshots, you can take the roll of paper, maybe cut it off and tape it up wide on the back on a wall or something like that. So that way you've got a background. That's a bit wider. You can zoom in on your headshots, but just keep in mind.
What's your purposes. Are you doing headshots? Are you doing full length? Are you doing something three quarter length in seamless papers comes in a variety of colors. I usually like to get a light color and I think it's called Fashion Gray with Savage. I've also got a bright white background because there are times that I need white, but I like Fashion Gray because usually what I want to do is, I want to composite my portrait onto some other background.
See, I don't do that kind of stuff. I'm not smart with things like that. The other thing I like is these pop up backgrounds. And I liked them from Manfrotto there's other vendors who create them, but you may have seen these things before. They're like five feet long and they have two sides to them and they can be different colors. Some of them,
you know, might be a green screen. I don't, I do not recommend using a green screen because the color of whatever's on your background may come back on your subject. Yeah, and green, on a portrait, just really is. It's a pain to deal with later on. So save yourself some time and trouble. But I've got a couple of them.
One of them that I really like, and Lee's use this for her photography as well, is tobacco on one side and olive on another side and they look kind of distressed. Hmm. They've got like a textured look to them. There are others out there. There are some that are, look like brick, you know, red or white. There's some,
we have like a concrete or smoke look. And I know there's a Joe McNally version out there that looks like iron works. In other words, it looks like some kind of distressed metal. It depends on what your taste is and what you want to do. But I really like these now. Here's the reason why I say, go with Manfrotto rather the Manfrotto or Lastoite? Either way.
There they're both the same company. I forget which one knows the other, but look for Manfrotto or Lastolite collapsible background. The reason I like them is because they don't have wrinkles. I've bought a few from other vendors. And even when you pop them up, the material has wrinkles in them. And then you've got to deal with that. Yeah.
That's kind of difficult. I guess. You'd have to steam it and then keep it straight. Well, that kind of defeats the purpose of having a collapsible background. Yeah. So it was like, I supposed to be ready to go. The other reason that I like Lastolite or Manfrotto is they have this little attachment that magnetically holds the backgrounds and you put it on top of a light stand.
It's kind of like a wide V shape. And there's like little magnets on either end. And you just put the backdrop up on that thing and click it, holds it in place. I don't know exactly what I cost. I'll put a link to it in the show notes, but this thing, if you're gonna use collapsible backgrounds, this thing is just a time saver. And also space is an issue because it doesn't really take any space to store.
Yeah. The problem with not having something like that, I've seen people. And actually, before I found this thing, I did this myself. You tried to hook the collapsible background, just sitting on top of the lightstand and it'll stay there. But then it'll slowly start to move to the side and then you want to move it back around. So it's,
you know, behind your subject, the way you want it to be. And then it slowly moves the other side. And you see what I mean by why the magnetic thing is a time saver because just getting that thing just right and making sure it doesn't move is a pain in the neck. If you don't have that magnetic holder. So I will definitely put a link to that in the show notes.
As far as backgrounds. Now, this is where I get to talk to Lee because she goes crazy with some of her backgrounds. And what do you mean crazy? You've got all sorts of books of paper backgrounds that you put down. We've got rolls of two-sided is the kind of rubber or whatever that's stuff is, is that vinyl, we've got a two sided vinyl stuff that we can put down the has interesting backgrounds.
And the nice thing about these backgrounds are they may look like it's marble or some other kind of material. That's very expensive. Well in a photograph, you can't tell the difference. No. And do you know what it is? Way cheaper than having to get marble or granite countertops installed for photos, because then it's still have to clean the kitchen. Thank you for saving me money.
You're welcome. Anytime. Setting up the background is really key because if you've got an interesting background, you're going to have a better chance of getting an interesting portrait. If you've got a dull, boring background, well, you better have a very interesting subject. Well, that's pretty much where I start not with my concept, but once I know what I'm doing with my background,
I get the, you know, the basics of the background in place first. Then I start building up the props around it and I'll often I'll add my subject in last. I just want to get a test shot. I'm doing more still life and food and products. It's obviously different. If you've got a person there, cause you know, with my stuff,
I get to move my subjects around that. You know, people get a little bit more testy if you just kind of start shoving them around and making them bend this way. That's true. I've tried that. So once you got your background set, whether you're doing a portrait, something that's vertical or whether you're doing a flat lay, it doesn't matter.
Just get your background set up. I really think for home studio, a seamless paper is fine. Collapsible backgrounds are fine. Now the next step is your lighting. We talked about using available light. I'm not a fan of available light for home studios, unless you have a home that just has a glorious window with wonderful diffused light coming in and you want to take advantage of it.
If you're on 500 PX, the most popular photographer out there is, he goes by the name, Sean Archer. He's a Russian guy and no that's not his real name. He does portrait photography with beautiful women in Russia using a big window in his apartment. And it has beautiful light. There's no nice... Small space. though. Very small space. I think we looked at this,
you set up the window. Yeah, he's got an extremely small space, but he's got beautiful light. And he started working with just, you know, a very basic and inexpensive camera. And now he's the most popular guy on that site. He's built himself a career off of having an apartment with a beautiful window. But that said I'm still not a fan of it because most of the places I go to don't have that kind of beautiful light and they don't have it consistently because as I said,
the sun moves Well. Yeah. I think if you're doing something a little more spontaneous, you know, if you're, if you're taking pictures of people in your home and you just decide on the fly, that that kind of thing could work. Cause there's the lights in your favor and it's let you just use what you've got at the time.
Now the nice thing about having a home studio rather than being on location is that you don't have to overpower the sun with your flash. In other words, you don't have to go spend a lot of money on a big powerful flash, your little flash that would normally go on top of your camera, which is absolutely the wrong place for it, will do fine with,
let's say a large shoot through umbrella or a large bounce. You don't have to go spend a lot of money to get started. You can. And I, unfortunately I have, but I've got different soft boxes, but you know what, a big, beautiful source of diffusion for light coming through it, nobody is really going to go look in there and say,
Oh, you didn't use, you know, the perfect soft box or Octa box. Yeah. If it does the job, it does the job. If you're starting off, I would just get a really big umbrella. And I don't like umbrellas outdoors because the winds will take them any which way they want to go. Indoors, you don't, hopefully you don't have a breeze coming through.
You can just set that up. It doesn't really matter too much. There, there are people who will get a big bounce umbrella. So in other words, it's got like a black lining on the outside of it. You shoot your flash into it. And then there's a diffusion on the bottom part of it. That is the diffusion that goes towards your subject and is basically a cheap,
soft box, but it creates beautiful light. I know Lindsay Adler, I've mentioned her a few times on the show. I look at her lighting setups in, she's got a Profoto rig with this big umbrella with diffusion on it. And I thought, okay, that's probably the most expensive umbrella you can buy if it's got a Profoto label on it.
But you know, you can also buy one from Godox and it'll do just a great job and same thing with Adorama. They've got a line of products as well. You can look around and find some inexpensive light modifiers. Yeah. If he's the collapsible mesh laundry hamper before outside to diffuse some partial lights, it was what was there. I looked around the garage door was open.
I was like, Oh, that will do some clothes pins. I pinned it up on to... I don't remember what I pinned it onto, but I just needed to kind of rig it up. So I didn't have this glare. I've used a white bed sheet before, because it may sound surprising, but you know what? That creates a large soft source of light.
You can put a couple of flashes behind that, stretch it out over a C-stand with an extension arm and to your subject, it looks like you've got a big eight foot light source where you're just simply shooting a couple of flashes at it. And the light is getting diffused by that. And then going on your subject, that'll give you better light than probably some of the soft boxes that I've bought and paid for.
If you have room, you may want to think about adding another light. And there's a couple of places where you can add lights. One, you may want to have something that's coming up under your subject's face. In other words, this is called clamshell lighting. We've got one that's overhead. That's your main light. That's going to be the brightest source of light.
That's coming at your subject and underneath at a lower power, you may want to have a light or you could also use a reflector, to bounce some of that main light back up. And that adds a bit of fill. So you don't get those dark shadows underneath the person's chin. Another option is to use a hair light, or a background light.
In other words, think of your subject as sitting in the center of a clock. Maybe you have your key light next to you at probably if it would be four o'clock. So on the opposite end of that was at 10 o'clock. You might want to put another light there just to give a little bit of separation and a little bit of highlight on the subject's
shoulder and hair, and that's really create some beautiful light. It creates some depth between your subject and the background. And if you're compositing, like I said, with the gray background, that little separation makes it easier to cut them out and put them into something else. Would the lights coming from behind be like a lower power softer light? I would think so.
Yes. I mean, typically the key light is the brightest one that I'll have, because I want to draw attention to their face. You want to draw attention to the part that's where you're drawing the eye. Yeah. That's where I want my brightest light. There are times that I will do something really silly looking. I will get the biggest light source I have to use as a fill light.
So in other words, it has a lower power. So that way the overall body and clothes or whatever I'm shooting is visible. And then right in front of that, I'll put a much smaller light just on the person's face. So their face is brighter than everything else. And that, that kind of draws your eye into that person. But these things depend upon how much space you have.
You can work with one light and move it around, get some ideas of what you like and where things work best. Some people like having the light source on their left. Some people like having it on the right. I've seen people put it over the person's head and just kind of in front of them. So in other words, you get the softest quality of light coming out of the edge.
So if you had a big soft box that you put over a person's head, you wouldn't put them dead center of the soft box. You'd move that so it's in the space between you as a photographer and them, and just the edge of it right over their head. And that kind of gives you a softer light coming out of that. That's interesting.
I guess you can play around with it as you do it more, you start thinking of, or trying different things out The idea for a home studio, you don't have to go crazy with light. And it doesn't have to be a permanent location in the house. I mean, for both of us, we set things up and then we pack them away.
It wouldn't be practical with the space that we have. Well, it's our living room. I mean, we don't want to have C stands and everything else up there. If we have to go out the backyard to feed the dogs, it would be a pain to try and move a roll of seamless paper. That's blocking the sliding glass door to go out the patio to feed the dogs.
Yeah. Well, same with the dining room table, could you imagine if you're late for dinner, first two people who get there, get a seat through us. I'm sorry, studio's and the way on the floor. So don't feel like you have to have a permanent space. You don't, you want something that's quick and easy to set up. And that's why I'm kind of really recommending probably the collapsible backgrounds.
I liked them best or a very quick small roll of seamless paper. It doesn't take that much time to upload them. I'll like I said, I'll put some links to some of these products in the show notes. Also just a practical thing to talk about, like where you set it up, you know, most homes, unless you live by yourself with your own space,
there are other people who live in the house. There's going to be traffic flow. Just be mindful of how that's, whether you're going to be in the middle of some kind of traffic flow. If there's dogs that go through, if it's like a room that kind of where you can have people walking up and down, just make sure that everybody knows.
Cause that's also frustrating when you're busy doing something. I know I was set up once on the kitchen Island and then suddenly everyone was hungry and wanted to come and get a snack and something cold out of the fridge. And it was kind of, I'm standing there looking, I mean, nothing really got bumped, but it just kind of put me on edge.
Cause I was looking at all the stuff that was set up and thinking of it. And that's a very good point because I thought that was our kitchen. I didn't realize it was the studio at the time. And that's what I thought about the living room. Yes, same thing. Alright. The last item I want to talk about a props.
Props can be anything. It really depends on your subject, your story. We were talking just last night. About the next time we do a shot, we could use a kitchen, dining room chair as a prop. You know, you can have somebody sit on that. You can have someone turn it around and sit over it backwards and fold their arms across it.
That gives you your profit. Maybe you need a little attitude with somebody out of it, but also things that maybe the subject holds, maybe they something, they were, we were looking at some other portraits. We saw a man sitting in a chair, smoking a cigar. And just that cigar kind of gave him some attitude. Yeah, it was just really a good look.
I mean, he was well dressed in, you know, a suit and size sit in the chair, but he had just a bit, a bit of attitude about him. I don't think it would look quite the same without the cigar. It was the way he was sitting and his expression. He kind of looked like he was sitting somewhere where if he wasn't supposed to have that cigar,
but he was having it and enjoying it. And he was doing it quite boldly. And neither one of us are smokers. I don't really want a cigar in the house, but I gotta admit, I liked the look that came with that portrait. You never know what the problem may be. And sometimes the prop is not something that your subject is holding.
Sometimes it's something near them. I look at some props where they have like these old studio lights, you know, the big fresnel things. The lights don't really work, but they just kind of bring them in to give you this vintage 1940s type of style. And maybe there's a chaise lounge that they put in the portrait for somebody who's leaning back on it.
I don't know if, if anybody has that much space, I don't have a place to keep that kind of a lounge around here. But sometimes the things that you already have in the house, you can be used as props. And that can look really good. Start planning on, you know, what you can do with the background around someone. You maybe you do have a nice chair.
Maybe you do have a great little side table or something that you could use as the display. If you're, maybe you're not doing a portrait, maybe you are and you want to put somebody in front of it. I would not recommend going off and getting a bunch of furniture to use moving in and out of your house as props. But it is cool when you see a really nice piece of furniture.
There's the guy I know who owns the portrait studio nearby. And he has this golden throne. It's just big. It's large. It's wicked. It's right in your face. Yeah. But then do you know, I was just thinking you don't want to go and buy pieces of furniture or maybe you've got space and stuff. But having said that if have a signature look and maybe your prop is the one thing that's present in all your photos and that's kind of,
that's your thing. That would be a different story. So maybe if all your models are seen, you mentioned the gold throne. So maybe you've got a red velvet chair and that's what everybody's setting on. Then that would be something where it's that one thing, that's your signature. I could totally see somebody investing in that and saying, okay, you know,
this is the standing prop for my photos. I change the background, change the model, put a dog on there from time to time. You know, you can do so many things. Yeah. If you've got one prop, you would invest this like me with those wood planks that I got those wooden boards, those feature in a lot of my photos.
And it's kind of became my thing. When I was doing health food photography, that was the background for everything. And I dress it up and bringing different little accessories in there, but that was the background. You know, and that's a good way to do a portrait series. So for example, a few years ago, Scott Kelby wanted to do a portrait series of photographers who are also musicians.
And he did a very simple thing. He set up a couple of light stands, put some muslin down, which is kind of a nice lightweight cloth and just set them on a chair with their instrument, maybe guitar players playing or something. He just did a sepia kind of post-processing on them. And he did a series of portraits of people who play instruments.
And that was... it all worked together. So you can do the same thing. You can come up with concepts, you can do hard lighting. You can do soft lighting. You can have the same set for everybody, or you can try and mix it up, you know, because those seamless rolls of paper or the collapsible backgrounds, you can get in different colors and styles and textures.
And those aren't the only places to look. There's a place called Denny Manufacturing, D E N N Y manufacturing. They have a ton of different props. They also have a ton of different backgrounds and even floors. They've got these little floormats that you just roll out as rubber, but they look like different... or floors with different textures and different materials on them.
And you can do the same thing with backgrounds. There are places where you can rent a canvas rather than buying one. So Gravity is one place. I know that the big place in New York that everybody wants is from Sarah Oliphant and she does rent her canvases out. She's not cheap, but I'm telling you, she is like the source that everybody goes to.
I mean, when you do the Hollywood portraits, they get an Oliphant of painted canvas back there behind it. I mean, she's high end. And I got to say, the quality is just simply outstanding. And I remember watching a video of her painting this stuff, and I thought she's just good old fashioned Southern girl up in New York city wearing her clogs and painting backgrounds,
but she's a beautiful artist. So that's our idea of how to create a home studio for portrait photography. We think that it is a wonderful idea. Particularly today. I'm old. I don't feel like going to a lot of places. I love it. I it's just so much easier to develop. You evolve into your own type of style, I think without having to consciously work towards it and have it obsess you when you're shooting in the same place regularly.
You'll kind of form your favorite props that kind of always cave in somehow that forms part of the foundation of developing your own signature look. You know, I don't think this is always something that gets planned. It certainly wasn't in my case, but my photos kind of grew into a very consistent, there's a look about them, even though they're so different.
There's a look, there's a consistency. And one of the other really nice benefits we didn't talk about is if you don't have to go any place, you're much more likely to take more photos. Oh yeah. Thank you so much for joining us on. I Like Your Picture. Show notes for this episode are going to be at Williambeem.com/episode227. And please let us know your thoughts.
If you like this, if you've got some ideas you want to help somebody else leave a comment on the show notes. Finally, I just want to say thank you so much for listening to us. We would really appreciate it if you would subscribe to us on Apple podcasts on Spotify, there's going to her Google Play is another one. We've got links on our show notes page.
So please visit there. If you're listening on your mobile phone right now, go ahead and subscribe. Thank you so much. We'll see you again next week.
Related Links