Affiliate Disclosure: We earn a commission if you purchase through one of our links at no additional cost to you.
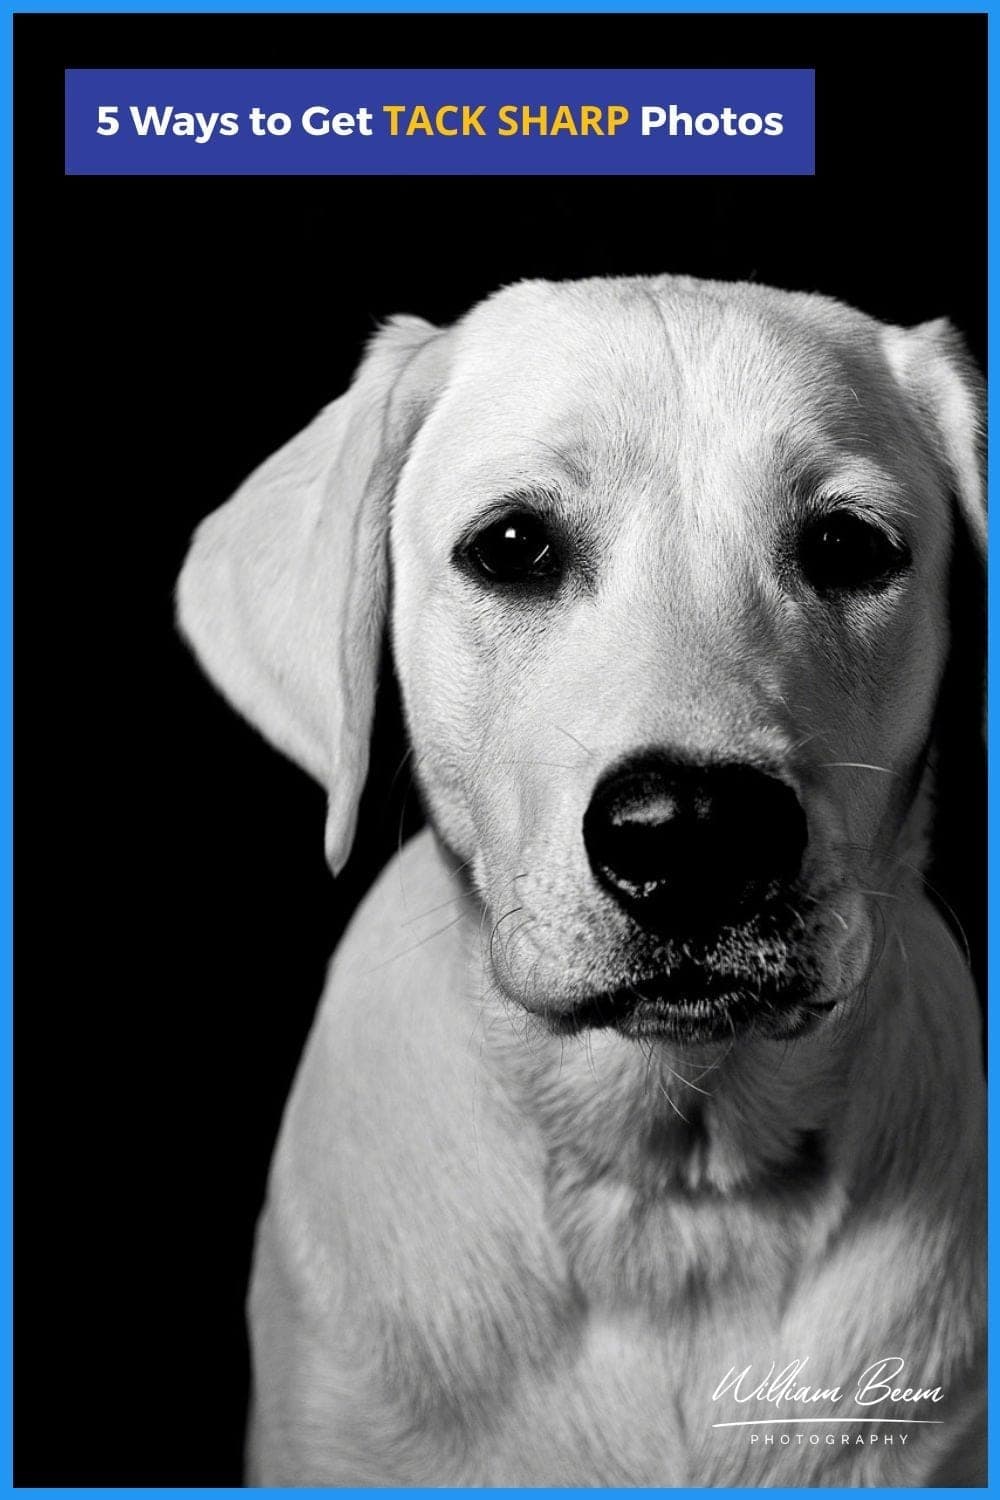
If you want to get tack sharp photos, you’re in the right place. We’ll share 5 ways to get tack sharp photos to ensure your subjects pop out and grab your viewers.
You’ll know why it’s important to get tack sharp photos, but also understand why not everything in your photo has to be sharp.
This Human Psychology Fact Explains Why You Need to Get Tack Sharp Photos
What’s the objective of a headline?
To get you to read the first sentence in an article. That increases the odds that you’ll get the message.
Photographers have the same challenge. We want to get you to look at our photographs, but we don’t have headlines.
So what can we do?
We related to a couple of simple facts of psychology to draw your eye where we want it.
There are a couple of things that draw in the human eye to get attention.
1: Were first drawn to light, so we brighten the subject in our photos.
2: Right after light, we’re drawn to sharpness and detail. That’s why it’s critical to get tack sharp photos of your subject area.
Brightness and sharpness. Those are the tools you have to get attention to your subject. Writers have headlines and use them all the time. You should use your tools to get attention, too.
Get Tack Sharp Photos with Ease
The good news is that it’s not hard to get tack sharp photos. All you have to do is pay attention to a few details. After a while, it feels like second nature.
Here are five things you can do to get sharp photos.
1: Watch your shutter speed
I love some motion blur, but that’s not always the right thing for your photo. If you’re working handheld with your camera, you have to be aware of how your trembling hands can magnify blur depending upon your focal length.
Here’s a simple rule to help you keep sharp photos. Your shutter speed should be no lower than your focal length.
So if you have a 50mm lens, make sure you have a shutter speed of at least 1/50th second to compensate for your shaky hands.
2: Choose the right lens
This advice has two aspects. Some lenses are sharper than others. Some apertures on a lens are sharper than others.
You’re going to find out which of your lenses are sharpest by trial and error. The cheap Nifty 50 that so many photographers love may not be the sharpest lens in your kit. Maybe it’s your 35mm or another lens.
Some of these old lenses don’t have the best auto-focus, so you may get better results with manual focusing.
While you’re checking out your lenses, try different apertures. On most lenses, it’s the aperture in the middle of the range that offers the best sharpness. So while I love my f/1.4 primes for their glorious bokeh, those aren’t always the sharpest apertures on the lens. Neither are the really small apertures that give the deepest views in the depth of field.
It’s usually the boring, f/8 or f/11 that find the sharpest results.
Does that mean you shouldn’t shoot wide open or closed down? No, of course not. Use what’s creatively best for your story and subject. Sharpness is a tool, not the objective. Apply it creatively and effectively, not as an end to itself.
3: Use a tripod (or other support)
Sometimes you find that hand-holding your camera just isn’t practical. Finding a stable platform to hold your camera is often one of the best ways to get tack sharp photos, particularly if you need multiple, consistent results.
I love my Really Right Stuff tripods, but they’re on the expensive side. They can also be a pain to carry around in some places, too.
That’s why I like some tripod alternatives, like the Platypod Ultra or Platypod Max – things that can slip into a pocket. Also, my Manfrotto Magic Arm and Super Clamp allowed me to get shots in some locations where tripods just aren’t allowed.

Tired of lugging a tripod around?
The Platypod Ultra is a compact and versatile tripod designed for smaller equipment like mirrorless and compact cameras. It features four heavy-duty spike feet for grip in unusual places, a 20-inch cinch strap for strapping to poles, beams, trees, and other freestanding objects, and a carabiner for easy transport. With its compact size and versatile design, the Platypod Ultra is perfect for capturing those hard-to-get shots in any situation.

The Platypod Max is the perfect solution for photographers and videographers who want to travel light. This ultra-light, flat tripod weighs only 13 oz and easily fits into any camera bag.
Despite its small size, the Platypod Max is incredibly sturdy and can support heavy DSLR cameras and long telephoto lenses. The Platypod Max is a perfect choice if you want a powerful tool that won't weigh you down. To top it all off, they offer a 5-year warranty.

The Manfrotto 244RC Variable Friction Magic Arm is essential equipment for any photographer or videographer. This articulated arm allows you to mount your camera at any angle, making it easy to capture the perfect shot. The large locking knob makes it easy to adjust the friction and lock the arm, while the quick-release camera plate ensures your camera is secure. With a load capacity of 8.82 lbs., this durable and lightweight aluminum arm is a must-have tool.

The Manfrotto Super Clamp is the original clamp that has thousands of uses. No camera bag should be without one. The Super Clamp can hold just about everything, including cameras, lights, umbrellas, hooks, shelves, and plate glass.
The wide jaws of the Super Clamp make it easy to attach to poles, posts, tripod legs, pipes, doors, stands, and beams. If you can fit the Super Clamp around it, it will hold! This makes it an incredibly versatile and valuable tool for anyone who needs a little extra help getting their gear where they need it.
4: Use a flash
Your shutter speed is fast, but your flash duration is faster. What truly matters is how long you have a light on your subject, not how fast your shutter clicks.
A fast shutter speed is great when you cannot control the source of light falling on your subject, but what if you could?
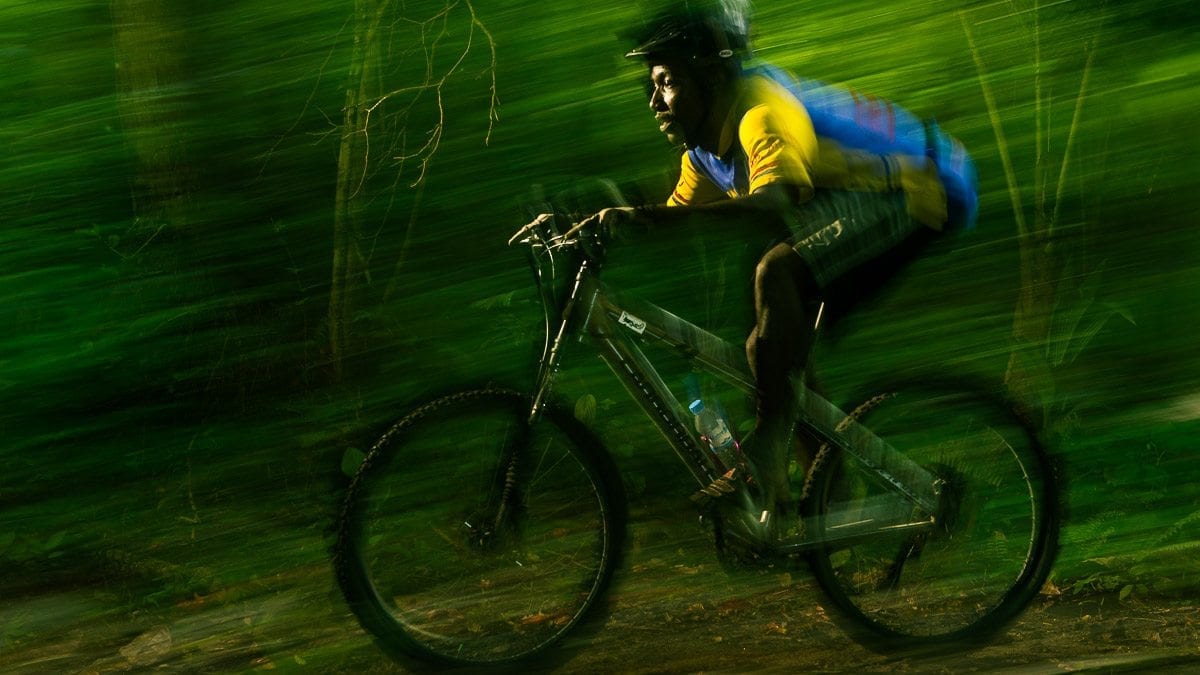
This mountain biker is moving downhill at a pretty fast speed. The idea was to show his motion by using a slow shutter speed and panning along with him. I used flash to add some sharpness on his face, rather than leave it as blurry as the motion.
You can identify the face of the biker because the flash hit him for an extremely short duration, while the slow shutter and panning give the impression of speed.
Not sure which flash to use? Check out my Resources Page to see which flashes and gear I used & recommend.
5: Sharpen in post-processing
I find a lot of photographers who forget this step, or perhaps they’re not sure how to do it. If you’re shooting in RAW, every photo needs sharpening.
It’s nice when you see a great image straight out of the camera, but that doesn’t mean it’s the best it can be. Sharpening in post-processing is essential to get tack sharp photos.
You may want to use a tool like I mentioned, Topaz Sharpen AI. It does an outstanding job of recovering detail and sharpening your post-processing.
Use coupon code WBEEMPHOTO when you checkout to save 15% on Topaz Labs products.
If you're a photographer, you know the frustration of trying to get a perfect photo only to find it blurry or out of focus. Topaz Labs Sharpen AI is designed to help you get tack-sharp images every time.
The software works as a stand-alone program or as a plugin with Photoshop or Lightroom Classic. By reversing motion and focus blur, Topaz Labs Sharpen AI lets you get the perfect shot every time.
Time Stamps
One thing a lot of photographers talk about is getting something that is tack sharp. And we've talked about this before. I think it was like episode 82 or something, but it's been a while. And I thought, you know what? This is a good thing to talk about again, is how to get tack sharp photos. So that's what we're going to talk about today on I Like Your Picture.
Welcome to I Like Your Picture. This is the show that helps photographers engage their imagination to create photos their audience loves. I'm William Beem. Along with my wife, Lee, we'll help you understand how to make great photos using your creativity, and some visual storytelling. Whatever type of photography you enjoy. I'm glad you found us. Hi, my name is William Beem.
My name is Lee Beem and of course, we're here to talk about getting tack sharp photos. And I guess I want to start off with Lee. What does that mean to you? When you hear the phrase tack sharp photos, You went to your, the edges that matter are the little details that matter to be completely in focus. And that's not going to be every single thing a lot of the time,
but you don't want to blurry photos. You don't want something that's kind of fuzzy or hazy, or just like, not quite. It almost looks like it was printed on a canvas instead of printed on something nice and glossy. Does that make sense? And the three things we want you to take away from this episode is why and when sharp photos are important.
We're going to give you some different options to get sharp photos in different situations. And we're going to talk about things that can mess up your tack sharp photos. So let me start off with kind of why, and when. It's kind of what Lee said, if your photo isn't sharp, it's not even so much of your photo, it's your subject. In other words,
where do you want to draw the eye? Yeah. And that's kind of the difference. Like you can have blurry bits in your photograph. A lot of times, you know, we like to blur the background by using a wide open aperture and we get that stuff that's called bokeh. But the idea is that you want to draw the eye. The human eye is drawn towards things that are brightest.
That's the first thing that grabs our attention. And the second thing is what's sharpest. So if you've got something blurry, for example, if you want to engage a portrait and you've missed your focus on the eye, you kind of ruin the entire photograph because we engage with people through their eyes. All right, let's go ahead and start off with some of the things that you want to look at.
And the first tip that we want to give is to watch your shutter speed. And Lee when you do your photos, shutter speed doesn't matter to you that much because you put your camera on a tripod and you've got a subject that isn't moving. You can use almost any shutter speed. You want. In fact, my shutter speed is almost always too slow for handheld.
And that's just because I am completely an aperture person. So if I do use some of those partly auto settings, I've always used aperture only. I have, I don't think I've ever used a shutter priority as a setting. And we're going to get to using a tripod a little bit further down, but the idea of watching shutter speed is if you're handholding or you're in some situation where maybe you don't have a rock solid surface,
like a tripod, because there are times that even if you're on a tripod, if you're in a high wind situation, which that happened to me in Las Vegas on top of the Stratosphere, you can't necessarily keep the wind away from your camera without blocking your shot. Sometimes depending on where it's coming from. And those vibrations either from the wind or from your hand,
holding the camera are going to affect you, if your shutter speed is too slow. The shutter speed will also matter. If you've got subjects that are moving. There's animals or birds, something like that. So that might be shutter priority might be a better call, but also think that you get to understand what shutter speed works for what. What kind of range most of the time in different kinds of lighting.
And when you do that, you're able to at least cut a guess it out and get within the range and then take a few test shots. It might take some experimentation. One kind of rule that goes with is that you don't want a shutter speed that is slower than the focal length of your lens. So for example, if you have a 50 millimeter lens,
you don't want to go slower than 1/50th of a second in order to be able to hand hold your camera and take some photos without the shutter speed, giving you a problem. Yeah. I don't think I could do 1/50th of a second hand held with no matter what lens. Well, it's a guideline. It's not gonna, it's not a promise that it's always gonna work,
but it's a guideline. So for example, if you have a telephoto lens, you're holding up, it's going to be more susceptible to handshake or vibration than a shorter focal length. And that's just the way it is. So, because you've got a narrow field of view and your hands are vibrating, it just simply shows it off more. So you're going to need a faster shutter speed if you're using handheld a longer focal length.
Yup. It's a lot also means you need more available light somehow or mess with your ISO. Okay. So here's the next one is choose the right lens. And we kind of have different thoughts on this one. There's a couple of different issues that come up with choosing the right lens. So let me start with Lee because she started off with just one lens.
And when someone said, choose the right lens, she kind of tuned out. I did. Look, I had one lens. So when someone, you know, I would be listening to a podcast or reading an article. And as soon as people came to how to choose the right lens, I kind of skipped over that part because it was irrelevant to me.
I just wanted to know what else I needed to do. I've got, I've got what I've got. So yeah, that was pretty much it. Cause it kind of irritated me when people started talking. Photography discussions used to be mean, I don't know if they're like that. They were so condescending. So if you said, Oh, you only had one,
it was almost like you're written off. If you don't have this lens, you never gonna make it. And I thought, okay, whatever, It's, it's still like that. And matter of fact, if you go to guitar forums, they're still like that. Basically when people get together on the internet and discuss things they get mean, but you know what,
if you get together with a group of people, they seem to be nice to each other. So meet in person. Face to face. When you're face-to-face, you don't have quite as many of those rude comments. I think people just think twice before they actually say something unkind to somebody in person, but that's a little off the topic. When we say choose the right lens,
there's a few aspects of it. Sometimes what I mentioned before with shutter speed is, it depends upon your focal length. So you may need to choose a shorter focal length and get closer to your subject to eliminate some of that shake and get tack sharp photos, or maybe it's your aperture. Different apertures are going to have different results. And there's a sweet spot on every lens for which part of,
you know, basically which aperture is going to be the sharpest. And it's usually going to be in the middle. It's not going to be on the extreme wide open or the extreme of everything in a very narrow kind of aperture. Now, the thing about using a small aperture like F/16 or F/22, you're going to have stuff that's in focus from front to back and maybe that's what you want.
It's not always what I want, but if you're looking for tack sharp, my thought is you want your subject tack sharp and the rest of it, you might want a little out of focus. And that's where you start looking and experimenting with each lens that you have to see where, which one is sharpest. Another item to think as not every lens is as sharp as every other lens.
So typically that little kit lens, the zoom lens that you get, it's convenient, it's inexpensive, but it's not the sharpest lens. And then Lee, you were talking about your little 50 millimeter that was inexpensive. Yeah. The little nifty 50, the cheap ones. And how you focus it made a difference on, on what kind of sharpness you got.
Actually, it's my favorite focal length. If I've got a fixed focal length, I love 50 and or everyone loves 35. I'm a 50 girl. I have a fifties girl. I'm a 50 girl. And I, I really love that lens. Now that is not a sharp lens. Also as far as the sweet spot. And I think with these lenses,
sometimes these old lenses, sometimes one lens will vary from the next, they're not quite as consistent. So where someone will go, Oh, my sweet spot range is over here. Honestly, it doesn't make a difference that much different. I mean, you get the aperture results that you would expect between F/1.8. And what is it F/22. I think it goes up to,
I don't recall. So I very quickly figured out, choose the apertura want, manual focus it. That little auto-focus. And I don't know if this is just because of my camera or how it kind of attaches and works with my camera, but that little lens does not have an inbuilt autofocus motor. So it uses the one on your camera, assuming you've all.
I think they all have one in built-in. Now I found for some reason that if you control it, wherever the sharpest focus is on that lens, that's just a smidge on one side or the other of where the autofocus takes it. In this case, we're talking about a Nikon lens and Lee and I are both Nikon shooters. The idea is that you can find a 50 millimeter lens for,
I think almost every camera brand. And you can find an inexpensive 50 millimeter and they're going to be kind of the same as far as what we're talking about. They may not necessarily be the newest model that's out. And that's part of the charm that they're because they don't have a lot of technology in them. And maybe you have to do things manually to get the best results from them.
But you can have a lot of fun with a 50 millimeter lens. That lens, when we're talking about choose the right lens, we're talking about the focal length. Is it going to have a good autofocus system that lands on something sharp or do you have to manually focus it? And what is the sharpest aperture on that lens? You get to know your lens,
like he gets to know your camera. Yeah. And honestly, I think it's easier walking around with a prime lens, like a 50 millimeter lens or the 85 than it is with a zoom lens. Because even with a zoom lens, you might start thinking, okay, I know this aperture is sharpest here at this focal length, but if I zoom out to something else,
is that still the same sharpest aperture? So you get into more math and calculation, depending about which focal length you're using with a zoom lens. With a prime lens. It's just like, Hey, this lens is going to have one focal length. I don't have to think about that. It's just, what's the sharpest aperture on here? Yeah. All right.
We mentioned before, use a tripod. That's number three on our list and it doesn't have to be a tripod, but we're talking about getting some kind of a steady or stable platform. Lee and I both like using tripods. We go out and take fireworks photos and she does her photography inside the house with available light, which means she's got a subject that isn't moving.
And she has all the time in the world really to take that photo. It'll like 50 times for the one shot I want. I don't know how many seconds it taking you with the light that we have in our dining room to take it. Maybe it's a second. Maybe it's a couple of seconds. Maybe it's less than a second longer than you can hand hold it.
Yeah. It's about, it's about two seconds is the average. But that also remember that it's not just the light we've got, I put things down in the light and then I start blocking light off. Whereas where I do it once it's Without a tripod, you'd have a hard time getting those photographs. Yeah. A tripod is essential. If you're a traveler,
you may want something like a Platypod. Those are little flat, aluminum stands. You can put a ball head on it. The nice part about that is that nobody gives you a hassle for having a tripod. I mean, as long as it's on the floor or maybe it's on top of a trashcan, you can strap them to a post or a tree.
They give you some accessories along with it. And you can put your camera in interesting locations. But with a tripod, there are people that just really freak out. Another thing is a Manfrotto, I think it's called a Magic Arm. It's a variable friction arm and a Super Clamp. And that's what it actually allowed me to get my photographs. When I went to a couple of locations,
one, I mentioned earlier, the going into the Stratosphere of the top of the Stratosphere in Las Vegas. And I remember in the line down at the bottom, you know, they have a security guard. The guy in front of me had a six inch tripod and she screamed at him. You know, no tripods allowed. It's very clearly marked. You cannot take a tripod up there.
So they confiscated that for him to go up there. And then I went in, she looked at my bag and she said, no, tripods. I said, it's not a tripod. And she looked at this variable friction arm. And I just remember seeing the flash on her face, like, Oh, okay, go ahead. Yeah. And that was a nice thing,
but it's not a tripod. So I put this thing on a rail and there's a high wind up at the top of the Stratosphere. And it was kind of shaking things back and forth. So it was more stable than if I was handholding it, but it's still, it's not perfect like a tripod is. Another place was at the National Museum of Air and Space in Washington,
DC. I came out and it's got railings around all of the airplanes. So I'd use the same thing. I clamped it on there. Security guard, came out and said, you can't use a tripod. I looked at him and said, that's not a tripod. He looked at it and he kind of agreed. He went back, talked to his boss. A moment or so later he came out and gave me a thumbs up,
says, you're good. Use a tripod is what our advice is. But sometimes you may want to use something that's a little bit different than a tripod because in crowded places, there are tripod police. Yep. And in a pinch, like let's say you're at home or in your yard and you're doing something, grab a bag of dried beans or some rice or something.
Honestly it works. I've done this in a pinch. I wouldn't probably go out and roaming around into parks and things with a bag of beans. But you Know what? They actually sell things like that. I mean, there's like a little beanbag you can find. My brother had one, he loved it. As Lee said, you could make it yourself. Yeah.
Why not? So beans, rice, whatever you want to put in there. But it's just like a bean bag for your camera. It'll hold things steady. If you've got something to put it on. And you can also get those little mini styrofoam balls. If you want to do that, if you don't want something, you know, that's food in there.
I know. Cause some people just don't want it because eventually it does get kind of like yucky. You can get the little, like this mini styrofoam, tiny little balls and they pretty cheap at craft stores. Or I wonder if the airport security would pull you aside, if you had like coffee beans inside? Because like drug smugglers used to be known for using coffee beans to kind of cover the scent.
Oh, I came back from San Francisco with a bag of coffee beans. I didn't really think about it. I didn't bother about it. It was in my hand luggage because it was a gift. Yeah. But it was in a coffee bag. It was in a brown paper bag because well, it cause he Right. He roasted his own beans. Sorry, we're off on a side discussion again.
If you want to use coffee, beans, Pinto beans, we don't care. As long as they're dried beans, I wouldn't use cooked beans. Coffee beans is a kind of expensive way to balance your camera. Pinto beans are cheap. Yes. Probably number four on our list, use a flash. And the reason we talk about this is a flash has a very short duration.
So you think about normally hand-holding a camera, you're in available light. It's the shutter speed that matters. A flash is going to have a fraction of the time used to flash it. Then you're a shutter speed. So therefore you're not really relying on the ambient light. You're relying on the speed of the flash. So that's just something else. And for example,
when I went on a flash workshop, Joe McNally had an advanced flash workshop at St. Lucia at one time. And one of the photographs that he set up or lessons that he taught was on using flash to get some mountain bikers. So guys come zooming down the trail on the mountain and we would have a very slow shutter speed. And we would pan with them and then use a couple of flashes,
strapped together to freeze part of them in. So I could see their face, but the rest of them looked like a blur. Of course it was an advanced technique. So it was, it was really nice. But without that flash, all we would have had was just blurry people. Proof they were going fast. Proof they were going fast.
You know, creative. Interesting. But you can't see who it was. You throw a flash in there and it could be anything that's in movement. And you just get the light on just where you need it on the subject. And you can freeze them because of that short duration of the flash. The last item on our list. Number five, sharpen in post-processing.
Yes. A lot of people skip this. I don't know why. Every photograph needs post-processing. If you're shooting in RAW, you don't have a photograph. You have a database. If you're shooting in JPEG, your camera is applying the color and the sharpening in there. A lot of people will say, shoot in RAW. So that way you're in charge of how the photograph gets processed.
I don't really care what you do because it depends on your genre. If you're a sports photographer, you don't want to have slow RAW photos taking up your buffer and your time, because you might miss some of the action depending upon your camera. Doing some sharpening as your JPEG. You know, maybe that's the right thing to do, but keep that in mind.
If you're shooting in RAW, then you need to have some kind of sharpening. Now there are a number of tools. You can do this in Lightroom. It does a very good job. You can do it in Photoshop. You have a tools from Topaz. I'll put a link to one of those in the show notes as well too. And it's like Topaz,
Sharpen AI, I think. And I've got that. It does an amazing job. I can take something that's actually out of focus and make it look like it's sharpen and clear, and in focus. Whatever you do, make sure you've got some sharpening in post-processing because otherwise you're just going to lack that tack sharp image that everybody's looking for. Yeah. I've got a bonus
one. Bonus tip. Bonus tip is not number six. Cause it's just bonus. I'm quite serious about this. Get into a habit of always wiping your lens before you take photos. I do this with my phone as well. In fact, it's become such a habit. That's when I opened it because I've got a little slide thing that covers the camera lens at the back.
I flick it open. The first thing I do is wipe it before I even framed for the photo. It's second nature. Speaking of phones, this kind of, I can highlight it by what happened when everyone was bragging. When the first iPhone came out about how wonderful these cellphone photos are, what quality and they were a better than the competitors. Eventually I got an iPhone,
And I looked. I thought these are the most like crappy photos I've ever seen in my life. They were not sharp. They were kind of cloudy. And misty. I kept cleaning the lens and nothing helped until one day I was sitting in the light and I caught a reflection and realized it was a plastic protective film. Where it was fine after I took, it's not funny.
But the point is like, you don't know what's on your lens. Cause something tiny is going to magnify and there's little specks of dust or maybe a bit of fingerprints or maybe some, they just like tiny, tiny things that You aren't really visible, but they actually impact the clarity. Right? I think that it is funny. Why? First off, because I'm a guy and you know what?
When guys get electronics, one of the most satisfying things they do is peel off the little plastic film protector over the, like the front screen. And if there's one on the back, on the lens of the peel off, they'll find that too. It's like, I don't know what it is. We just really like peeling off that plastic. Yeah.
I don't, I'm definitely not a guy. No, you're not. And I wouldn't have married if you were. Good. Hey, those are our five tips plus a bonus from Lee and she's absolutely right. That if you don't keep your lens clean, you're possibly going to have some smudges or something. That's going to keep you from getting your tack sharp photos.
Hey, that's all we've got today. Except a reminder that I have a course called Luminar AI Elements. If you are a Luminar AI user, please go ahead and check it out. I'll have a link in the show notes or you can go to WilliamBeem.com/courses and see it there. If you don't have Luminar AI, you can use my coupon code.
BEEM, that's my last name. And that'll save you $10 off the price. And also if you send me your receipt, I'll give you the course for free. So just something to keep in mind. Thank you so much for joining us on I Like Your Picture. This is episode 253. So show notes will be at WilliamBeem.com/episode253.
And I hope you're enjoying this. This year, we're actually trying to get back to a little bit of fundamentals, but also get into some of the creative things that help people take better photographs. So we're going to continue on this track. I would love to have your feedback and comments. Just go to the show notes page, let us know a comment.
And if you have a question or an idea for a future episode, you can leave it there. Thanks so much. We'll see you again next week.
Related Links
These products are the tripod alternatives mentioned in this podcast episode. The Platypod Ultra and Platypod Max are of different sizes. I own both and typically use the smaller Ultra, but there are times when the Max works best – typically for landscape or wilderness.
The Manfrotto Magic Arm and Super Clamp go together and are a handy pair. I have this set up in my home office to hold my Nikon Z50 attached to my desk and over my monitor to use as a high-quality webcam. This is the rig I mentioned using at the top of the Las Vegas Stratosphere and inside the National Air and Space Museum.