Affiliate Disclosure: We earn a commission if you purchase through one of our links at no additional cost to you.
I wanted to share this Lightroom Classic workflow to help you develop your photos in a way that provides the best results and saves you time. Many people use the Develop module from the top panel and work down to the bottom.
Then some folks like presets. Personally, I’m not a fan. There’s an annoying problem with Lightroom presets.
If you have a specific look for all of your photos, or just a large batch, then I think presets make sense. However, slapping some random preset on a photo for style seems to deprive yourself of the opportunity to make the most of your photo.
Unfortunately, Lightroom Classic isn’t laid out in a thoughtful order for people to develop their photos. There are three major types of adjustments that you need to make. If you do them out of order, your results may ruin some of the work you already performed.
Tonal adjustments tend to affect colors. Lens correction or straightening photos may ruin your crop.
That’s why I developed the Lightroom Classic Develop Workflow checklist.
How Do You Prepare Your Photo for Processing?
I mentioned there are three major sections of your Lightroom Classic Workflow. The first one is to prepare your photo before actually processing it. That includes some steps you may have considered and perhaps a few you didn’t think about.
Let’s get started!
1: Check the Process Version
Instead of starting at the top of the Lightroom Classic Develop module, we’re going straight to the bottom.
Adobe occasionally updates the Process Version that Lightroom and Adobe Camera Raw use to process your photo. However, it doesn’t automatically update for some of your older versions.
If you uploaded photos to Lightroom Classic a few years ago, you may be using an older, out of date, process version. That version changes some of the tools available to you in the develop module.
Here’s a view of the differences between Version 1 and Version 5 (current as I write this article).
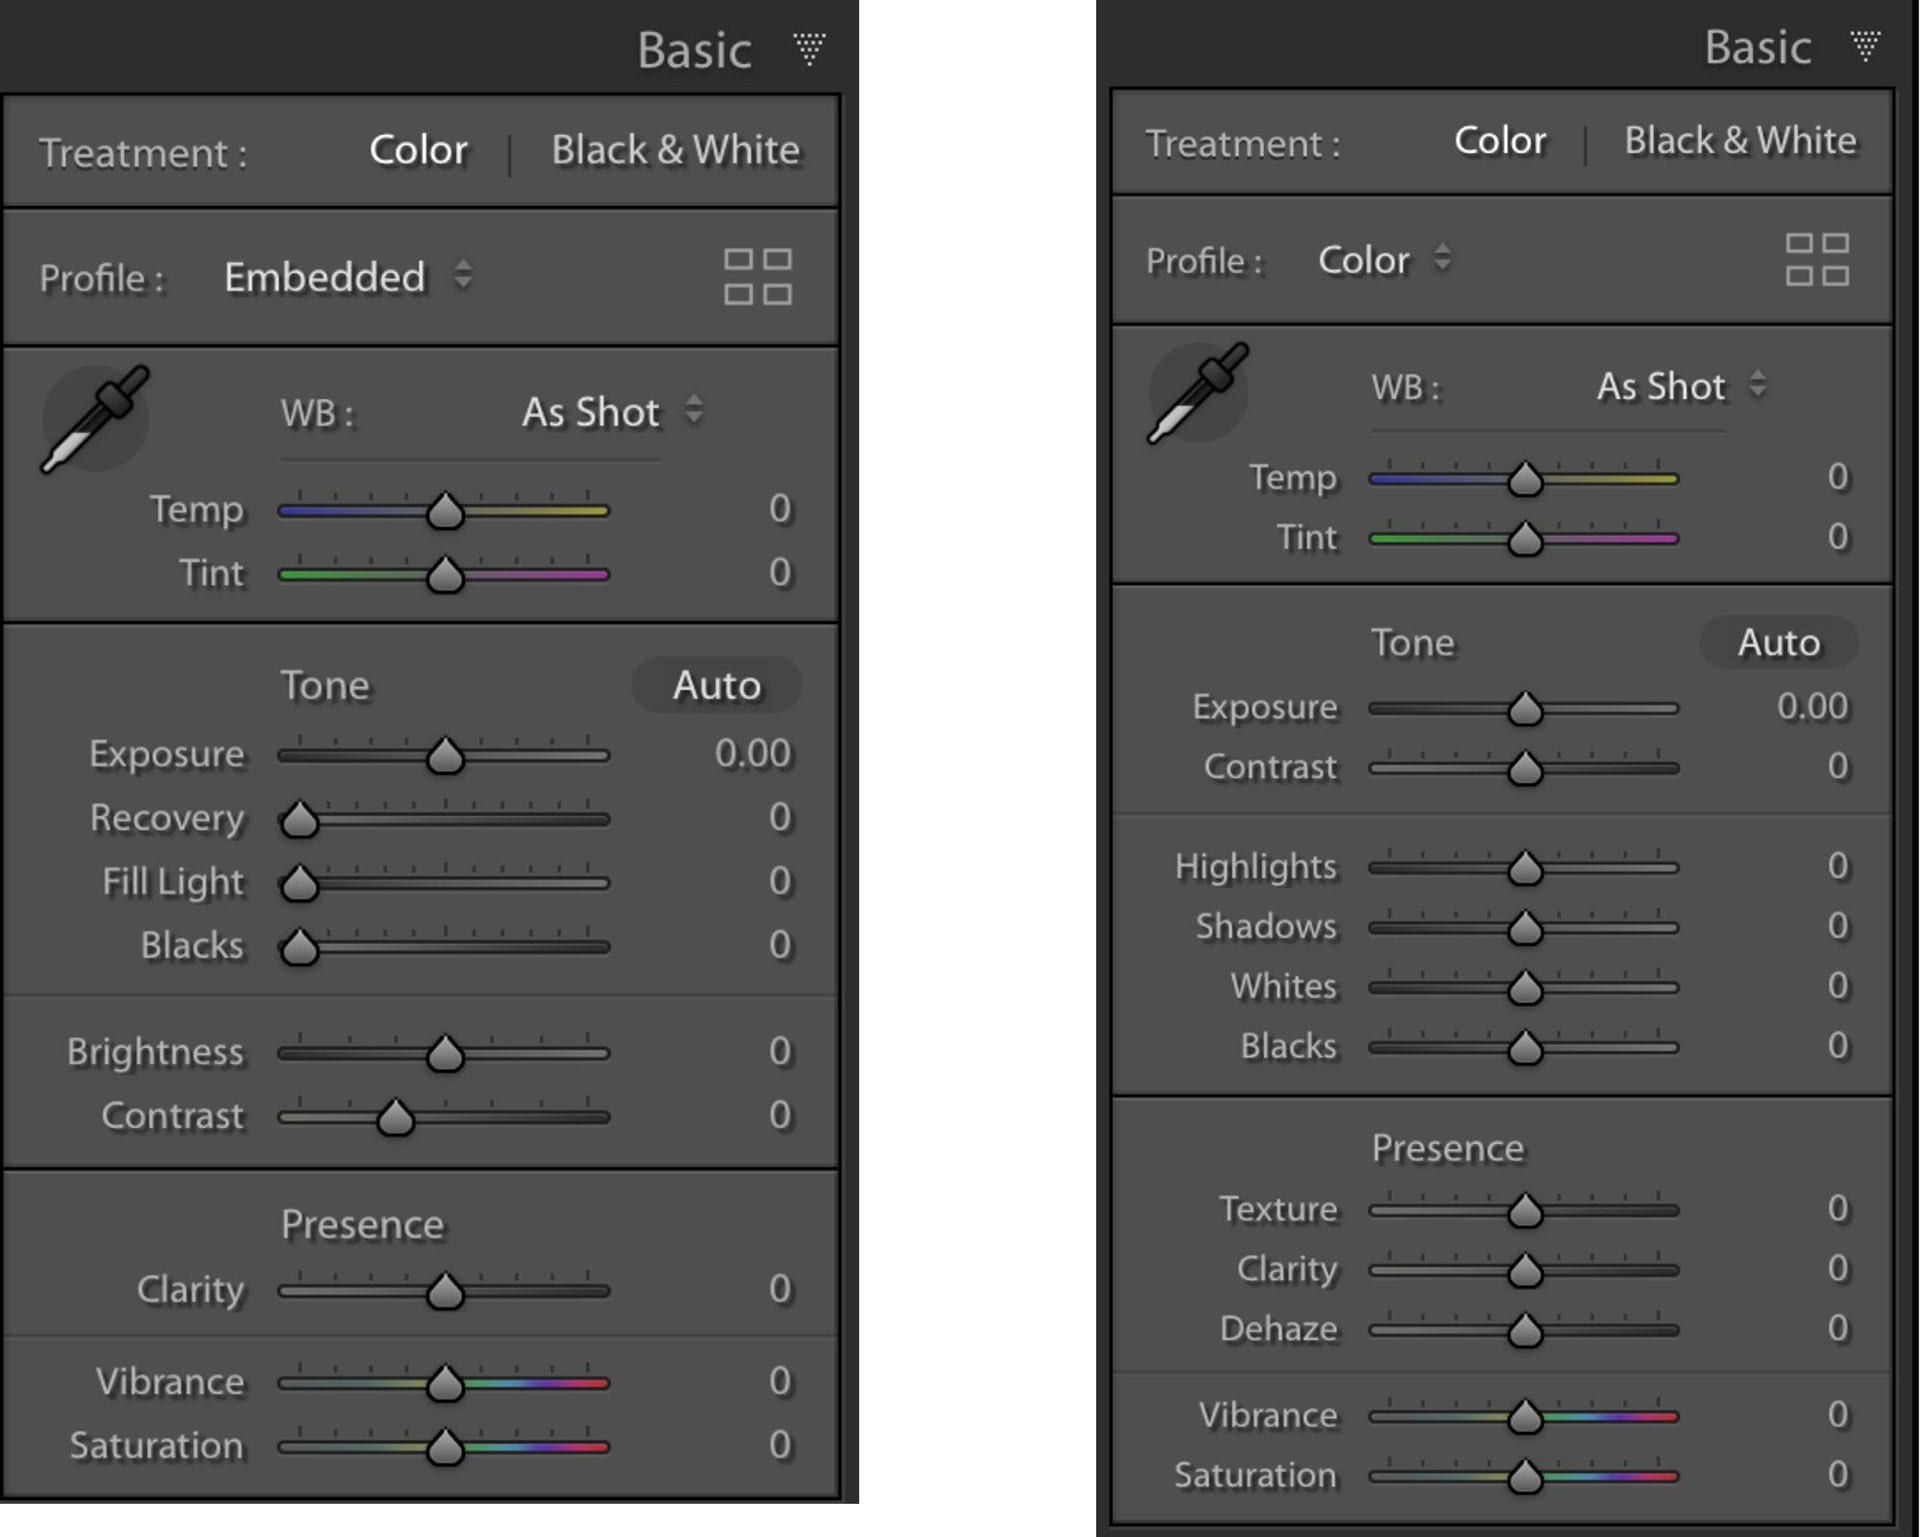
The panel on the Left is from Version 1 and the panel on the Right is from Version 5. Notice that the sliders are somewhat different. Adobe adds or changes features in Lightroom Classic and ACR every time it updates the Process Version. Some are visible changes, like the sliders and options you see in the panels. Other changes you don’t see immediately, but you may see their result in RAW conversion.
Adobe works to improve the algorithms it uses to process your photos. Years ago, Noise Reduction wasn’t so great. Then Lightroom Classic had an update that astonished us with its results.
To change the process version, go to the Calibration panel and select the Current version from the first dropdown box.
2: Set Profile to Adobe Standard
If you plan to take charge of developing your photo, and I recommend you do, then go back up to the top of the Develop module and select the Basic panel.
In the second section, you’ll see the Profile options. There are a couple of options here. The one I intend for you to use is the first option next to the word Profile. I recommend using Adobe Standard in this selection. It may be there by default.
There are other options, including:
There may be other options that you can add, or you may not see these if you’re looking at a PSD file. Think of these options like the Auto settings on your camera. They apply different post-processing results to your photo. You may even like some of them.
I prefer and recommend Adobe Standard because it’s relatively flat. That’s a good starting place if you intend to develop your own photos. You don’t want added contrast or saturation applied from some of these other Profiles if you’re going to develop your own photos to your taste.
Next to these options are four squares. Those are different types of profiles with more options than the ones listed above. Adobe adds more categories and profiles, and other vendors can offer these. They’re like presets. You may like them, also.
However, they change the color and contrast of your photo and that’s not a good thing if you want to do it yourself.
3: Set Lens Correction
All lenses have potential for distortion and chromatic aberration – those little purple & green fringes on the edges of objects in your photos.
Visit the Lens Correction panel next and check those two boxes. The odds are good that Lightroom Classic will automatically detect the Make, Model and Profile of your lens.
When you apply these settings, you’ll see a quick change in your photo. The photo may seem to stop bowing or snap upright a bit, even if you didn’t notice those problems in your photo before making the change.
That means it’s also changing how the pixels lay out in your photo. Good to fix these problems before making the other changes below.
4: Adjust Transform (for architecture)
The Adjust Transform tool is optional, but recommended if you have buildings or architecture in your photo.
You can correct lines and geometric shapes with perspective correction using Transform. You may not need this step for photos without architectural subjects. Correction perspective may dramatically warp your photo, which you’ll want to do before taking the next steps in your Develop module workflow.
Open the Transform panel and start with the Auto option. That works very well in many cases.
However, there are times when you need the human touch. Use the Guided option to show Lightroom lines that should be straight (building edges, stairs, rails) and it will start transforming your photo.
You may need to use the sliders to adjust buildings that you took at an awkward angle, transforming them into a view that looks like you were centered in front of it.
5: Straighten Photo
Open the Crop tool (type the letter R) to Straighten your photo. You can select Auto or drag the slider to adjust your photo’s angle. For example, you can correct horizon lines so they’re straight.
Bodies of water should not tilt to one side or the other. Ignore this step if you took a photo with an intentional angle for an artistic or dramatic impact.
6: Crop Photo
After straightening your photo in the Crop panel, it’s time to select the crop you want.
You can change the Aspect Ratio to one of the preset options, or make your own freeform crop.
You can also use the Crop panel to reframe your image. Use the “o” key to change the overlay grid to show different artistic guides.
Now that you’re in the Crop tool, you can see why a lot of the steps above were best performed before you cropped your photo. Some of them changed pixels in your photo, which may have ruined your crop and caused you to go back a few steps.
7: Use Spot Removal
This is the last step in the Prepare section, but an important one.
The Spot Removal tool is the first item to the right of the Crop tool under the Histogram panel. It looks like a circle with an arrow on its right side. There are two Brushes, Clone and Heal.
Clone allows you to click the spot to remove, and then it shows a circle you can drag to another area of your photo that would be a good selection to use when replacing the spot.
The Heal brush selects color, texture and light near your spot to replace the area you click.
When selecting the Spot Removal tool, a checkbox opens on the bottom row under your photo. The Visualize Spots tool changes your view to a black-and-white view, making it very easy to identify dust spots on your photos. Use the associated slider to adjust the view. You may need to move it more to the right to see some spots.
Here’s a tip I like to use. In the Navigator panel on the Left side, change the view to 4:1 and move the view box to the upper-left corner. Now you have an up-close view to inspect for spots. When you’re ready, hit Page-Down to move down the image one section at a time.
When you get to the bottom, hit Page-Down again and Lightroom will move the box up to the top and over to the next section. Keep repeating this until you’ve analyzed the entire photo closely to identify and remove spots.
Process Your Photo for Color and Tone
Now that you’ve done the work to clean-up your photo and get it in the right size, it’s time to start processing your photo for color, tone and exposure.
Some of these adjustments affect the results of others. That’s why we establish a base image with White Balance and Exposure, and then work with Contrast and Tone curves before doing more color adjustments.
1: Adjust White Balance
Hit the letter “w” to select the White Balance tool. White Balance is a tool that allows you to correct for colors that are too warm or cool in the photo. Of course, you can also use White Balance for creative effect.
Use the eyedropper tool to select a neutral grey spot in your photo (not White or Black) to adjust the white balance to a neutral color range. You can choose preset White Balance options in the panel, or move the sliders to your preference.
2: Adjust Exposure
The Exposure slider allows you to choose or remove brightness or darkness in your photo. With a RAW image, you may get up to 5 stops over or under the exposure you captured incamera.
If you feel the image is too dark, move the Exposure slider to the right. Likewise, move Exposure to the left if you feel it’s too bright. There’s no right or wrong. It’s up to your taste.
One caveat I’d mention here is if you want to use selective exposure to draw the eye to your subject. I think it’s a great idea. In that case, you may want to slightly dim your overall exposure so your selective exposure to brighten a subject has some room to breathe. Radial filters (discussed below) are great tools to use for this purpose.
3: Apply Contrast or Tone Curve
The Contrast slider changes the ratio of Dark and highlights in your photo. Move it to the right and the Darks get darker and the highlights get brighter. Move it to the left and those contrasting differences reduce to achieve a flatter result.
If you prefer to use the Tone Curve Panel to have a bit more control of the contrast in your photos, this is the best place to use it in your Develop workflow.
4: Apply Local Adjustments or Graduated/Radial Filters
Now that you’ve performed the basic global adjustments, it’s a good time to make any local adjustments you like. For example, I often like to brighten selective parts of an image to draw the eye. Sometimes I use a Radial filter to brighten a face, or a gradiant filter to darken the sky.
Radial filters are some of my favorite adjustments. As I mentioned previously, I like to use Radial filters to brighten selective parts of my photo. Sometimes I use them to enhance Sharpening or Clarity. That’s because the eye goes to the brightest thing in your photo first, and to the sharpest thing second. It’s a great tool to help your viewer.
You may have a situation where you need to use a Local Adjustment Brush to change colors in a specific region, apply smoothing or texture to an area, etc. I use local adjustment brushes to whiten teeth, enhance the color in an iris, brighten eye whites and even apply makeup on some of my subjects.
5: Apply HSL/Color Adjustments
The HSL/Color panel allows you to tweak some colors specifically. You can change the intensity or hue of obects in your photo with this panel.
Maybe you don’t like the lipstick on your model. Open the Hue/Saturation/Luminance channel for the color of lipstick and you can start making changes. Do the same thing with clothing, colors on a building or elsewhere.
Want the grass to be greener? This is the place to do it.
6: Split Toning (optional)
Split Toning is a form of color grading applied globally to your photo. It allows you to unify all of the elements in your photo by adding a color in the Shadows and another color in the Highlights. You often see this effect in cinematic photos, motion pictures and movie posters. You don’t have to add a Split Tone. It’s done for artistic effect.
It may be hard to see exactly which color you’re selecting for the highlights or shadows, so here’s a keyboard shortcut to help. Hold down the Option or Alt key while moving the slider. Then Lightroom Classic shows you the full saturation version of the color you’re choosing.
Release the key and then use the Balance slider to see how much of that color you want in your Highlights or Shadows.
Enhance Your Photo
It’s time for the last phase of your Lightroom Classic Workflow to develop your photos. In this phase, you’re going to provide the final enhancements to finish your photo.
All photos need sharpening. Some may need noise reduction or even the addition of noise. It depends upon the look you want to achieve. We also look at vignettes and other potential effects you can apply to your photo.
Finally, you may want to export your photo to another tool, like Photoshop or a plugin, to perform some manipulation or enhancements that Lightroom Classic doesn’t provide.
Fortunately, this phase shouldn’t take too long.
1: Sharpening/Noise Reduction
Click the Detail panel to access Sharpening and Noise Reduction. All photos need sharpening, but you don’t need to sharpen every pixel. Apply a small amount of sharpening. Then hold the Alt or Option key while moving the Masking slider to the right. That reduces the area where sharpening applies fo you only sharpen edges.
Use Noise Reduction after sharpening, if needed. It’s most common to need noise reduction for photos shot with high ISO and poor lighting conditions.
Start with the Luminance slider. Move it to the right until you’re satisfied with the result. You are effectively softening your image. If you see color specs, move the Color slider to eliminate them from your photo.
2: Apply Vignette/Effects
Lightroom Classic has a Post-Crop Vignette effect. That’s why it’s best to crop first, or your vignette may not appear where you want it.
A vignette darkens the edges of your photo and draws the eye to the brighter center of the image. You can also add a white vignette in Lightroom Classic, but why would you? This isn’t 1984.
Lee and I mentioned that we aren’t fans of the Vignette effect anymore, though. The reason is because you can’t move the center of the vignette with Lightroom’s tool. After all, one key principle of composition is to avoid putting your subject in dead center. So why would you want to use a vignette that misses the target?
This is why we prefer to darken the overall exposure just slightly, and then use a Radial filter to bright the exposure where we want it. For us, it’s a subtle and effective way to draw the eye to your subject.
You can also add Grain to your photo in the Effects panel. This is sometimes useful to emulate a film style or as part of your storytelling process.
3: External Plugins (Optional)
External plugins abound for Lightroom Classic. They add features not found in Lightroom that allow you to do more photo manipulation. You can use anything from Photoshop to a number of third party tools to enhance your photos.
I find it’s best to prepare my photos in Lightroom Classic as best I can, and then send the photo off to another tool for manipulation, like using Photoshop to extract a subject, create graphics or add text, or perform tasks that Lightroom doesn’t offer.
Why You Need a Lightroom Classic Develop Workflow for Your Post Processing
One of the biggest frustrations that I had when I started my post-processing was not truly understanding that I needed a workflow. Like many others, I’d work my way down the panel, completely unaware that using this approach caused frustration and foul results.
This workflow divides your post-processing into sections that build upon each other rather than screwing up the results of the step you just performed.
You can see how some of the tools in the Prepare phase could undo the results of the previous step. The same thing is true in the Tone and Color phase. Imagine getting your color just right and then screwing it up with your Contrast and Tone Curve. Skin tones turn Orange, grass becomes electric…it’s just a sad mess.
I hope this Lightroom Classic Workflow helps you understand which tools you need to use, which ones you can skip, and that the order saves you time and delivers better results when developing your photos.

Want to learn more about Photography software? Click below to check out articles about Adobe, ON1, Skylum, and more.
Photography Software Articles