Affiliate Disclosure: We earn a commission if you purchase through one of our links at no additional cost to you.
Why Create Silhouette Portraits?
One of the many questions I get asked is “Where do I put my light in relation to my subject?” It’s a fine question with many valid answers, each different from the other. However, there is one answer that’s better than all of the rest.
It depends.
Where you place your lights depends upon the story you want to tell. That’s why Lee and I decided to play around with silhouette portrait photography after a recent marketing/product photo session that we set up in our living room.
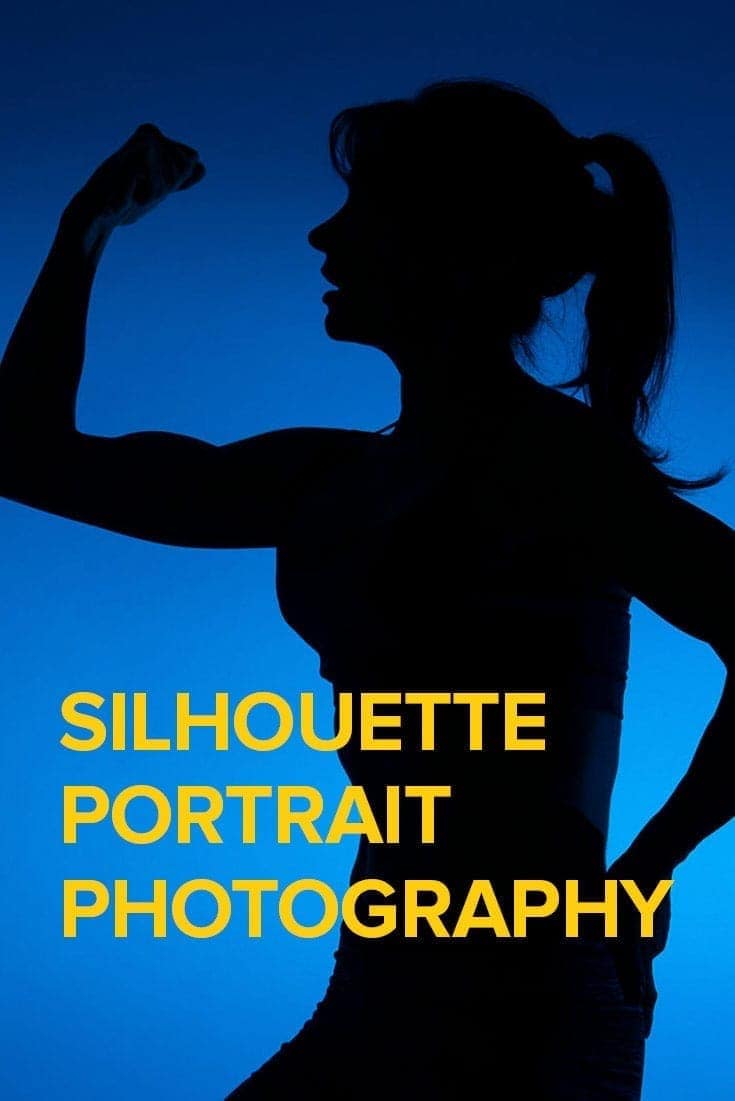
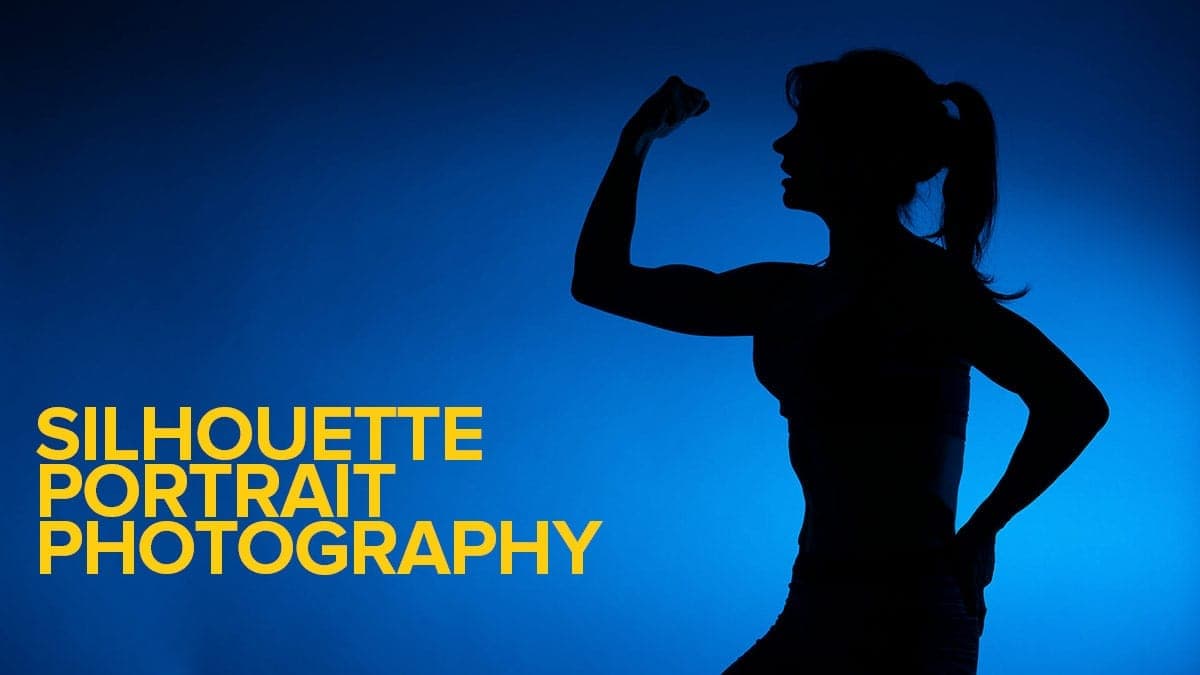
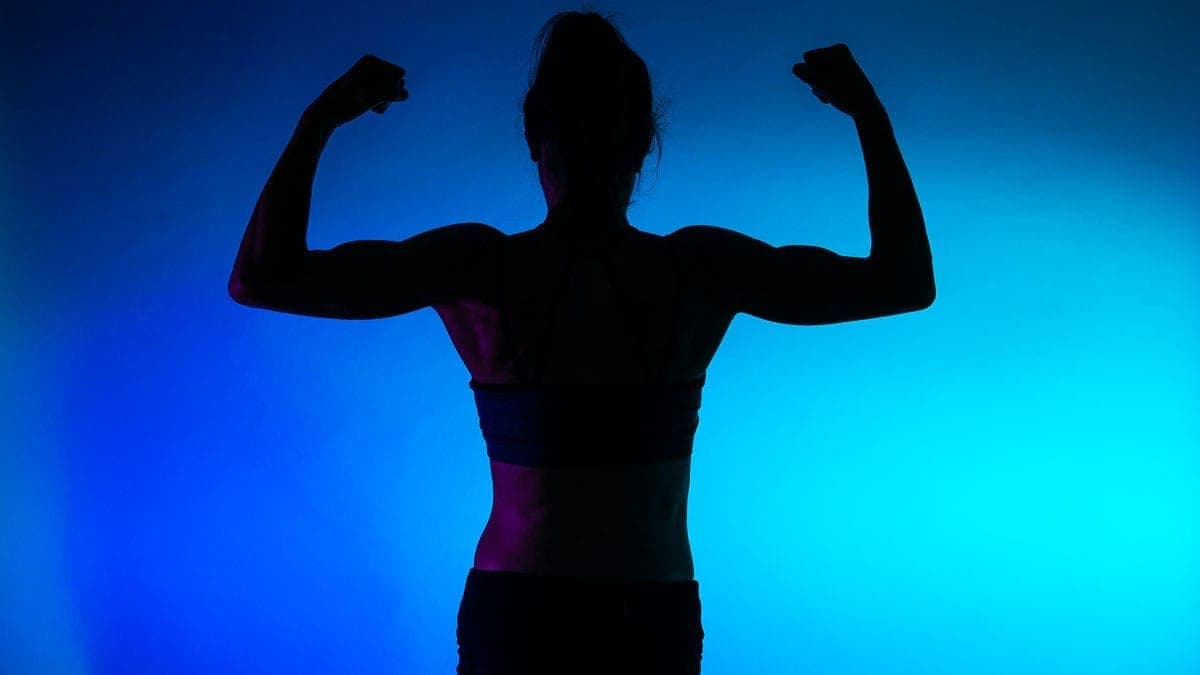
The story was about Lee’s fitness and muscular development. She’s worked very hard lately, and the results are noticeable. Not monstrous, but she just looks fit.
At the gym where she coaches people, new clients walk in and say “I want to look like her.” That’s pretty high praise.
I knew we could use some dramatic lighting and shadows to show off her development, but then I wondered how things would look if everything were in shadow.
We had to light the background behind her and allow her definition to tell the story. It’s sort of like those old Apple iPod commercials with dancing silhouettes. The shape tells the story by itself.
What Gear Do You Need to Take Silhouette Portraits?
This list is pretty simple. I’m going to mention the bare minimum and then mention some items you can use to enhance your portraits.
1: The Basic Kit
The concept is to light the background without letting the light hit your subject. So you need a location with a backdrop and some space to move your subject away from it.
To light your background, you can use either one or two flashes. I recommend two, as it gives you more options to control the light flow and eliminate fade.
For this session, I used a pair of Godox AD200 flashes. These are the most versatile flashes I’ve ever used and are typically what I choose first when I need to light something.

The AD200 from Godox is a game-changing flash that offers powerful, battery-operated performance in a compact, portable package. This versatile light can be used on or off-camera to provide stunning results in any situation. With its 200Ws of power, the AD200 is perfect for everything from location shoots to portrait sessions.
The AD200's lithium-ion battery provides up to 500 full power flashes, making it ideal for extended use. And with its built-in 2.4GHz radio receiver, the AD200 can be triggered wirelessly from up to 100 meters away.
Note: I own two of these.
- Quick recycle time
- More than one type of flash head
- More powerful than on-camera flash
- Great battery life
- Easy to use
- Only works off-camera
- Rapid-fire HSS causes overheating
Next, you need a light stand for each flash. My recommendation is the Manfrotto 1005BAC Light stand. I had my best results with the Manfrotto brand. Having bought some Interfit and Impact stands in the past, I think they’re not as good as Manfrotto.
My opinion of them is much worse, but I like to keep things family-friendly.
These Manfrotto light stands are tall, strong, and reliable. They don’t collapse to a short height, but they stack with their legs flat, side-by-side, and then clip together. It makes them perfect for backdrop support.

The Manfrotto 1005BAC light stand is a must-have for any photographer or videographer. Its lightweight, compact design makes it perfect for on-the-go shoots, while its Quick Stack System allows you to connect multiple stands for easy storage. With a pack of three, you'll always have a spare stand on hand when you need it.
Of course, you also need your camera kit. That’s the minimum, so this isn’t complicated.
2: Optional and Recommended Gear
While you can create a silhouette portrait on a white background using the gear above, your creativity comes into play when you start adding colors. That’s why we like using color gels.
Also, you may not always have the right background in place, so we recommend a roll of seamless paper.
We use Savage Fashion Grey seamless paper, 107″ in width. If you want to make it white, the flashes can do that easily enough. It’s also relatively easy for your gelled lighting to get color – we think it is much better than white or black. Fashion Grey is perfect for portraits on their own or as a background to make compositing easy.
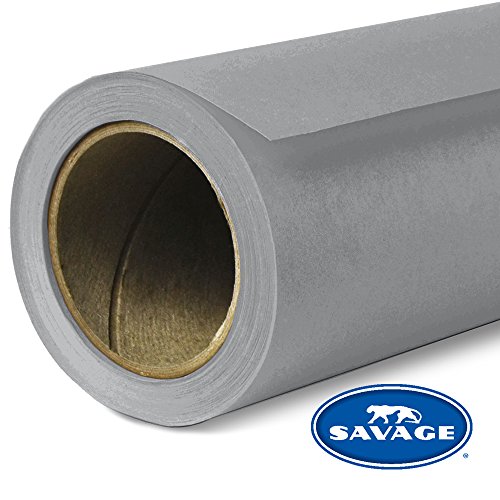
Savage Seamless Background Paper in Fashion Gray is a top-quality background paper that features a non-reflecting surface with an exquisite, fine-tooth feel that’s ideal for creating smooth and even backgrounds. It’s perfect for fashion photography, portrait photography, YouTube videos, interviews, and so much more.
It’s easy to use – just unroll what you need. If the end of the paper gets torn or dirty after a photo shoot, the used portion can be cut off and recycled. The 107” wide x 36ft roll gives you plenty of paper to work with, so you can create stunning backgrounds for all your projects.
If you go with the seamless paper option, you need something to support it. There are kits just for supporting seamless paper, but we went with a different direction that’s a bit more flexible.
The support kit starts with two more Manfrotto 1005BAC Light Stands mentioned above. Then we use a Manfrotto 272B background support. It collapses down to under four feet or expands to nearly ten feet.

The Manfrotto 272B is a high-quality, three-section telescopic pole that extends from 3.7 to 9.8 feet (112 to 298cm). It's perfect for anyone needing a reliable background support system, and its black aluminum construction is both durable and professional-looking.
We run that through the Fashion Grey Seamless and tighten them up. Then we just raise the extensions of the light stands.
You’ll want at least one pair of A-clamps, but perhaps two pair. You can get this 6-piece Spring Clamp from Amazon or just pick up something from your local hardware store.

The HORUSDY 6-Piece 6" inch Spring Clamp is a heavy-duty, durable clamp that is perfect for various projects. The thick spring material ensures the product is long-lasting, while the nickel-plated steel construction makes it rust resistant. The arc of the handle improves comfort, and the non-slip plastic cover protects the tool surface.
We use it to control backdrops, secure cables, or anything else that needs a 3rd hand.
After you roll down your seamless paper, use an A-clamp on each side of the roll to prevent it from creeping down. Trust me, you do not want the seamless to bunch up. That causes lines and shadows on your background if it isn’t uniform and flat.
Use the second pair to add weight to the bottom of the paper if you’re not shooting full length. That helps eliminate any wrinkles in the paper.
If you need to shoot full length, then roll out enough to separate your subject from the background and hold it down with Gaffer Tape – the photographer’s best friend.
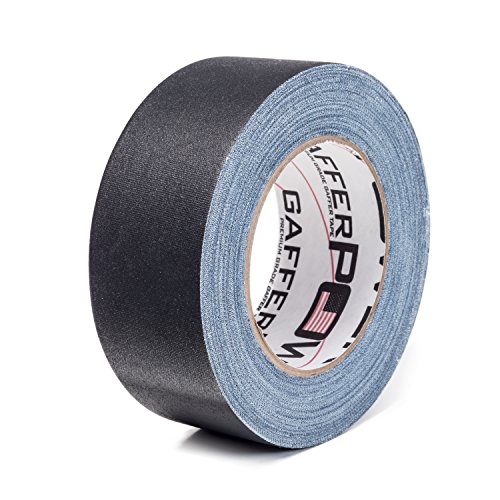
We recommend Real USA Professional Grade Gaffer Tape. Made in the USA with only the highest quality materials, our tape is perfect for indoor and outdoor use.
With a powerful adhesive that can hold up against any weather conditions, Real USA Professional Grade Gaffer Tape ensures everything stays put. And when it's time to take it off, the easy-release formula ensures that there's no residue left behind - making cleanup a breeze.
It's easy to tear by hand, so no time is wasted looking for a knife or scissors.
3: Adding Color to Your Background
There are a lot of different types of gels available for your flash. From my experience, I absolutely hate using flimsy gels. It’s one of the reasons why I never did much of this kind of photography in the past – other than some necessary color correction gels.
Now I have a solution, and I love it. It’s from MagMod, and it really makes flash photography a lot more fun.
If you haven’t used MagMod light modifiers before, I’ll admit they can get a bit pricey. However, they’re exceptionally well made, rugged, and delivery quality results better than their competitors. There’s an off-band knock-off version of MagMod from Selens, I think. Don’t waste your money on those.
You don’t have to use MagMod to get results. I just find it easier to use MagMod, so I’ll mention my kit.
Want to learn more about MagMod light modifiers? Read this article:
Is the MagMod System Right for You?
The MagMod Starter Flash Kit 2 will get you started. I suggest getting one for each of the flashes you want to use. That’s because you need the MagGrip for each flash, as that’s the piece that attaches magnets on your flash to hold the other modifiers. You can buy the MagGrip by itself if you don’t want to get a whole kit for other flashes.

The MagMod Starter Flash Kit 2 is a great way to get started and save money. The kit includes the MagGrip 2, MagSphere 2 diffuser, and MagGrid 2, which are essential for on- or off-camera lighting.
With the simple-to-use MagGrip 2 and precision MagGrid 2, you can create perfect light control. The MagSphere 2 diffuser gives you omnidirectional light for a softer look.

The MagGrip 2 by MagMod is the heart of the MagMod system. This innovative product is made from silicone rubber, which means it will retain its elasticity over time - no matter how much you use it.
The MagGrip 2 is designed to be smaller and lighter than its predecessor, making it even more portable and convenient. The new and improved design is even more secure, so you can rest assured your flash won't go flying off at the worst possible moment.
Next, I bought two additional MegGel kits: The MagMod Pro Creative Gel Kit and the MagMod Pro Artistic Gel Kit.

Make your images pop with MagMod's Pro Creative Gels. These gels are durable polycarbonate and feature permanent, embedded names for quick and easy identification. The embedded magnets make it easy to attach and remove the gels to change your look in a flash! With various colors to choose from, you can easily add drama and interest to your photos.
Includes 1 of each: Red, Orange, Yellow, Blue, Green, and Purple.
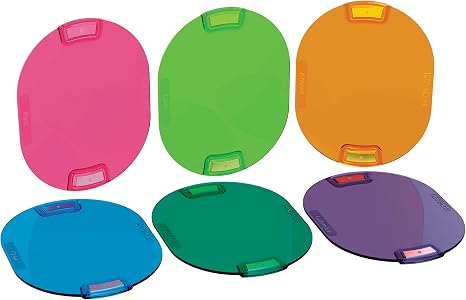
MagMod Pro Artistic Gels are the perfect way to add color to your shots. Mix and match multiple colors to create your unique looks, or use them to add a dramatic effect to your photographs. With permanently embedded names and magnets, these gels are quick and easy to use and will last for years.
Includes 1 of each: Cyan, Amber, Aqua, Pink, Lavender, and Lime.
What’s the difference? Mostly because they have different colors and that provides you with more options. I don’t find that one kit is more creative or artistic than the other, but they have to call the product something.
I love these gels. They work well, they’re tough, easy to use, and easy to store.
4: Kicking it Up a Notch
Having a variety of colors to use on your background is great. Do you know what makes it better? Use some masks to add shapes with gelled light on your background.
To do that, I bought the MagMod MagBeam and some additional MagMasks (Yes, everything starts with “Mag”).

The MagBeam Kit is the most versatile and unique fresnel lens flash modifier ever created for photographers. Its collapsible design makes it easy to swap in a wide lens for epic landscape shots or a MagMask for creative portraits with eye-catching patterns and shapes.
Extending the MagBeam gives you 2-3 extra stops of usable light, making it ideal for shots at greater distances. And because it collapses down, you can use it for wider beam patterns while retaining the beautiful shape and crisp edges.
The idea for the MagBeam is to extend the range of your flash. Wildlife photographers use it to light up critters they want to photograph. However, there’s another purpose for this little beast.
You can use it to hold a gel and a mask to display patterns on your background. You can show anything from a window frame to some really spaced-out patterns that add some extra punch and dimension to your photos.
The MagBeam comes with a few basic masks, but two expansion kits are available with more patterns. Check out MagMask Pattern 1 and MagMask Pattern 2 for some creative options.

The MagMod MagMask Pattern 1 Set is the perfect way to add some pizzazz to your existing MagBeam. With four different patterns (Dots, Wave, Orb, and Dream) to choose from, you can easily create interesting shapes and designs. The MagMasks are made from stainless steel and can be reused repeatedly. Plus, they're the same size as the MagBeam's gel slot so that you can insert both simultaneously.

MagMod's MagMask Pattern 2 Set is the perfect way to add some flare to your shots. With these custom-made stainless steel filters, you can quickly achieve Scatter, Flare, Bubble, and Blossom gobo patterns. Just insert them into your existing MagBeam's gel slot and position the beam as a background light. You'll be able to create some truly unique designs and shapes. And because they're made from high-quality stainless steel, you can reuse them over and over again.
So you can tell I spent a bit of money going in for the kit, but I’m very impressed with the MagMod tools. There are other light modifiers, grids, and accessories to give you a lot of combinations and options for your photography.
Things We Learned With Silhouette Portrait Photography
While the results are interesting and we’re pleased, we learned some lessons along the way. Here are a few things we thought would be nice to know before we started.
1: Have Ample Space
Our living room is fairly large from front to back, but we ran into issues when moving the lights away from the background.
You need to keep your subject away from the background so far enough that the light doesn’t bounce onto the subject. How far? That depends upon the size of your background and the power of your flash.
We found that you don’t need to blast flash power to saturate your background with color. Too much flash power causes your color to fade on the background, so less is more. If you’re trying to use bare flash to create a solid white background, you risk light bouncing off your background and onto your subject.
Moving your flash away from the background increases the size of your light on the background. This makes sense. If you put the flash right against the background, it doesn’t have room to fill it up with color. Move the flash back to increase the range of its output on the background.
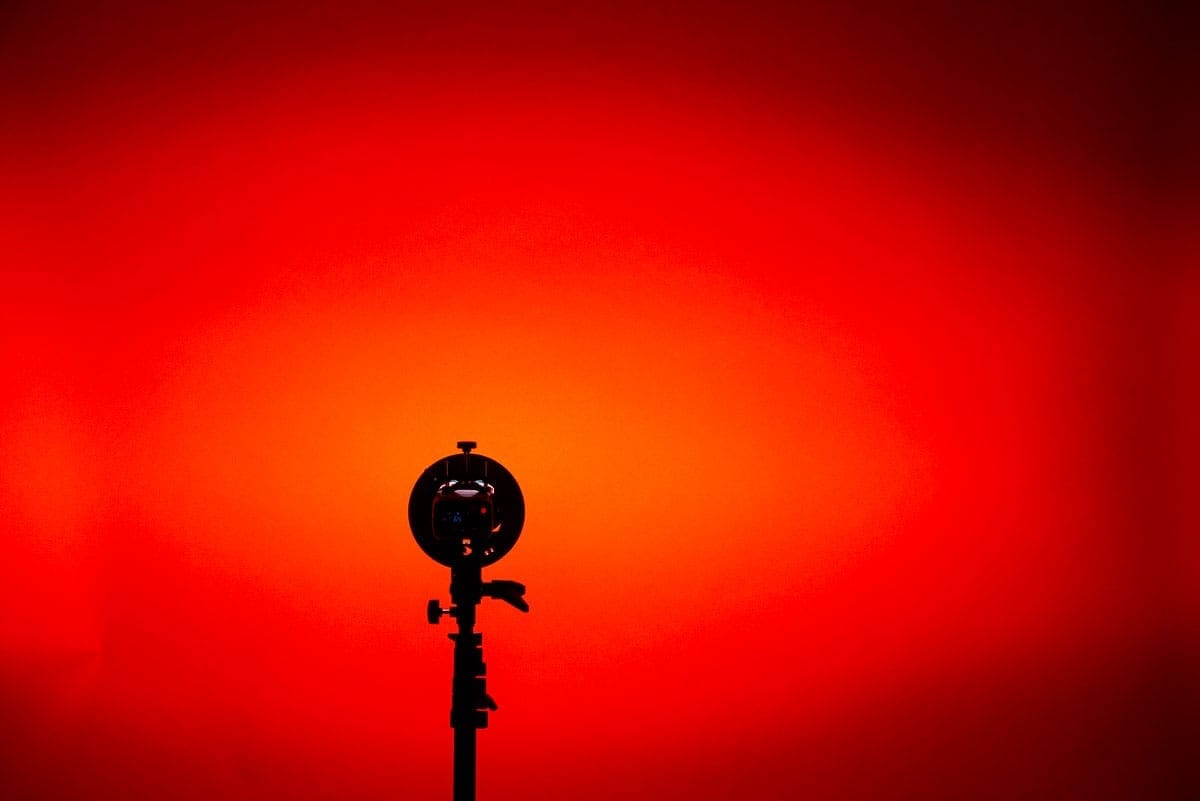
You can see the shape from our Godox AD200 head when it’s too close to the background. Pull it away, and the gradient goes away, leaving you with a saturated and even background.
That was one of our problems in our home studio. One side had room to back up, the other side had a wall in the way.
2: Think About Your Pose as a Shadow
Remember, there shouldn’t be any detail on your subject. That means the result should look like a shadow, entirely defined by its outline. Some poses work well when you light your subject, which won’t play out like a silhouette.
If your subject puts her hands behind her back or on her hips, then the result looks like her arms end in stumps. You need to make sure the pose includes definable features.
There are cases where you can get away without complete definition. If the subject faces you, then we recognize the shape of a human head and we don’t need to see the nose. Turn that same head for a profile and it better be a complete profile.
Now we’re looking for a definable nose, lips and jawline. If the head isn’t in a right angle profile, it just doesn’t look right.
The same thing happens if one hand is too close to the body. You lose definition in the shape. Silhouette portraits are a bit more demanding for specific poses.
One issue you may have is explaining these issues to your model. They can’t see what you’re doing, so you may need to shoot tethered so they can understand how to adapt their pose.
3: Watch Your Color Combinations
You need to consider two problems when using more than one color on the background.
You first notice that complementary colors, or those on opposite sides of the color wheel, don’t really work well on a background. There are color combinations that may look good if you’re putting them on your subject in a controlled manner, but they just don’t seem to play nicely on the background.
For example, Christmas is full of Red and Green together. Yet it’s a hot mess as a background.
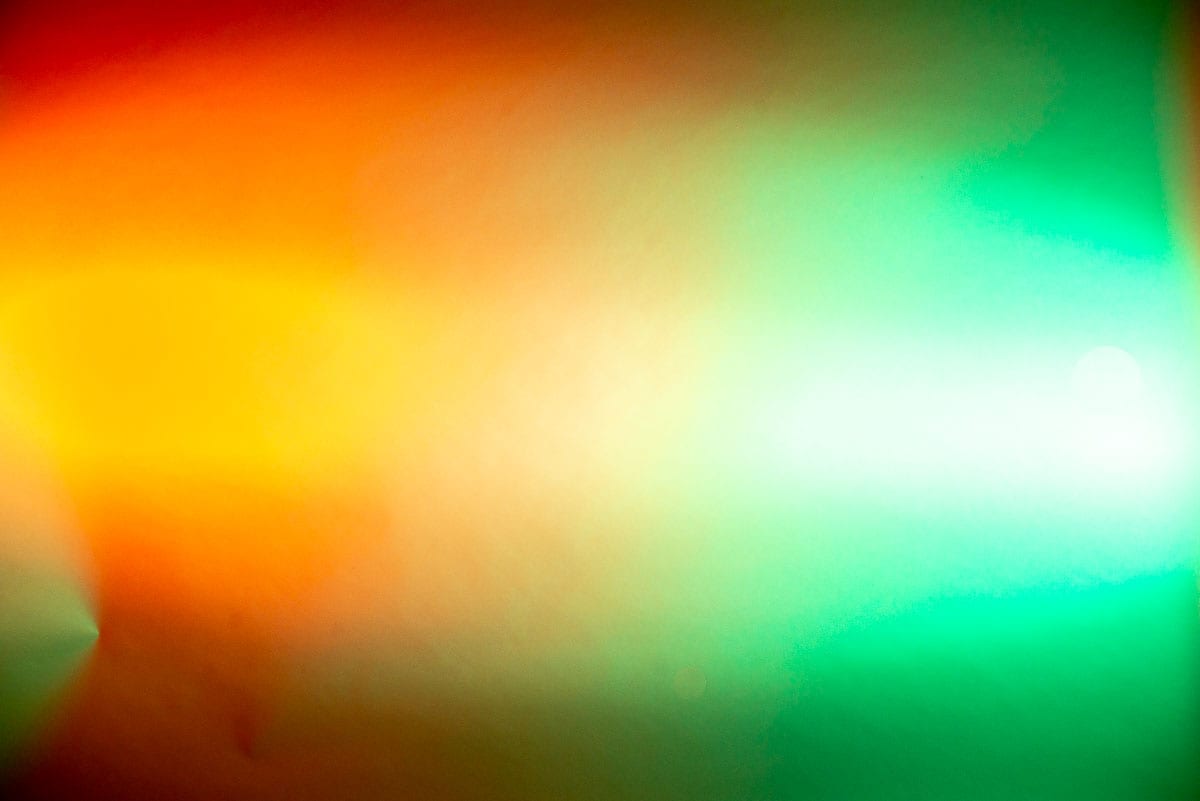
The second problem happens when colors bleed together. As you can see in this photo, combining Red and Green doesn’t blend well. We found that Analogous colors work better as combinations on a background.
4: Clothes Show Every Bump and Dip
We didn’t take these photos through Photoshop and Liquify to illustrate a point. Lee’s clothing has a plethora of bumps. No matter how often we stopped to smooth out her shorts or top, they bunched up with her first movement.
I’m not suggesting you go nude for your portraits, but remember that your clothing choice can make the difference in how much retouching time you spend after the session.
Silhouette Portrait Photography Ideas
Lee and I decided to do this as a test concept, but we enjoyed the results. You may not want an entire portrait session with silhouettes, but it may be part of your bag of tricks for portraits.
Imagine how you can use this for pregnancy portraits, engagement or wedding portraits with the couple, or practically anything else with a recognizable shape. I may do this with my Labrador Retriever (or both of them).
I hope this gives you ideas for a new and creative way to tell a story.
Subscribe to The Photo Flunky Show
Thank you for listening to The Photo Flunky Show. Make sure you get every episode by subscribing.
iTunes – https://williambeem.com/itunes
Stitcher – https://williambeem.com/stitcher
Google Play – https://williambeem.com/googleplay
Blubrry – https://williambeem.com/blubrry