Affiliate Disclosure: We earn a commission if you purchase through one of our links at no additional cost to you.
Looking for the best Photoshop plugin for automatic skin, retouching, healing and smoothing? Like many people, I own more than one skin-softening plugin. Naturally, I wondered which one is the best.
UPDATED: April 18, 2016
I originally posted this comparison on December 2, 2013, after taking advantage of some Black Friday sales. Since the technology behind these plugins has changed from some of the vendors, I thought it was time to update the comparison.
Skin Softening Plugin Comparison Test
Here are the three skin-softening plugins on my test list:
Here’s the good news. Each of these products does a very good job. Some do more than the others, so that ought to weigh into your own purchase decision. The price points aren’t terribly far apart, which means you may decide to opt for the tool that gives you the most bang for your buck or for the one that does one thing particularly well. The choice is yours, but just make sure you’ve considered which has more value to you.
My criteria for this test is pretty simple. All of these plugins have variables to tweak for fine tuning your results. There’s no way I could go into each of them and provide a comprehensive comparison for this post, so I decided to use their default or preset options that seemed most suitable for the test photo. I wanted to evaluate the results based upon two criteria:
- Is it fast?
- Is it good?
You buy plugins to save time and to yield results that you may not be able to achieve, depending upon your skill level.
The Unedited Photo For the Skin Softening Plugin Test
I want to say that there is nothing wrong with the skin of my model. She’s a lovely girl with a nice complexion. The reason we use skin softening is that cameras cheat. They take remarkably detailed photos. They capture details that we just don’t notice when talking to someone.
When you put on a flash and get a sharp lens, like my Nikon 70-200mm lens, the camera picks up incredibly fine details. Our eyes don’t perceive people in the same way, which is why we use skin softening plugins or other techniques. We want to show the person we remember meeting.
Of course, you can go overboard and remove every pore and detail from your subject’s skin, but that also isn’t the purpose of skin-softening tools and techniques. It’s our job as photographers to show people in a realistic and flattering manner. Somewhere between the original capture and the fake plastic skin of over-processed imagery is the result we want to present.
This is Brittany. She’s young, attractive, and fit. You wouldn’t think someone like this would need skin softening in Photoshop. Click the image below to take a look at a larger copy of the image.
You can make out some imperfections in her skin and a few blemishes. Those are the things that you don’t really notice when you’re talking to someone. That’s because they aren’t frozen in time. People move about the light changes on their skin and we perceive something very different than a still image captured in a split second under a flash of light.
Imagenomic Portraiture
Let’s be honest. Imagenomic Portraiture is not an inexpensive program, and it really serves a single purpose. Typically $199.
Many vendors will give you several versions of their plugin with the same purchase to work with Photoshop, Lightroom and Aperture. Not so with Imagenomic. I bought the Photoshop plugin, but the Aperture and Lightroom version were an extra cost.
Keep that in mind for your value proposition.
- It does one thing
- It costs extra to use in different programs
With that in mind, let’s see how well it does it’s sole purpose effect.
Perhaps Imagenomic Portraiture only does one thing, but it does it very well. This is from one of the default settings for skin softening without any additional tweaks. You can spend time achieving more fine control, but Imagenomic Portraiture does a great job right out of the box at smoothing skin, eliminating splotchy skin and reducing abrasions.
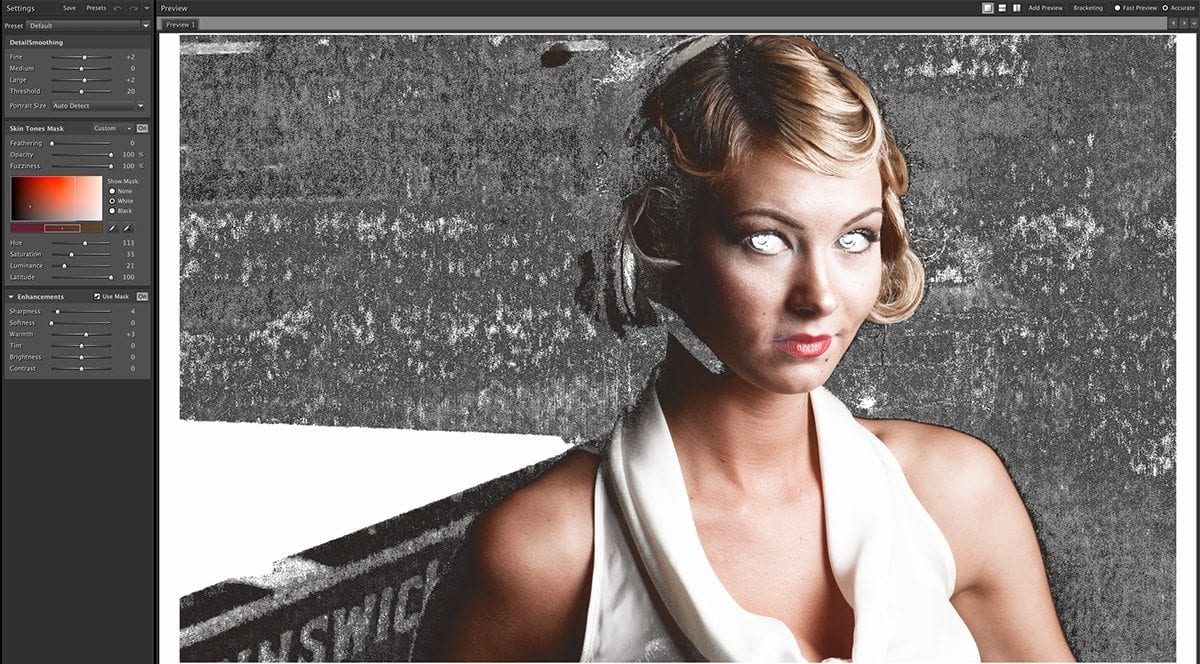
To use Imagenomic Portraiture, you create a mask to define the skin tones of your subject. It’s actually very simple. One eyedropper tool allows you to select a base skin tone. That creates your first mask.
Another eyedropper allows you to add more skin tones to the mask until you get the selection of skin that you want in the mask. Here’s the mask I created for my test with Imagenomic Portraiture.
As you can see, there are several sliders on the left to tweak you results. For this image, I just created the mask with the eyedroppers and used the default settings.
My mask isn’t perfect. You can see that a portion under her jawline isn’t selected, as it’s in shadow. I’m not worried because it doesn’t need processing. However, the mask also selected some of her hair and her blouse. You can work to refine the mask in Imagenomic Portraiture, but I prefer to brush it out in Photoshop.
There are versions of Imagenomic Portraiture for Photoshop and Lightroom. You get a discount if you already purchased one of the versions and decide to purchase another.
You can get a bundle for Imagenomic Portraiture for both Lightroom and Photoshop with one purchase.
Nik Software’s Dynamic Skin Softener
Dynamic Skin Softener is one of many tools in Nik’s Color Efex Pro. The entire Nik Collection is free now, so you get an incredible set of tools without spending a dime. On the other hand, it hasn’t really changed since 2011 and there won’t be any future development for the Nik Collection.
Yet, the questions that remain are the same. Is it fast, and is it any good?
Here’s the photo after the default application of Dynamic Skin Softener.
First, it’s quick. Upon opening the Color Efex Pro plugin and selecting Dynamic Skin Softener, I only had two more steps. I chose the Default preset option, and then I used the eyedropper to select a skin tone from Brittany’s cheek.
The results aren’t bad, but this is the least realistic of the three packages. You may want to dial it back from the default settings so the pores show up and the skin doesn’t end up looking like plastic.
Nik’s Dynamic Skin Softener doesn’t do much for blemishes. That means you still have to go back and do more touch-up work, which adds to the amount of time you spend working on your portraits.
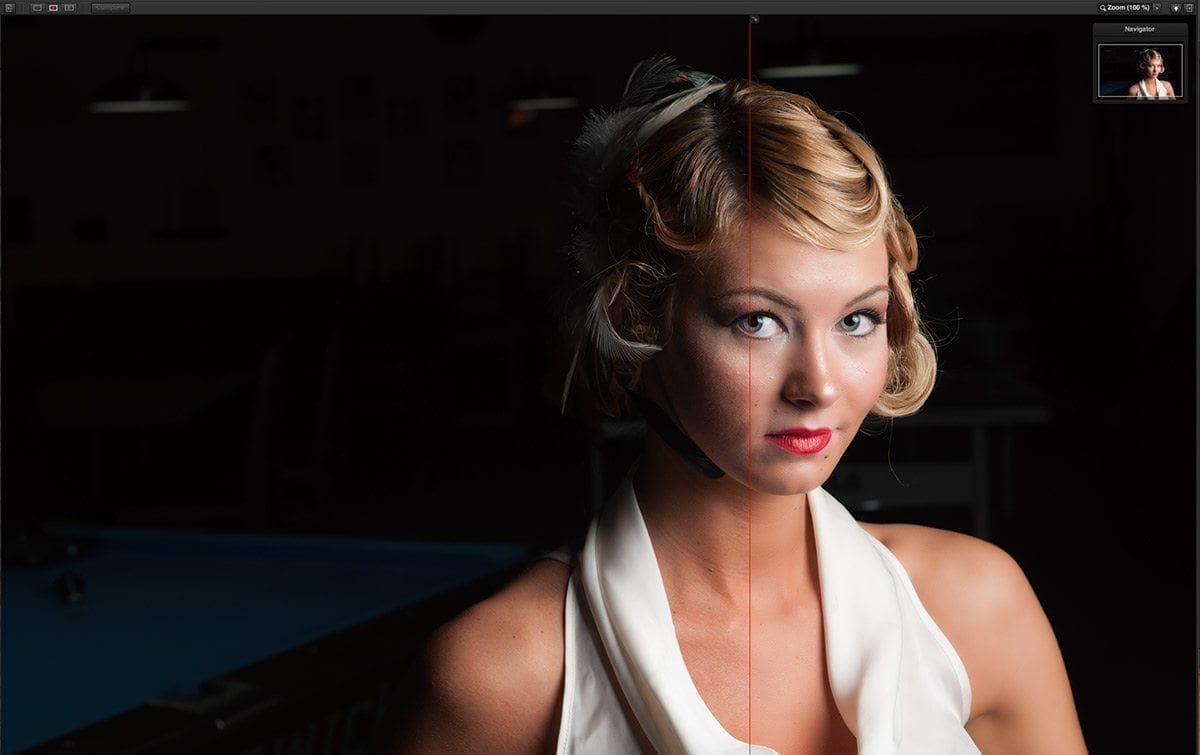
Here is a split-screen view from inside the Nik Color Effex plugin using the Dynamic Skin Softener tool.
Basically, the Dynamic Skin Softener tool is a color-sensitive blur. If you click the image and look closely, you can see that it’s affecting more than her skin. Take a look at the eye on both sides of the red line. Also, look at her hair. The hair on the right is softer and smoother than the unprocessed hair on the left.
That means you have to go back and do more work to erase or mask out the results of the Dynamic Skin Softening tool. Since it is a Nik tool, you can use Control Points to select areas that will add or remove the effect. With some practice, you can get fairly quick as using Control Points to mask the subject and the application of a filter as you want.
This tool is pretty good and fast, but I don’t think it has the best result. Also, keep in mind that it has no future. It works for now, but may not work in future versions of Photoshop or your operating system. There’s a reason it’s free.
ON1 Portrait 10
Skin softening is only one part of ON1 Portrait 10. It has options to cover all of the portrait retouching issues you face, including attention to eyes, teeth, lips and skin.
When I wrote this review in 2013, I really wasn’t impressed with the results that ON1 created. Three years later, I think that ON1 Portrait is a much better tool and it shows in the results. It’s much faster than the older versions and offers more tools for tweaking and correction.
You have plenty of options to adjust the skin smoothing, but ON1 Portrait does more. It allows you to deal with blemishes and control other aspects beyond skin softening. With ON1 Portrait 10, you can whiten teeth and eyes. There are options for your skin retouching based upon gender, age and ethnicity. Of course, you have sliders available to tweak how much of each adjustment to apply. Unlike the other skin softening plugins, ON1 Portrait 10 also works as a stand-alone software package.
Another feature I liked with ON1 Portrait 10 that the others didn’t offer was a Shine feature. Sometimes you have just a bit too much light on your subjects face. If you try to reduce the exposure in Lightroom, it can turn the skin grey. The Shine slider lets you remove a bit of shine on the subjects face without losing the skin tone. It won’t eliminate a hot spot on the end of the nose, but it’s nice to pull back some highlights on skin.
Which Skin Softening Plugin is Right for You?
Before I get into that question, let me say that I can honestly recommend each of these products. I bought every one of them, I use every one of them and I’m happy with them for different reasons. That said, how do you decide?
My Overall Recommendation
It’s clear to me that ON1 Portrait 10 is the overall winner here. It offers more features for portrait retouching than any of the other products. The results are fantastic. The folks at ON1 have really improved the product over the last three years. It works with Photoshop, Lightroom, Aperture and as a Stand-Alone product.
I want to mention that I’m an affiliate for ON1, but my honest opinion is that this is still the best of the bunch. Check it out at https://williambeem.com/on1. There’s no extra cost to you and it helps me support the site with a small commission.
Best of Breed
You want the best product for skin softening. Imagenomic Portraiture is right for you. It’s the best of breed product here. You pay for it, but it delivers excellent results and saves you time.
Best Portait Software
Skin softening is only part of your portrait retouching needs. ON1 Portrait can deliver excellent results.
The Free Choice
Get Nik Software’s Complete Collection as a free trial. You’ll love most of the other tools. The Dynamic Skin Softening gets you most of the way there for those times when you do portraits, but you may still need to do some touch-up work for blemishes. The software won’t work forever, but it’s free and still a good option to use until you can get something better.
Want to learn more about Photography software? Click below to check out articles about Adobe, ON1, Skylum, and more.
Photography Software Articles












I agree with your assessment. I’ve used them all at one time or another. But, if I want to get the job done(skin softening), I use the tool whose whole purpose is to smooth skin – Imagenomic Portraiture
True. They all work at various levels, but the value proposition that each plugin offers may vary from one photographer to another – especially when you consider the price and what else the plugin may do for you.
I would like to see Portrait Professional 11 thrown into the review. Any chance in the future?
Hi, Chuck:
I’ll see what I can do.
I gave Portrait Professional 11 a whirl. It’s defaults tend to be a bit “heavy handed” – especially when it comes to face sculpting. One nice feature – if you do a lot of portraits, is the ability to add make-up.
I tend to be a minimalist when it comes to retouching (eye enhancement, slight skin softening using Clarity in Lr) so any sort of plug-in tends to be overkill to my tastes.
I think you should add SkinFiner to the comparion.
I once thought Portraiture was the best skin smoothing program. But because I don’t shoot many portraits a year, for me it is unacceptable expensive.
SkinFiner does a *much* better job and a lot faster than Portraiture. It also costs about a quarter to a fifth the Portraiture price.
Both these programs have similar controls and aim to do the same thing. They create a mask and let you clean up the skin with several sliders. If you are used to Portraiture, then there is no learning curve for SkinFiner. Both programs lack a brush.
http://www.photo-toolbox.com/product/skinfiner/
I might want to see Portrait Professional 11 tossed into the survey. Any shot later on?