Affiliate Disclosure: We earn a commission if you purchase through one of our links at no additional cost to you.
You can use depth and dimension in your photos to help your viewer enjoy a sense of realism. Fight those flat 2D images. Give your viewers some 3D photos that look like they could just walk into them.
Yes, we all know that a photo is really just a 2D image. That’s why you have to help your audience experience the same thing you saw at the point of capture. Careful composition can help their mind fill in the blanks to give a 3D experience when viewing your photos.
What is Depth and Dimension in Art?
By definition, we only have 2 dimensions with a photo – height and width. That’s just plain flat, and flat is boring. I know Jonny Ive likes flat design, but he’s not a photographer.
The things we photograph are the same things we relate to in three dimensions – height, width and depth. It’s the last dimension – depth – that requires us to help the viewer experience despite the fact that they’re looking at a 2D image.
What we’re trying to accomplish is a sense of relatability, to give the viewer’s mind a trigger that they understand what they’re seeing in such a way to process it as something real.
Depth and dimension also assist in storytelling with your audience. If you want to convey a sense of distance, you need to show a lot of depth between the foreground and background in your photo. You don’t always need that much depth, though.
Sometimes you can use texture (coming up in episode 206) to provide a 3D experience. That could be tree bark, alligator skin or leaves.
Depth comes from providing the viewer with the perception that something is on a different layer than another thing. We’ll go over some of the ways you can create the sense of depth and dimension in your photos to help engage your audience.
10 Elements of Composition in Photography
This episode and blog post are part of a series we’re creating to expand upon this blog post.

As a list of 10 elements of composition, I thought the post touched on some useful ideas. However, I decide that it may help if we expanded a bit more on each of those elements. I hope this gives you some ideas to use in your compositions.
Techniques to Show Depth and Dimension in Photography
The entire idea of showing depth and dimension in a 2D photo is really just playing a trick on the mind. We want to engage the viewer’s own senses based upon their memory and experiences. The idea is to give them a perception.
Why bother?
Engaging those senses gets the viewer involved with your photograph. They’ll take more interest in your work if they can relate to it, but also if their brain has to do some work to process your composition.
Make them wonder what’s off in the distance. Get them to think about the texture of a 3D object. Engaging their mind is part of your charm.
Foreground, Middle and Background
This is probably one of the most common methods of showing depth and dimension in your photography. Landscape photographers are often taught to have something in the foreground, something in the middle, and something in the background. I’m not really a landscape photographer, but let’s go with this example photo.

You can see that different elements are in front or behind other elements.
The treeline up front is closer than the water or mountains behind them. Those mountains are closer than the clouds behind them, also. The idea is to provide a sense of depth, showing the viewer that the scene extends beyond the limited plane of height and width of the image.
Where does your subject go?
Anywhere you want. In this case, my subjects are those two Piton mountains in St. Lucia. If this were a portrait, I’d probably have my subject much closer than that treeline. Here’s another example.

Ideally, you want your elements to complement each other – to belong in the same space.
Although I’ve shown some photos with a lot of depth, you don’t have to go to extremes to show depth and dimension in your photos. Sometimes you can do the same thing in an intimate setting.

Bed linen in the foreground, subject in the middle, pillows and headboard in the background. Look for layers in your compositions to show depth and dimension.
Natural Frames
Natural frames are anything that can provide a frame for your subject. That doesn’t mean the natural frame can’t be something man-made. It can.
Here’s a photo of a young woman sitting inside of a window frame. You could use a doorway, an arch, curtains, etc. You get the idea. Something in your environment surrounds your subject, giving the subject a way to stand out.
Natural frames can help any part of your dimension – height, width or depth. Your subject doesn’t have to be inside the frame in order to work. Sometimes you want the subject behind the natural from, inside it, or before it in the frame.
You decide which works best for your composition.
Leading Lines
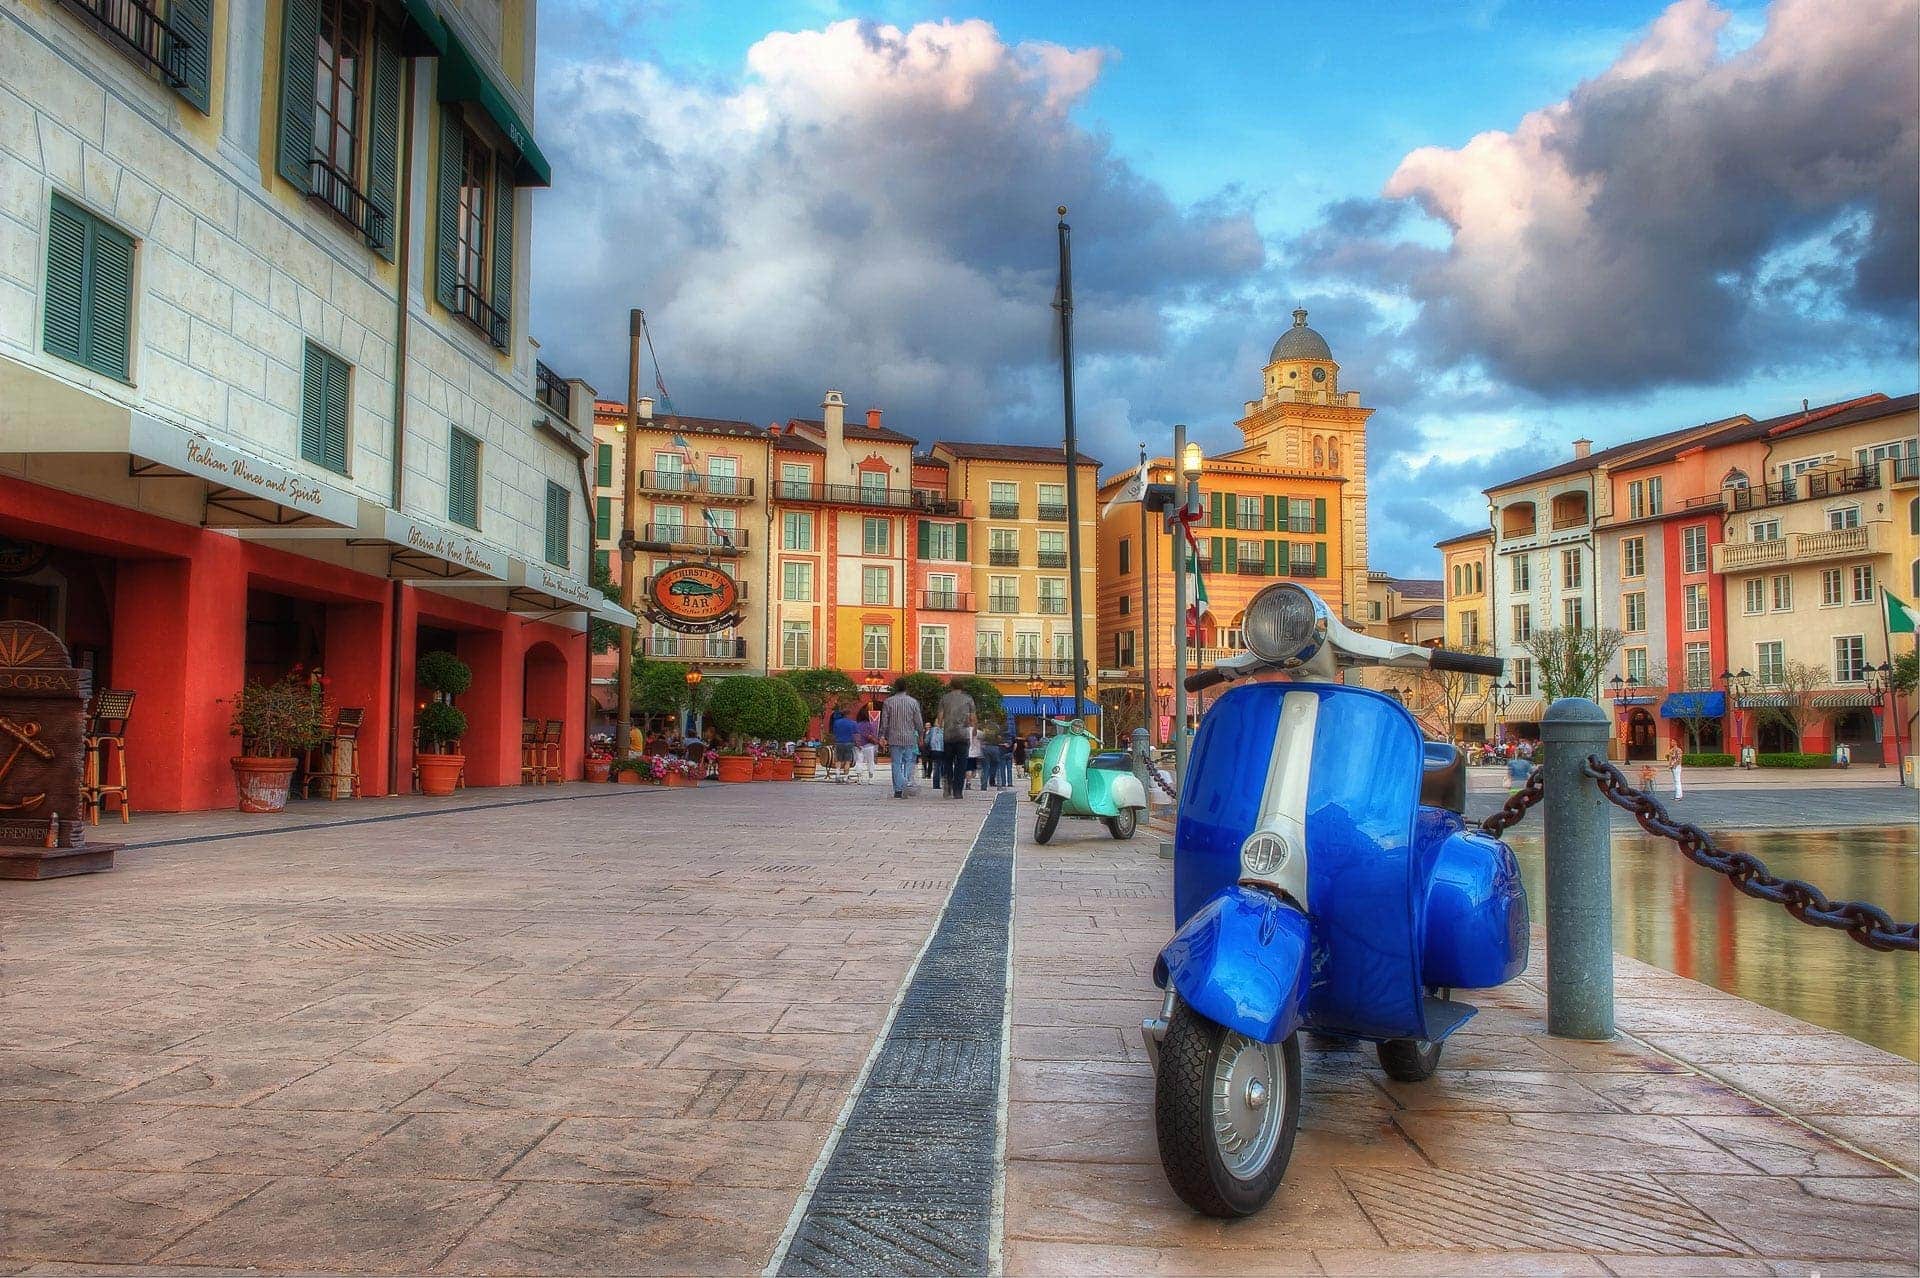
We often think of leading lines as directing the eye to your subject. That’s true, and it’s a useful compositional tool. However, you can also use lines to illustrate a sense of depth, as in the photo above.
My subject here is the blue scooter, but it’s the environment that supports the subject and provides its meaning. I used this line in the pavement to draw your eye beyond the subject in the foreground.
If you really want to use leading lines to show depth and dimension, find some tall architecture.
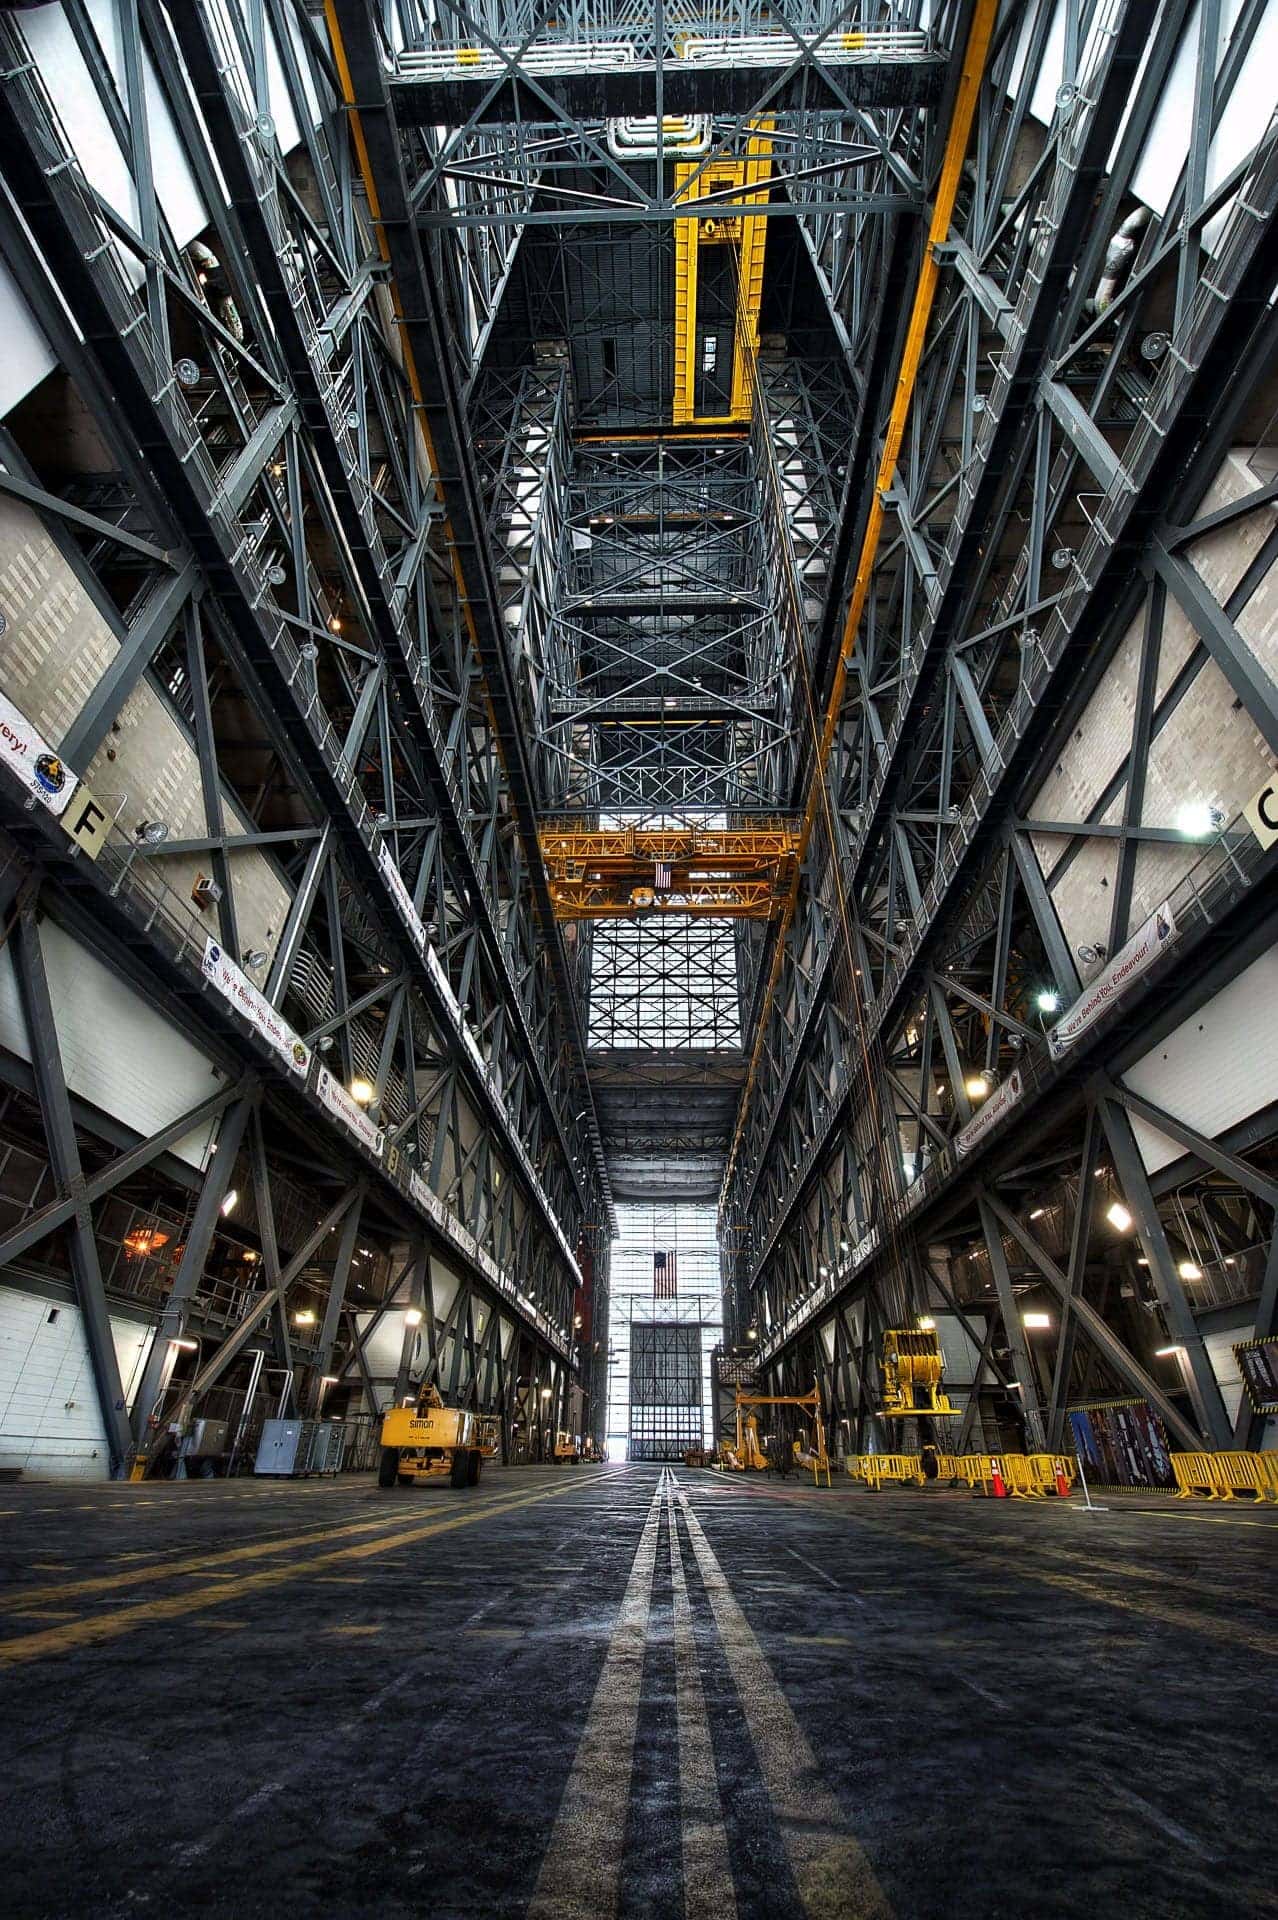
This photo of the interior of the Vehicle Assembly Building at Kennedy Space Center is rife with leading lines. Lines leading deeper to the back, lines leading up to the ceiling, and diagonal lines that just lead to different parts of the photos.
My subject here isn’t any particular object. It’s the sheer size and complexity of this building that tells the story I wanted to share. That’s right, sometimes your subject may be a concept, rather than an object or person.
Use Perspective or Convergence
Here’s the idea with perspective. It’s to use a 2D surface to create a sense of height, width, depth and position. Sort of like we’ve discussed all along, but there are a few other things to consider.
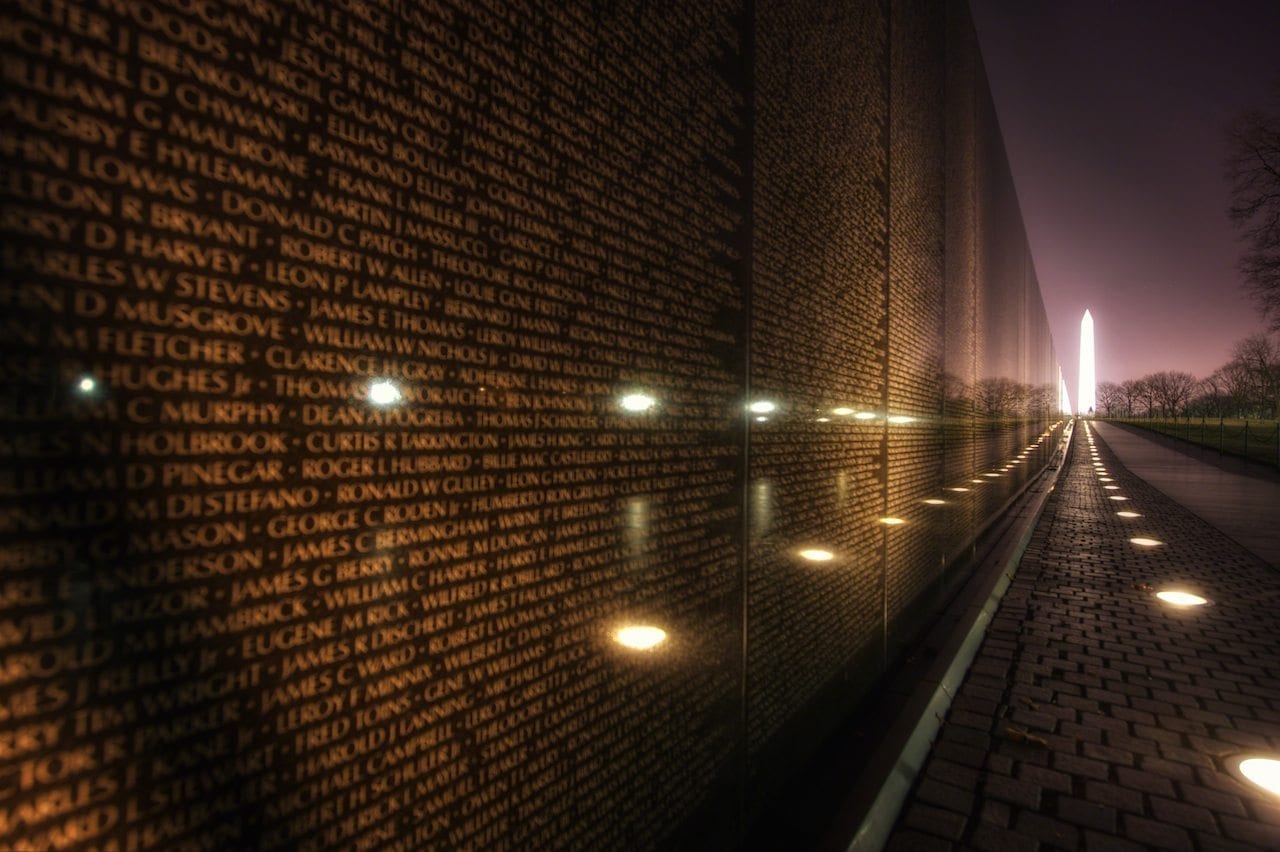
The first is convergence. That’s when you have two or more lines that come together – or converge – at a single point in the composition. You can see that happen in the photo above with the Viet Nam Memorial. The Wall starts outside of the frame and converges to a point along the top-third of the photo. In this case, the point of convergence leads you right to the Washington Memorial.
There’s a bit of an echo of converging lines here, also. Those ground lights reflect on the wall, creating another set of lines that converge on the Washington Memorial.
Perspective also is about the camera position, too.

That’s baby Milo. I could’ve taken this photo from above, looking down. Instead, I decided it would be more interesting if my camera view was on his level. So I got down on my belly to change perspective, and get a view that most people never see of their dog.
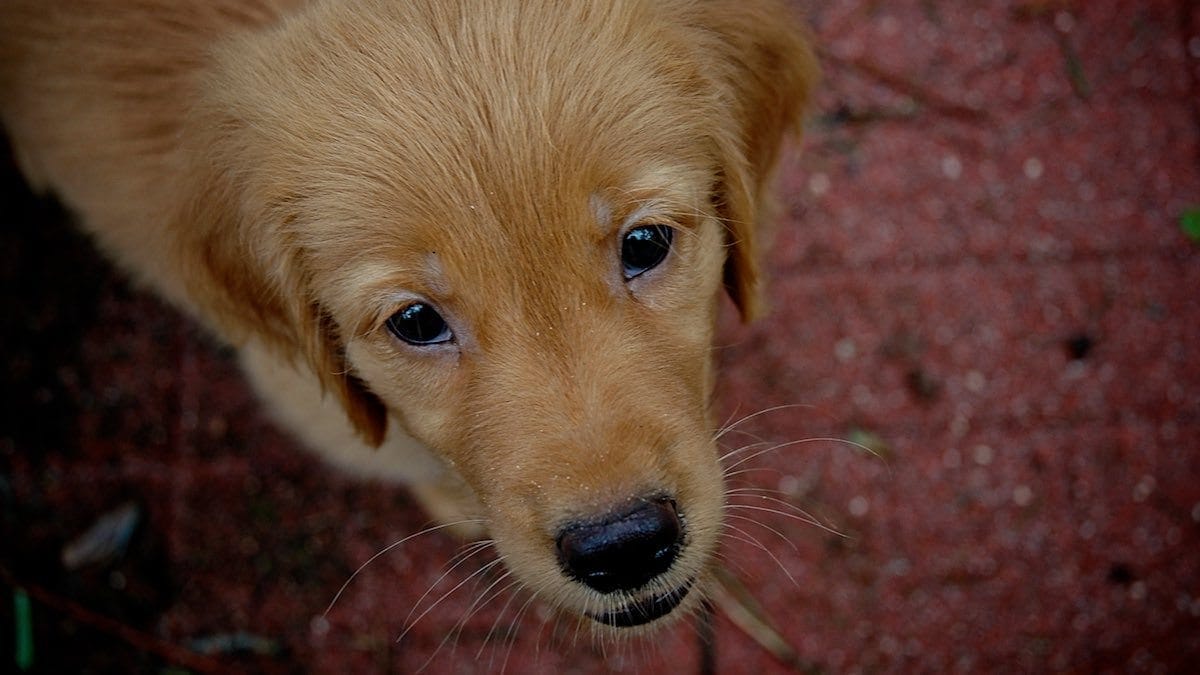
This photo of baby Zach is top-down. That’s what most people experience with puppies. Neither view is right or wrong. It’s just more beneficial to use perspective to put your camera in an interesting place.
Both of these photos help show depth. The decision to make is which direction you want that depth to go.
Depth of Field
Photographers love depth of field, whether it’s shallow with bokeh or lets the viewer see things far away. Whatever aperture you use, you can control the sense of depth and dimension in your photographs.
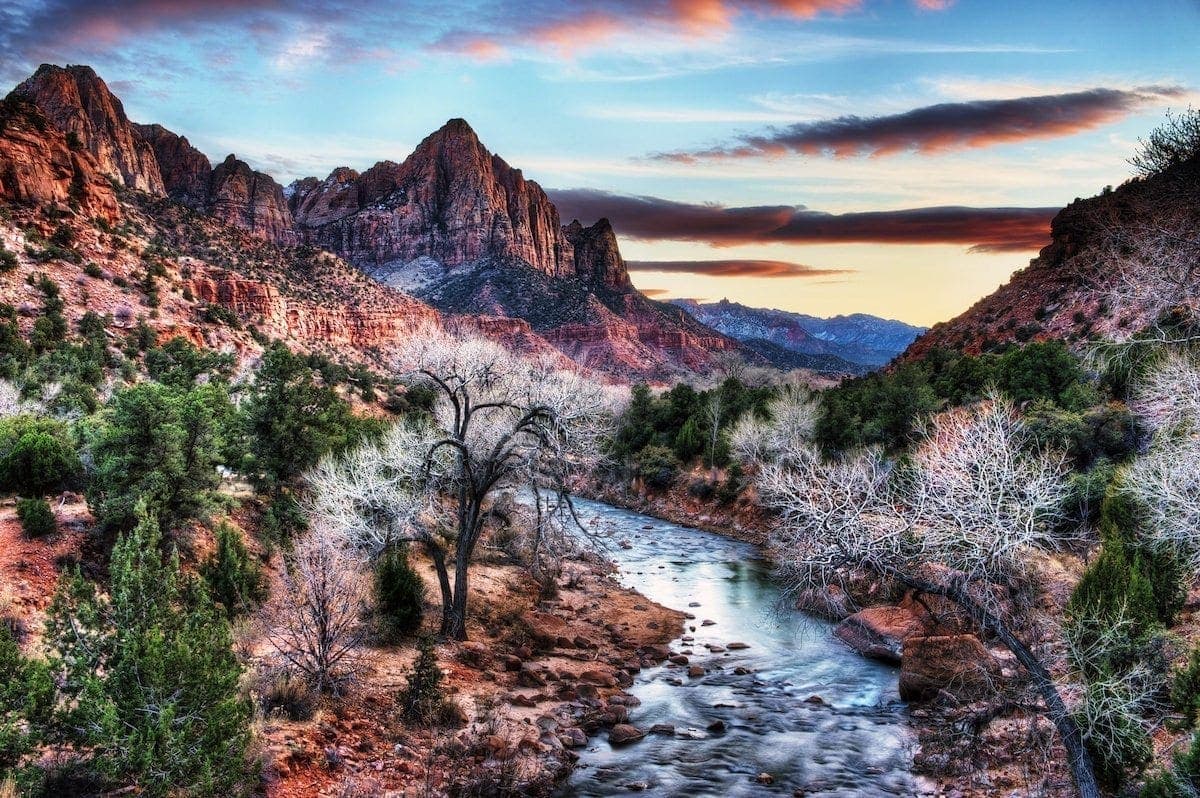
In this photo I took during winter in Zion National Park, I went for a large depth of field. You can see depth from where I stood on a bridge off to mountains way back on the horizon line. The river leads you back part of the way, and you can just imagine it winding off in the distance.
This photo would’ve looked rather silly with a shallow depth of field.
On the other hand…
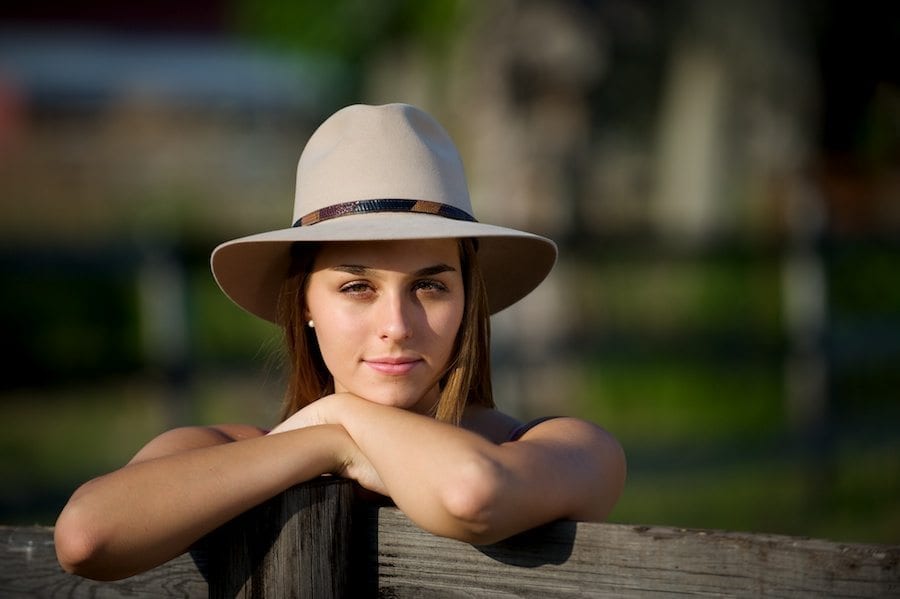
A shallow depth of field really helps to isolate your subject. However, you know there’s more depth behind her. Despite the blur from the shallow depth of field, your mind can make out the fence, grass and trees in the background.
The bokeh also gives a sense of distance, as if the background were too far away to focus with your eyes.
Point of Focus
The point of focus is another way of showing depth and dimension in your photos. Who says that you have to focus on the object closest to you? Sometimes it’s interesting to have a foreground object that’s out of focus, and the middle subject is your point of focus.
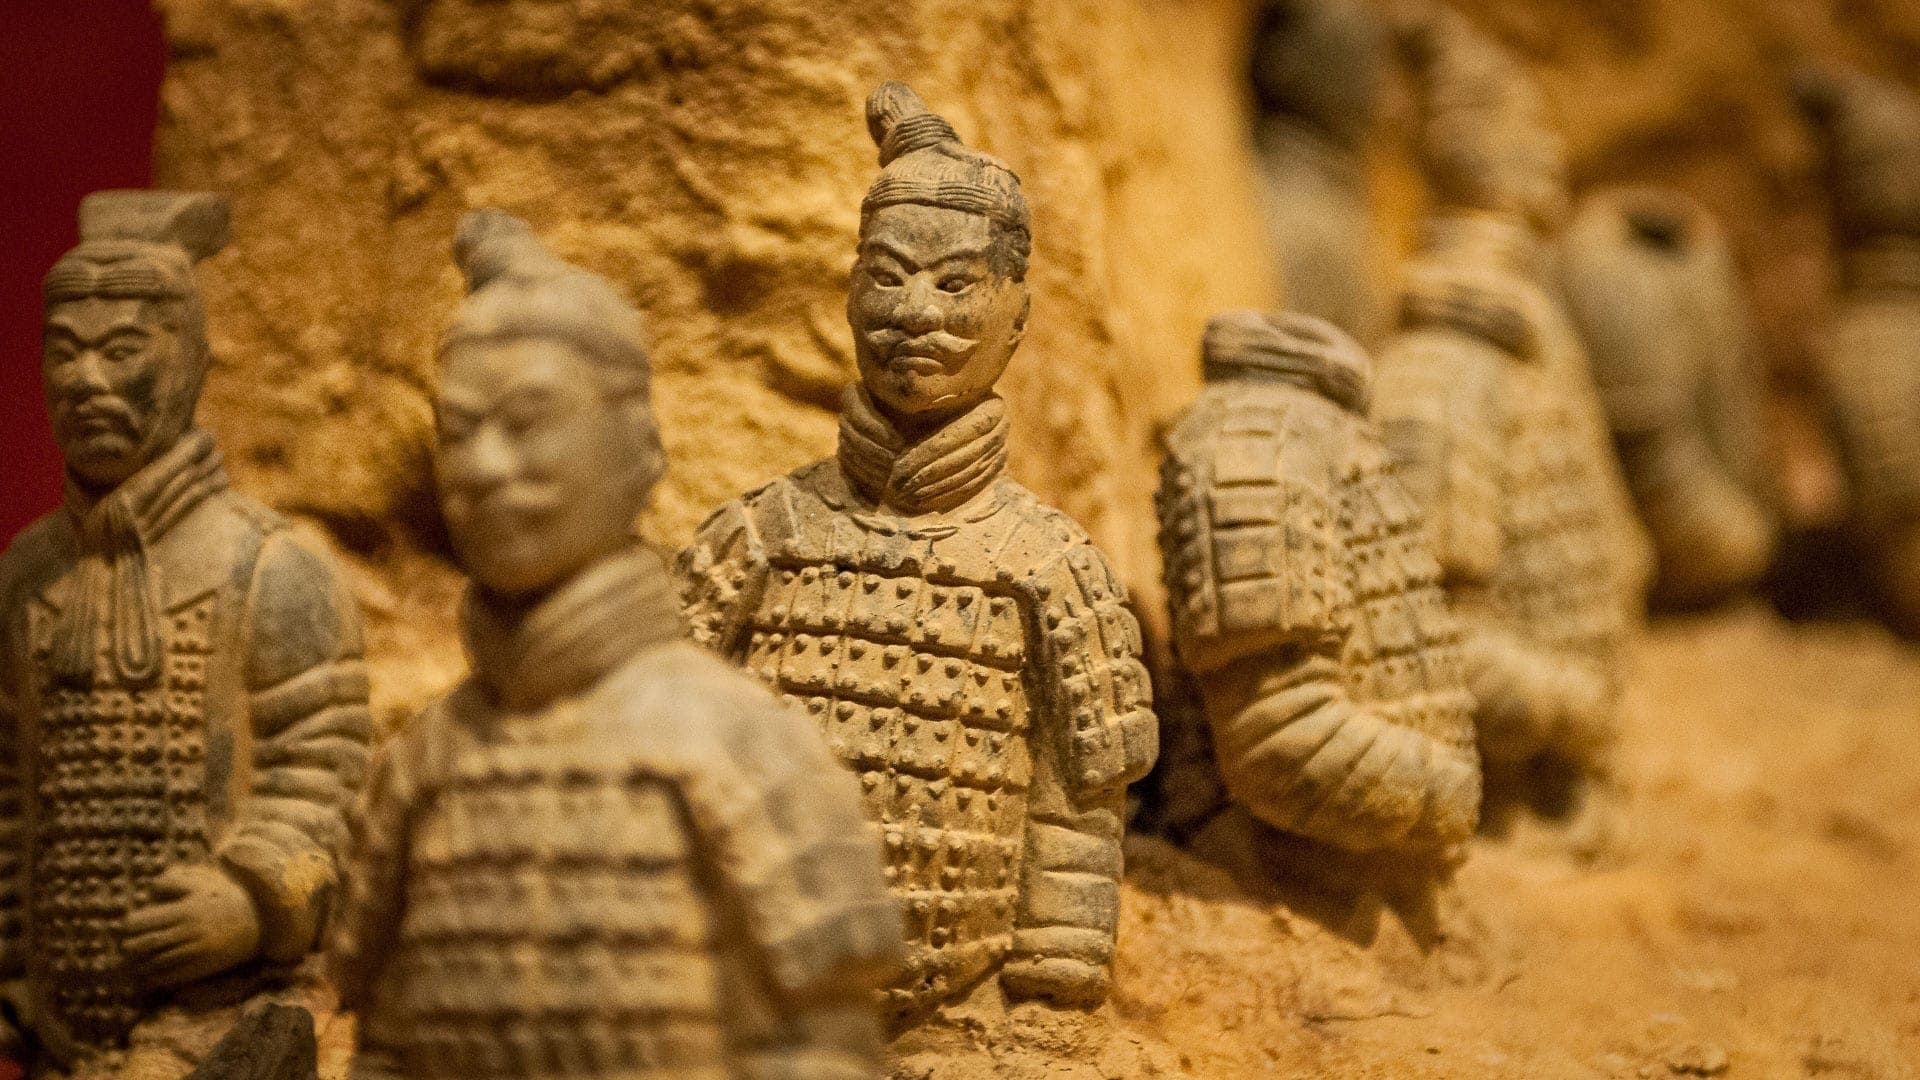
In the photo above of the terra-cotta warriors, I used a shallow depth of field combined with a middle point of focus. You still get a sense of depth between foreground, middle and background. However, the point of focus helps pull out your subject.
Instead of a story about a group of warriors, now it’s a story about one particular warrior. I suppose it’s fair to say the story is over for those headless warriors in the background.
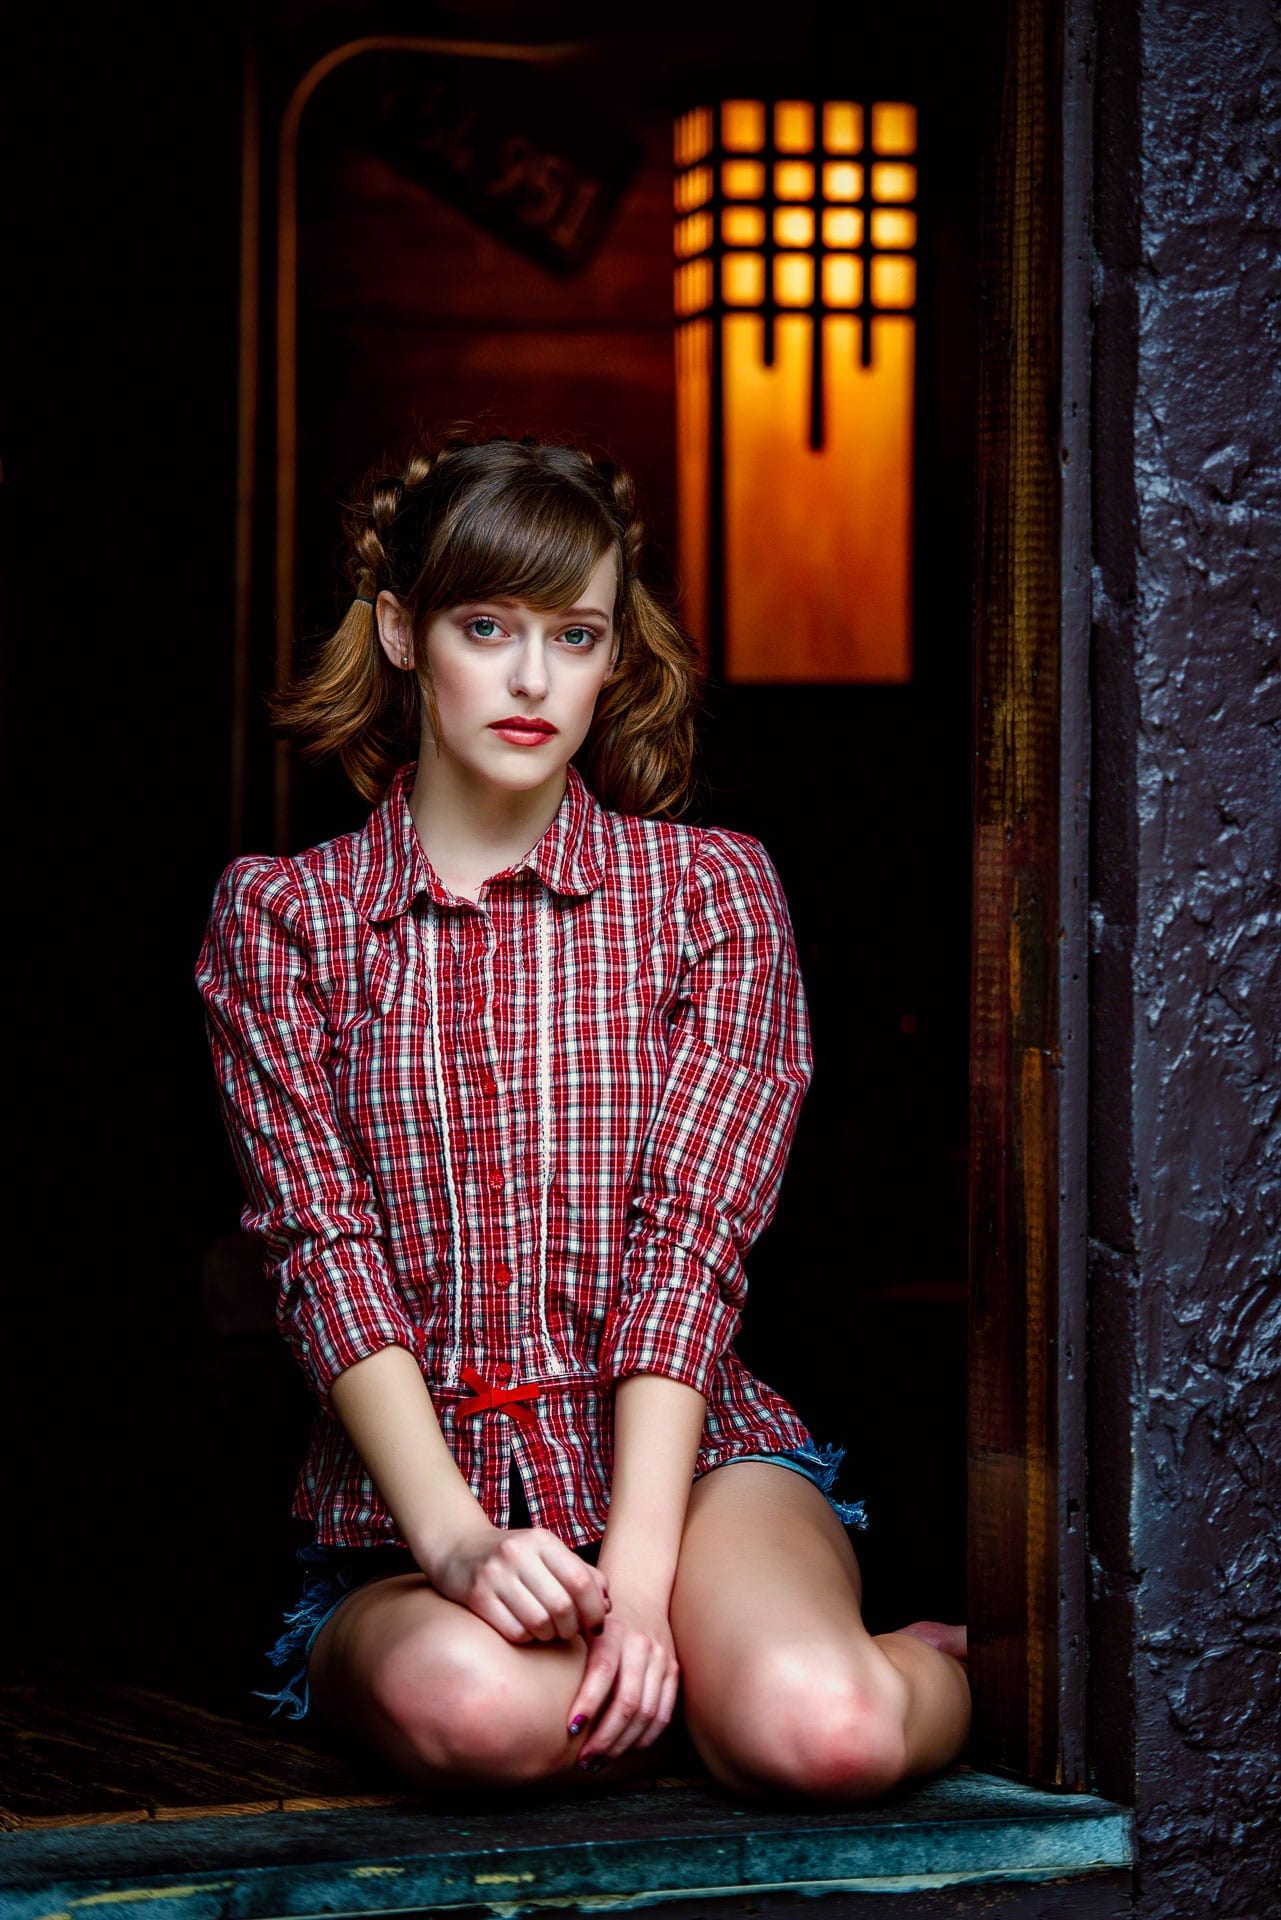
Selective Lighting and Shadows
When it comes down to it, all we’re truly doing with photography is playing with light and shadows. I enjoy the simplicity of that idea. It’s contrast. Light and dark. Highlight and shadow. Now you see me, now you don’t.
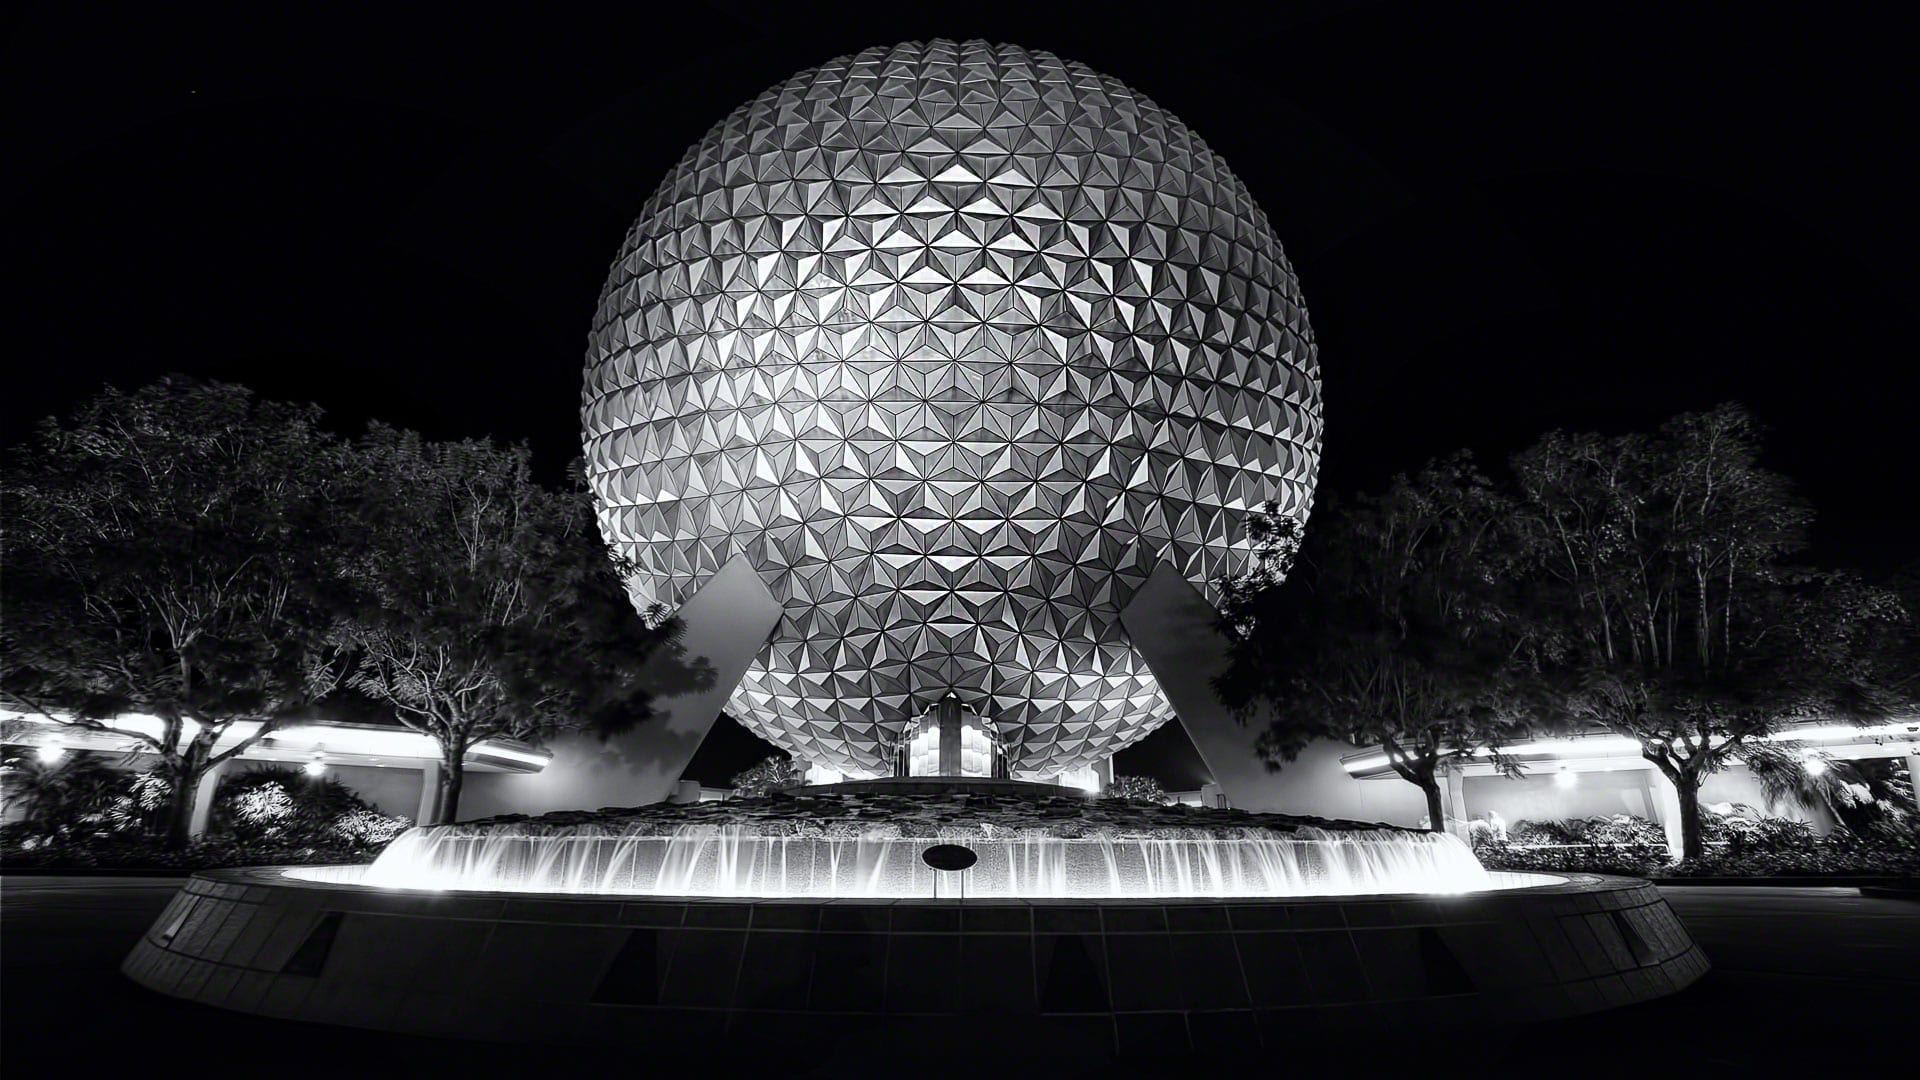
You probably don’t think about it in this photo, but there’s a lot of depth and dimension going on here.
Those panels on Spaceship Earth give it a 3D feeling, as if it were something tactile you could imagine feeling in your hand. More than that, you can perceive that the object is round and wrapping away from the front and center.
If we had even lighting on the surface of Spaceship Earth, it would seem much more flat and less interesting to us. That’s because we wouldn’t have the same perception of depth and dimension.
The fountain in front of Spaceship Earth stands out ahead of the building, so you know there’s some depth to the image. More than that, there’s a dimly lit rim around the fountain, giving even more depth between what you see and what you perceive.
Everything from the barely lit trees to the brightly lit buildings in the background show depth and dimension.
Not only does selective lighting make things more interesting, it makes them seem a bit more realistic. A touch of mystery or curiosity about what’s in the dark doesn’t hurt, either.
Using Depth and Dimension in Practice
I think you can look at a lot of these ideas and see some common elements. The idea is still to show a sense of depth in a flat, 2D photograph. The most common way to do that is to show a foreground, middle and background.
However, you have a lot of creative options when deciding just how to show that depth. You can combine these ideas in your compositions, or just use the ones that make sense for your story.
As much as possible, look for differences in lighting between your foreground, middle and background. Nothing shows depth and layers, or grabs viewer attention, as much as interesting lighting in your photos.