Affiliate Disclosure: We earn a commission if you purchase through one of our links at no additional cost to you.
Dust spots can suck the life right out of your photos. Instead of enjoying the scene or portrait that you created, a few dust spots will get your viewer to start looking for problems in the image. Most processing tools have a relatively easy way to deal with dust spots. The problem is finding the little boogers, though.
Some are pretty obvious. Large spots in the sky stand out. Zap those dust spots with a Healing Brush in Photoshop or some equivalent tool and you’re all set. The problem is that they aren’t always obvious. There are a few different techniques for finding dust spots, but none of them seem to be perfect. Here are some that I use.
How to Reveal Dust Spots
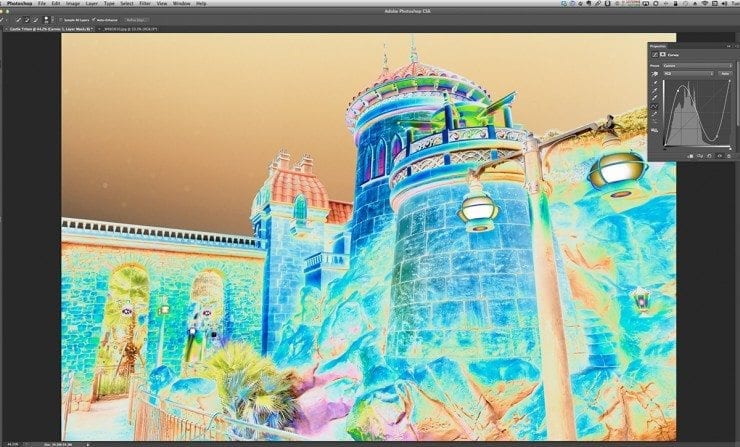
This first technique is one I saw Scott Kelby teach at Photoshop World and it just seems brilliant in its simplicity and effectiveness. You open a Curves adjustment and twist it to look like a sine wave. Many of the dust spots will suddenly jump out and scream for attention, as shown below.
You can see an example of the sine wave curve on the right side of the photo. The dust spots appear as bright dots in the sky. Just remember to make your Healing Brush adjustments on the photo layer, not the Curve layer. When you’re done, throw away the Curves adjustment.
I’ve used a Levels adjustment in a similar fashion. The idea is to bring the shadows and highlights toward the center, and then move the midtones around to reveal more dust spots.
Pro Contrast from Nik Software Color Efex Pro is another good way to reveal dust spots. Take a look at the screen shot below.
Compared to the Curves adjustment, this filter makes several more dust spots visible in the sky. In fact, contrast is your best friend when trying to draw out those dust spots. If you really want to get drastic, go for a stronger type of contrast, such as Tonal Contrast.
Now you can see that my camera is nothing more than a filthy beast. There are spots all over the place, hiding in the low-contrast sky. When you first look at the image, it seems like only a handful of dust spots need your attention. Not so, there are hidden lurkers in the sky.
If You Can’t See the Dust Spots, Do They Matter?
Why should you go hunting for dust spots? After all, that Tonal Contrast is pretty garish on this photo, so why apply it just to find dust spots that you didn’t notice otherwise?
It’s a matter of workflow. One of the first things I want to do is clean up the image before I start manipulating it. As you start making more adjustments to your photo – particularly those that enhance contrast – those spots become more prevalent. Cleaning them up after you’ve increased the contrast makes it more likely to add halos and other tell-tale signs of post processing. If you nail them before adding other adjustments, they aren’t quite so noticeable later.
Even after scouring my photos, sometimes there are a few faint spots that I don’t find until after I’ve posted a photo. That’s my life. Mistakes follow me around, but I like to make the effort to mitigate as many problems as I can. If you can’t get them all, then a nice Soft Focus filter helps smear them out a bit.
Happy dust spotting.

