
Affiliate Disclosure: We earn a commission if you purchase through one of our links at no additional cost to you.
What if I told you that Pinterest can help your portrait retouching? You can use social media to learn as well as to promote.
 It’s not that far-fetched, when you think about it. Women love many things, but two of them are beauty secrets and Pinterest.
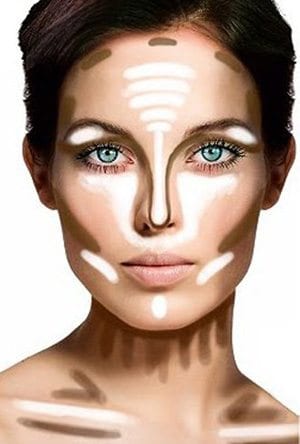
Photographers who are looking for some tips on how to enhance their portraits can benefit from a little time scouring beauty tips on Pinterest. For example, look at this photo pinned by my friend, Sofiya Mushyakhova.
This Pin shows how to use cosmetics to sculpt a woman’s face. Photographers can use the same techniques in Photoshop to define highlights and shadows on their subjects. The technique is actually pretty simple.
Let’s start with our photo of a model out of camera without any other retouching. You’ll still want to do other things, such as:
- Eliminate blemishes
- Enhance the eyes
- Enhance the lips
- Remove flyaway hair
We aren’t going to do a full retouch here. Instead, let’s just take a look at how to make a subtle change to the facial structure of our subject. The idea isn’t to dramatically reshape her, but to merely enhance what she brought to the portrait session.
Add a New Layer
We’re going to add a layer in Photoshop and select the Brush tool. Hit the D key to reset the foreground and background colors to Black & White. Using the X key to alternate the colors, start to paint over her face on the new layer. You’ll get something that looks like this image below.
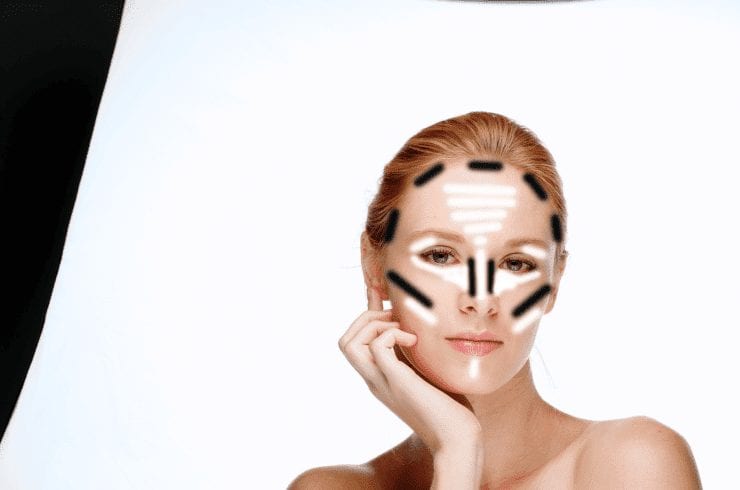
There are a couple of things different about my strokes on the new layer vs. the illustration. First, I chose black for the dark color while the illustration used a brown color. Try them both and see which you like better. I’ve always used black in the past, but I can see where different colors may work better, depending upon your subject’s skin tone.
The other issue is that my strokes around the nose don’t exactly mirror those in the illustration, but I’m using something that I’ve done in the past. In some cases, I’ve also added dark strokes between the bottom lip and chin, depending upon my subject. These colors show you the areas you want to examine, but feel free to experiment and adapt based upon your subject’s appearance.
If you’re like me and can’t draw a straight line, it’s pretty easy to do it in Photoshop. Start your line where you want, hold down the shift key, and then click where you want the line to end. If you screw up, there’s always Undo to save you.
Change the Blend Mode
Once you have the lines where you want, change the Blend mode of the new layer to Soft Light.
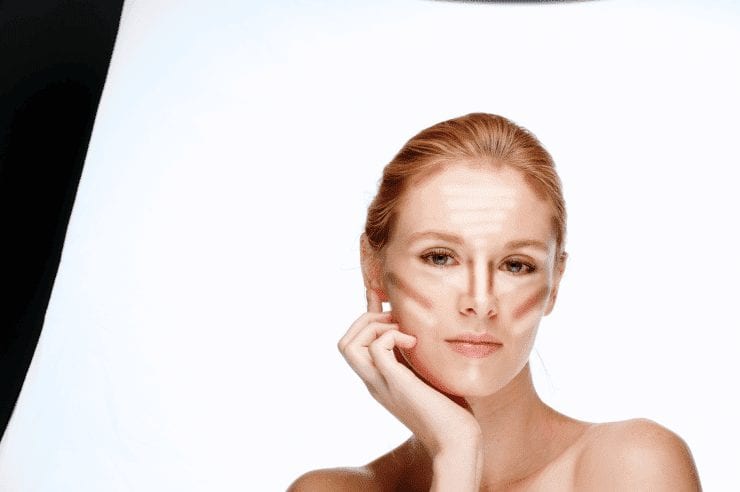
Lower the Opacity
We’re almost there. You can see how changing the Blend Mode affected the strokes on the new layer. Now you can reduce that layer’s opacity until you get the result you like. For the image below, I reduced the opacity to 15%.
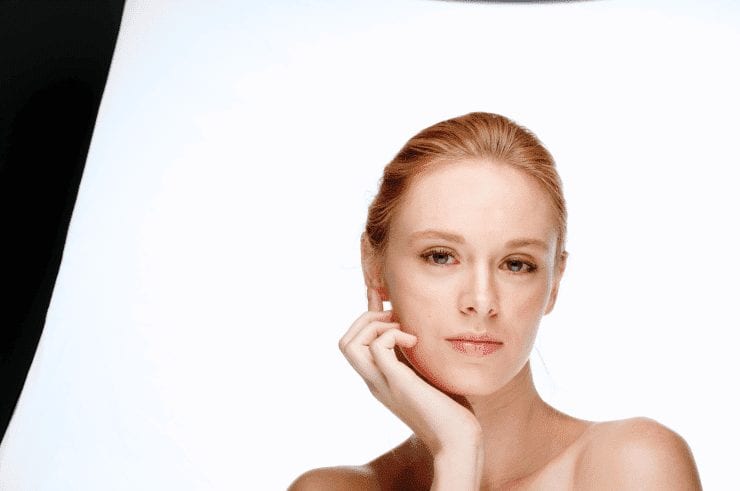
Once you’ve set the opacity where you like, toggle the layer on and off to get a view of how the strokes changed the facial structure. This quick example gave a bit more definition to her cheek bones and slimmed down the bridge of her nose a bit. You may want to use thicker or narrower strokes than the illustration shows. For example, I’d probably go a bit wider on the cheekbone area next time.
Pinterest Can Help Your Portrait Retouching
Make-up artists have known how to enhance beauty for years, but we don’t always have the luxury of shooting with a MUA. When you have to make some changes after the shoot, learn from those who know best. Head over to Pinterest and do a search on “cosmetics” or “beauty tips” to get some great insight.
[clickToTweet tweet=”How to use Pinterest to help your portrait retouching. ” quote=”Use Pinterest to help your portrait retouching. “]
Pinterest is more than just a bunch of folks posting pretty pictures. There is some great advice and tutorials behind those photos. While you’re over there, feel free to check out my pins on Pinterest, too.


Thanks for taking the time to explain things in such great detail in a way that is easy to understand.