Affiliate Disclosure: We earn a commission if you purchase through one of our links at no additional cost to you.
Aurora HDR 2017 is Almost Here
Hello and thank you for listening to The Photo Flunky Show. My favorite HDR program is getting an update and launching soon, so I wanted to dedicate this podcast to sharing some of the benefits and details of this program with you. I’m already putting a pre-release version of the software through the paces and I love the results I’m getting so far.
Just to let you know, I am an affiliate for Aurora HDR 2017 and other Macphun products. I use and recommend them, and I’m happy to share a discount coupon code of BEEM for 10% savings.
That discount will not apply during the pre-release period for Aurora HDR 2017, but don’t worry. You can save a bit of money if you order between September 14th and September 29th, 2016. Not only will Macphun give you a bit of a discount during that period, but they’re also bundling some nice items along with your purchase.
However, please remember that the coupon code is perfectly valid for the Macphun Creative Kit, which I can also highly recommend. That means you save 10% and I get a small commission. It’s a win for all of us.
Here are the details for the Aurora HDR 2017 pre-order offer.
AURORA HDR 2017 PRE-ORDER OFFER INFO
Offer available: September 14 – September 29
Upgrades and Pricing:
- New Customer Pre-Order Price:
$99$89 – Save $10 during pre-order, Includes Pre-Order Bonuses! - Current Users of Aurora HDR Pro Upgrade Price: $49 Includes Pre-Order Bonuses
- Current Users of Aurora HDR Upgrade Price: $69 Includes Pre-Order Bonuses
Pre-Order Bonus Items:
- Trey Ratcliff Deep Dive video
- 1 Year basic subscription to SmugMug
- 60-day KelbyOne membership
- 25 Square Prints from Parabo.press (free global shipping)
Aurora HDR 2017 Key Features:
- NEW: Polarize Filter
- NEW: Powerful Zone System for Luminosity masks
- NEW: Defringing Tool to remove chromatic aberration
- NEW: Batch Processing
- NEW: Radial Masking
- IMPROVED: Tone-mapping technology with reduced HDR noise, improved realism of initial result and faster performance
- IMPROVED: User Interface with a cleaner more modern style
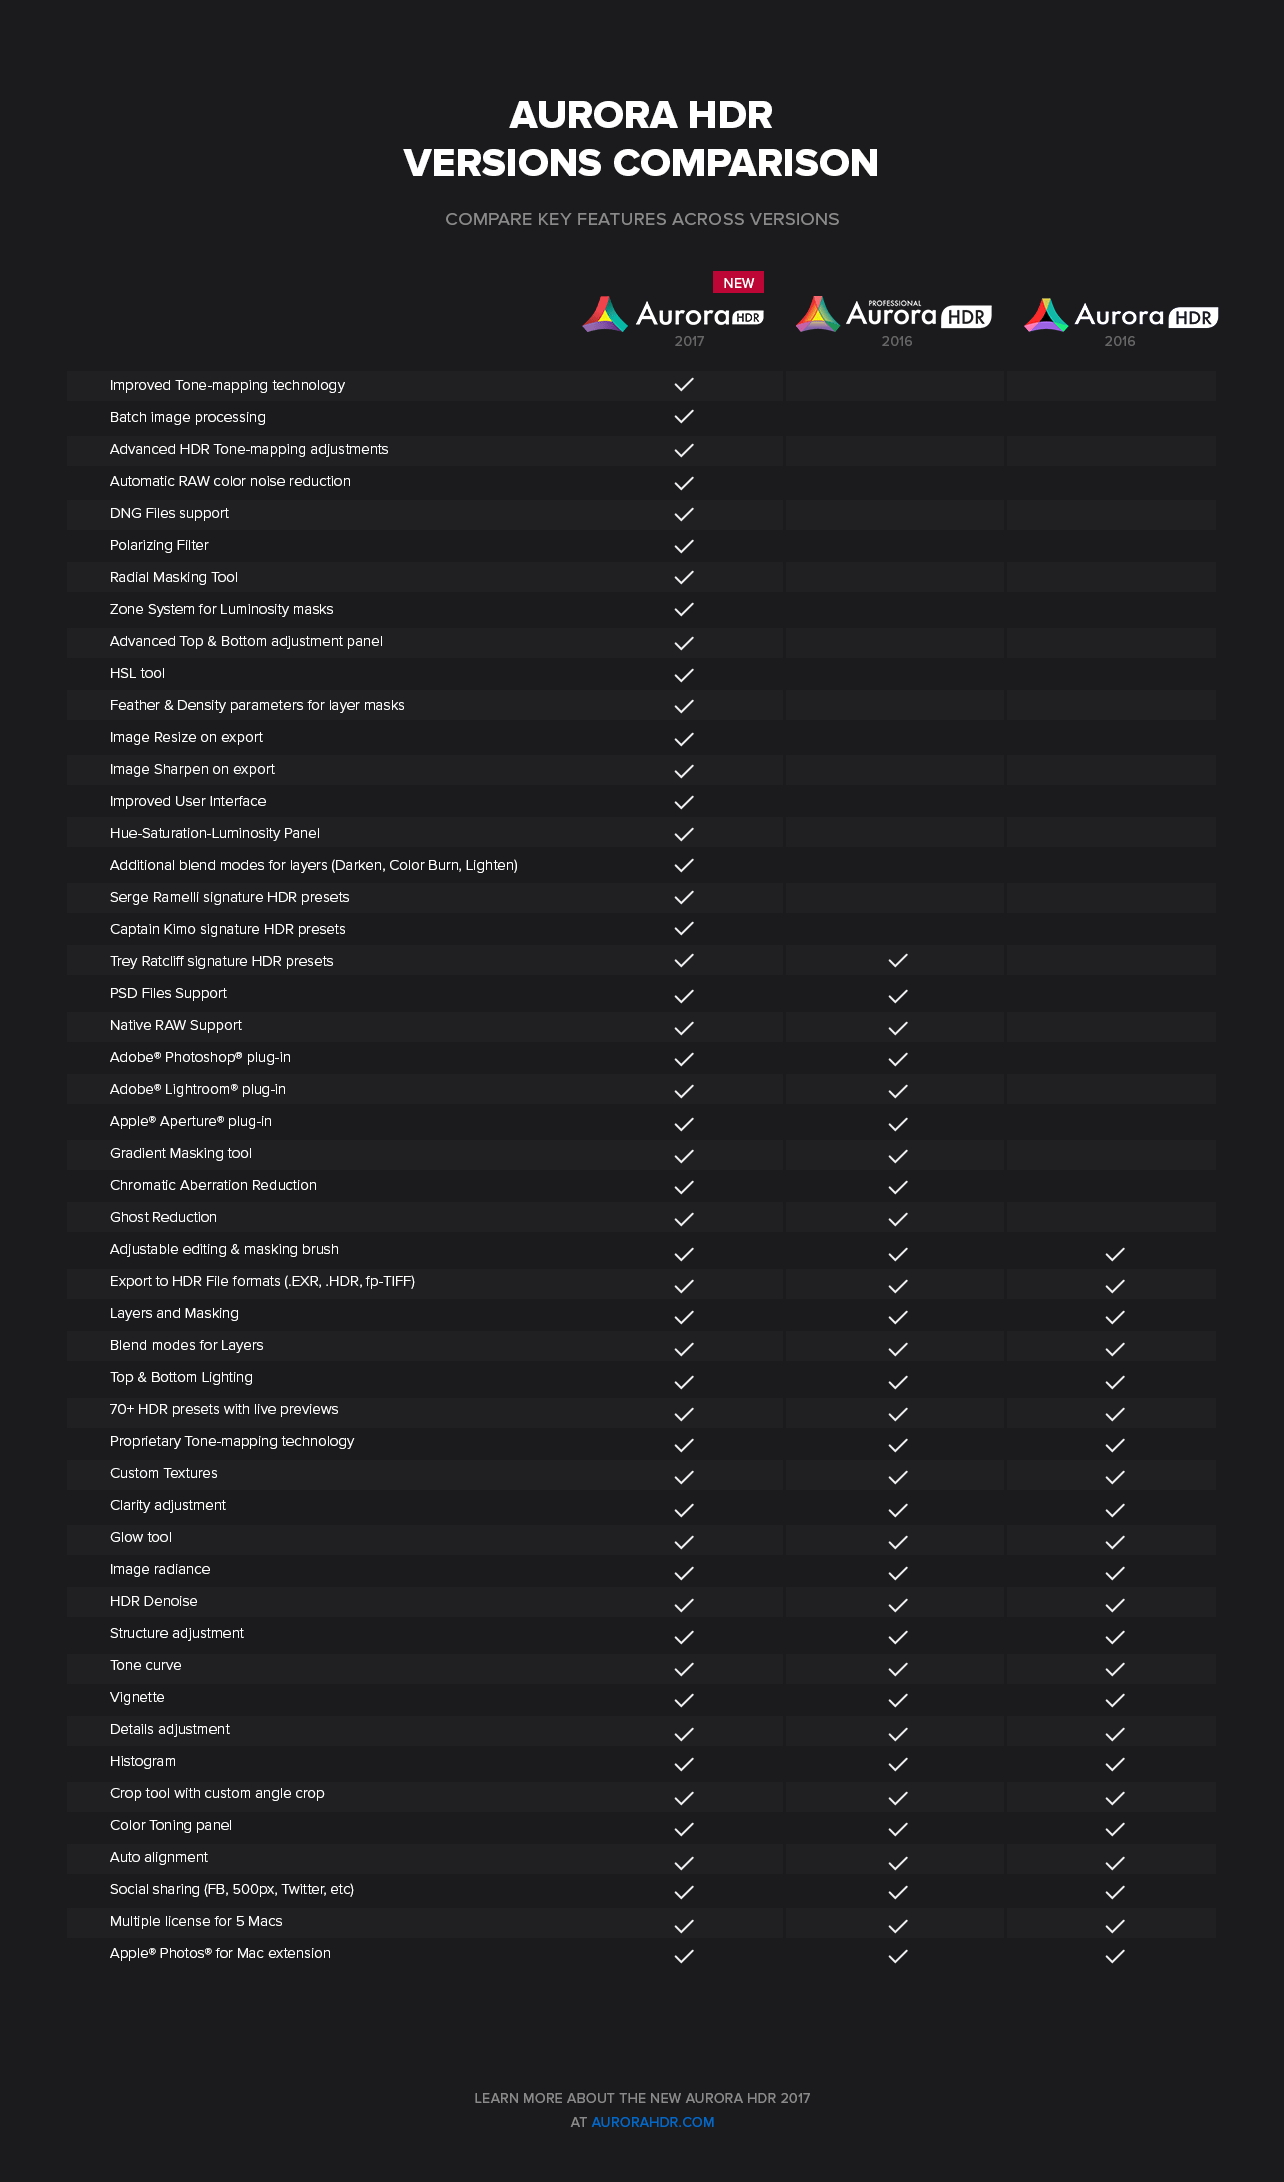
If you already have Aurora HDR, you may wonder if this is worth an upgrade. It’s a reasonable question and it’s something only you can decide. Take a look at this comparison chart to see what new benefits and features are in Aurora HDR 2017.
Diving Into Aurora HDR 2017
You can use Aurora HDR 2017 either as a stand-alone program or as a plugin with Aperture, Lightroom or Photoshop. Here’s how it starts as a stand alone program.
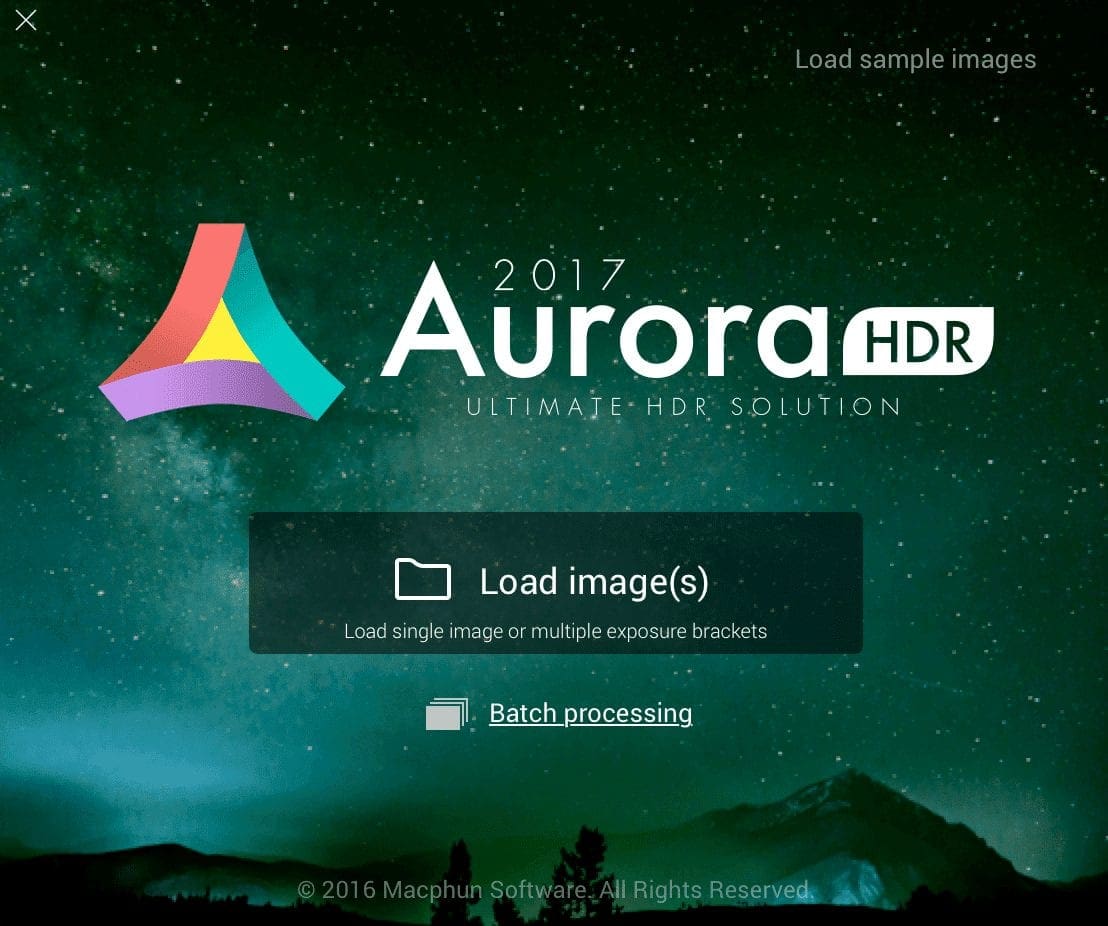
You can drag your photos right onto the splash screen to get started. Notice that little URL for Batch processing. That’s right, you can drag in sets of brackets. Aurora HDR 2017 will recognize which images go together and start processing them all for you.
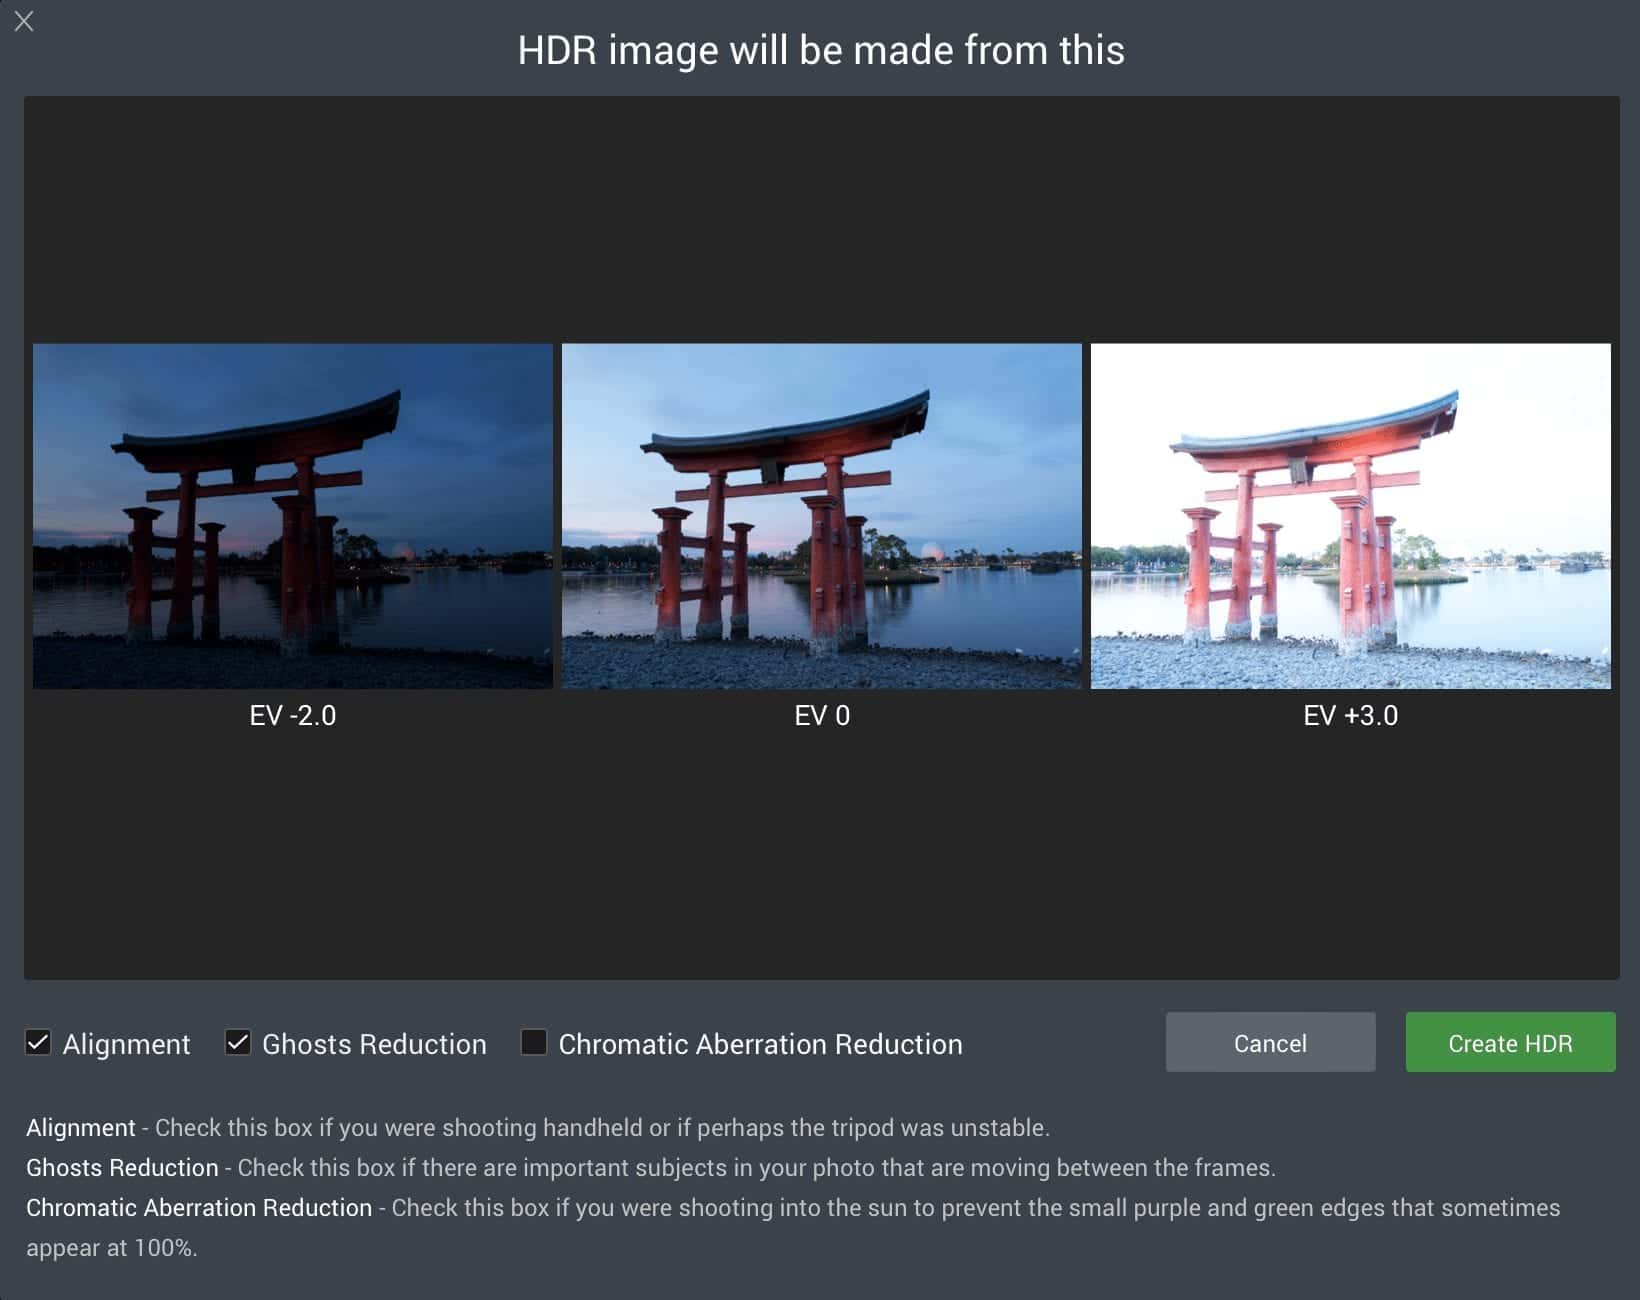
Next, you get to review your selected images and check off the boxes if you want Alignment, Ghosts Reduction or Chromatic Aberration Reduction.
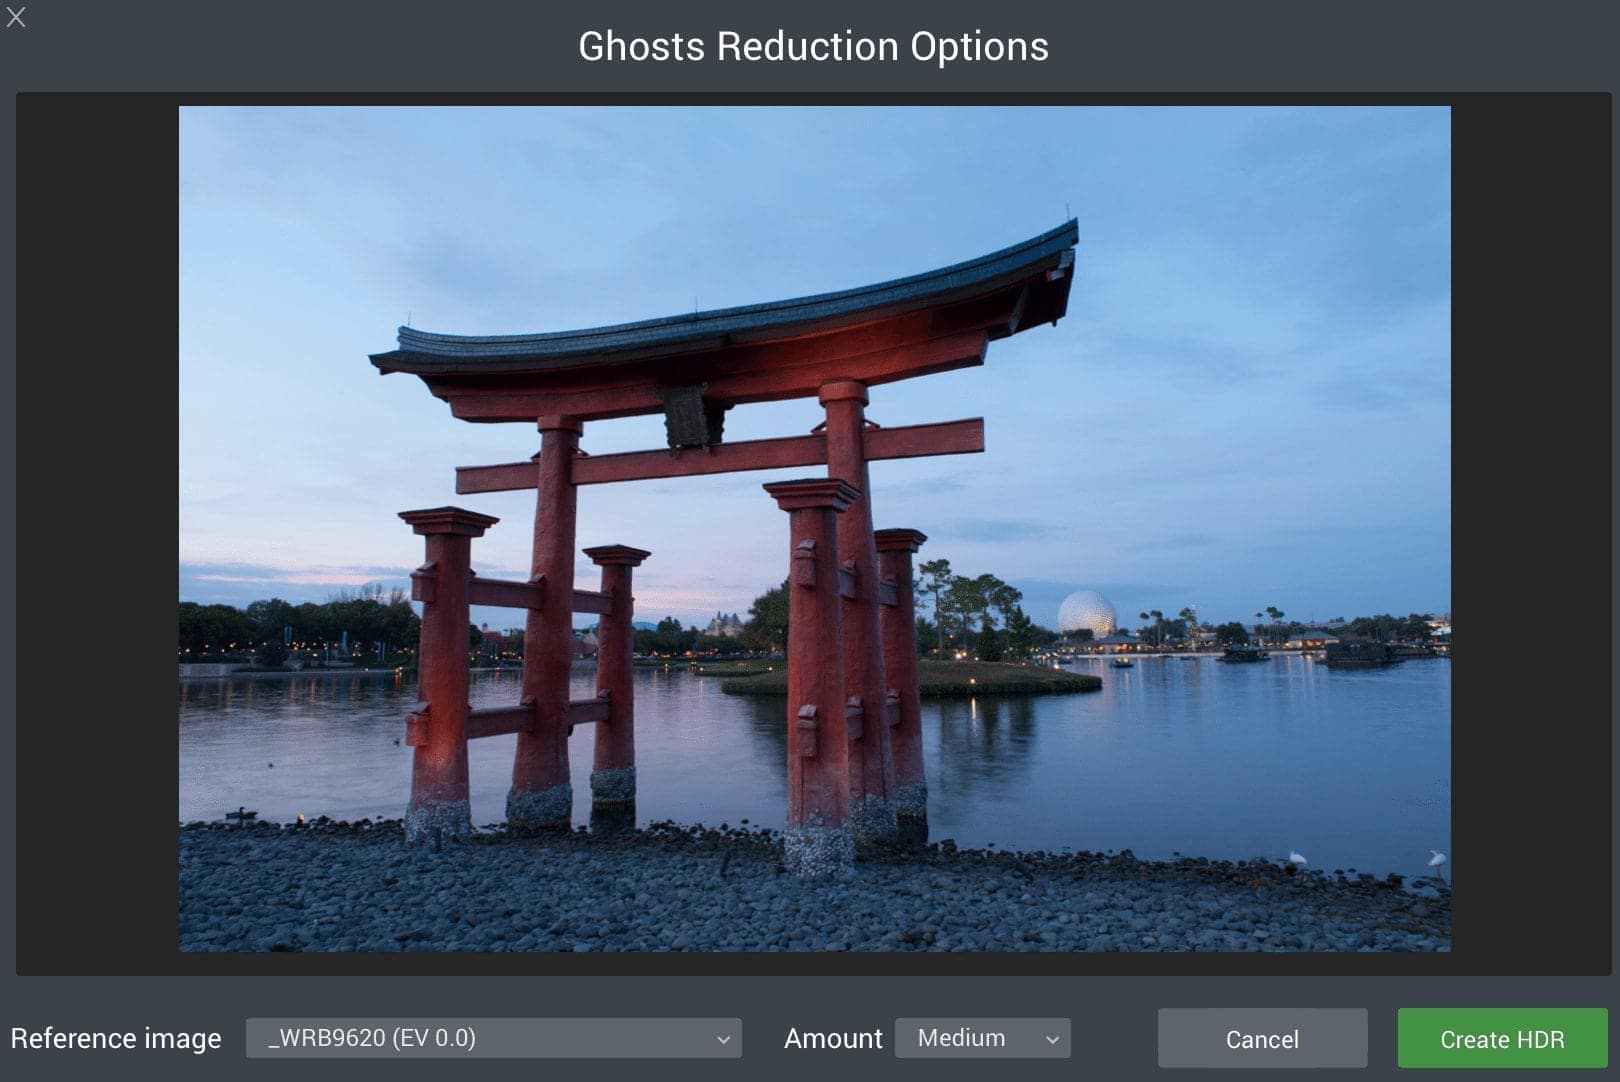
If you selected Ghosts Reduction, there is one more step before Aurora HDR 2017 starts processing your images. You can select a Reference image to use for your de-ghosting.
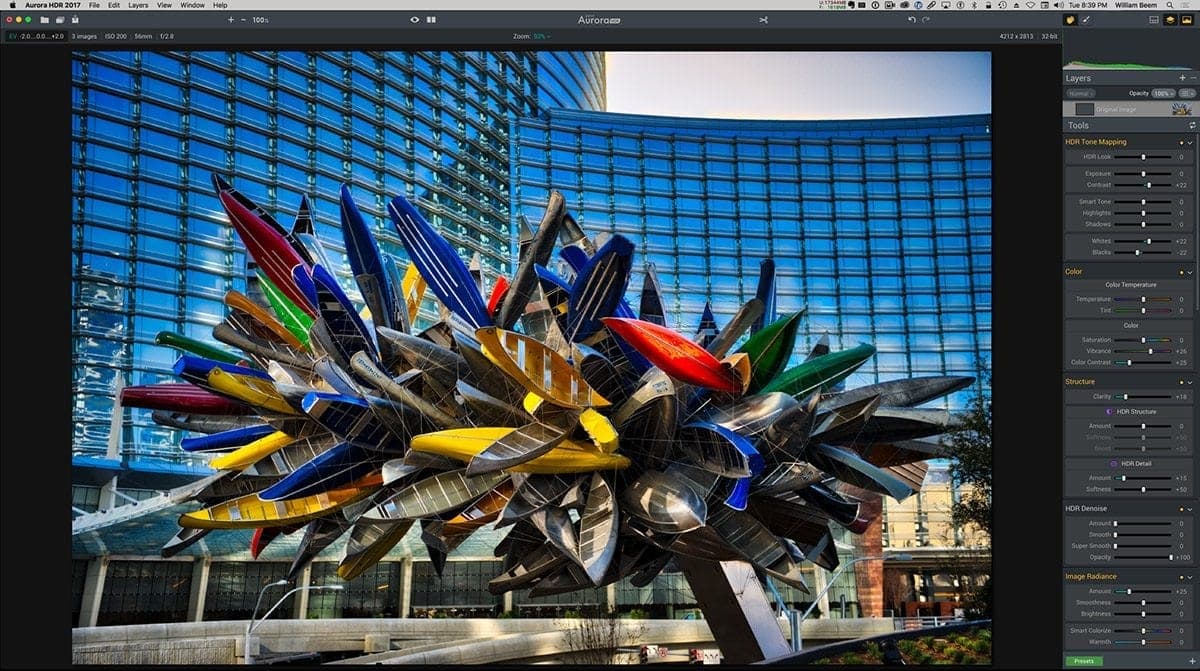
After a bit of processing, you get this full display for your workspace.
That panel stretches down quite a bit further than my screenshot will show. Aurora HDR 2017 is chock full of editing tools.
I hope you enjoyed listening to the podcast and seeing a bit of the new program here. If you have any questions about Aurora HDR 2017, please let me know in the comments.
My affiliate link is http://willliambeem.com/macphun.
As always, I stand behind the products that I recommend. If you have any problems with the tool or questions on how to use it, I’m happy to help you. I appreciate your support if you decide to buy this, or any other affiliate product, from me. It costs you nothing extra (and sometimes saves you money with coupon codes) and I get a little commission to help keep the site running.
Thank you, and I appreciate you.
Macphun Coupon Code
I mentioned at the start of the show that you can save 10% (or $10) on Macphun software using my coupon code. This is my affiliate code, which means that I make a small commission if you purchase from me, but it also means that you save money.
For Macphun products like Luminar and Aurora HDR, you save $10.
For other Macphun products, like the Creative Kit, you save 10%.
Just visit: https://williambeem.com/macphun
When you check out, use my Macphun coupon code: BEEM
Subscribe to The Photo Flunky Show
Thank you for listening to The Photo Flunky Show. Make sure you get every episode by subscribing.
iTunes – https://williambeem.com/itunes
Stitcher – https://williambeem.com/stitcher
Google Play – https://williambeem.com/googleplay
Blubrry – https://williambeem.com/blubrry
Social Media Links
We love seeing your photos and keeping in touch with you on social media. Here’s where you can find us.
Transcript
THE PHOTO FLUNKY SHOW
Episode 42
Hey, thank you for joining us on the Photo Flunky Show. It’s episode number forty-two.
Today we’re going to be talking about one of my favorite HDR programs. There’s a new version coming out and we are going to give you a little bit of detail before it arrives. I’ve got a pre-release version and hopefully I can update you on some of the specs.
My name is William Beem. Lee is not here today. It’s just you and me. The program I’m talking about is from MacPhun; it is Aurora HDR 2017. This has been coming out for a little while, I’ve been waiting for it, I’ve got a pre-released version of it and finally I can share this with you. It’s really a wonderful update to an existing program and I’m sorry to say, if you’re a Windows user, there is not a version for you.
This is a Mac only program as you can probably guess by the name MacPhun. But if you are a Mac user and you’re into HDR, this is just a phenomenal program. If you’ve already got it, you are probably looking at it and noticing if this is something you want to upgrade to.
If you don’t have it and if you’re using other tools, I can highly recommend this. I’ll give you a little advanced disclosure: I am an affiliate so I’m going to give you links over here and my affiliate code for this product, but I wouldn’t do that if I didn’t believe in it. So trust me, if you like this program and you buy it from our link, I would be happy to stand behind it and give you support or help you with it if you’ve got any problems.
With that in mind, why don’t we go ahead and get into a little bit of detail.
Aurora HDR 2017. They are announcing it today, September 14th. There is no live date on this, but when you actually start getting the product in your hands in September 29th, so you’ve got a while to go ahead and put an order in for it. And of course, obviously, right after the fact if you decide to wait that long. But honestly, this is one of the things that I was just greedy to get my hands on it.
Alright, let me give you a little bit of the details on what has changed and later on we’ll come back and we’ll talk about the pricing and so forth.
They call this the world’s ultimate HDR Photo Solution. Honestly, I think that’s a title that they’ve earned. It sounds like they bragging rights when you say that for yourself, but truly this is a program that covers almost every base that I can think of that I want to use for processing HDR photos. The only thing I haven’t found there is something to eliminate spots. But it’s a wonderful tool and it has much more than you would expect for just and HDR program.
Of course this is going to be going for anyone from a casual user to professional photographers. If you are into landscape and nature, if you are doing architecture, particularly people who like to do street and urban exploration photographs, I’ve done long exposure on this and you can even do composites in this because you’ve got the ability to do layers and add textures and other frames inside of the application without having to go back into Photoshop, so it’s really quite nice what they can do.
And of course, it has raw file support so most of the popular raw files are out there and you want to check and make sure, but you’ve got Canon, Nikon and there are some of them over here that I don’t even know what they are. There are plenty of them out there. Check to make sure that you can get a different camera than Canon, Nikon or Sony; take a look and make sure you’re supported, but it is also supporting jpegs, pngs and gif files and a number of other formats. I think it is probably going to have most everybody covered on it.
It’s got good support whether you are using a Magic Mouse or multi button mouse, but the thing that most of us are using once we get into this is a Wacom tablet and it works wonderfully well with my Wacom tablet.
It’s not really taking too much of your system requirements, as long you have a processor core 2 duo, from late 2009 or newer. I think most of us who are working in 2016 are going to have hardware that is within their range.
Four gigs of ram is the minimum, Maverick is your OS and a couple of gigs on your hard drive; this is something that is not really tearing your machine apart. I don’t think having a seven year old or younger computer is too much of a requirement. I’m actually kind of happy, because I upgraded my PC last year and I’ve got the Mac 5K and I’m enjoying the display on this thing, but I’m also enjoying the power behind it.
OK, enough of me yakking about basic statistics of what you need to go on here. What you are really looking for is what this does for you. And if you’ve already got the previous version of Aurora HDR, what is it going to do for you that is new?
Well, they have improved a number of things, starting with the user interface. It’s got a new image processing engine in it, but what I like is the fact that overall it’s faster.
There is layer masking that is working faster. The user interface looks kind of the same at first glance, but when you start looking into the panel items, you’ll see some changes. It is better and it’s a bit more of a modern style to it. You can zoom in to three thousand per cent, so if you really want to pixel peep this application will let you get inside and take a good look at everything you’ve got.
Alright, so what’s new inside of it as far as editing? They’ve got a polarize filter, which to me, I didn’t think that was going to do very much and it’s not like your polarizer that you’re putting on the front of your lens as far as the physics of it, but the effect that it’s having on your photographs simulates the effect that you would get from having a polarizer, if that makes any sense.
So your skies are going to be deeper and richer, but it’s not necessarily going to affect some of the other colors.
They have got a zone system now for luminosity masks and we’ll talk about the luminosity masks a little bit more, but you can do an entire luminosity mask to just see how the mask looks between your darks and your lights, but you can zone in. So if there are certain areas that you do want to tweak and do it by that luminosity mask, it’s really very simple.
There are a couple of ways to do it. There is a luminosity mask button on the interface, but also if you look at the histogram and you hover your mouse over that, you’ll see the luminosity mask icons come up and you can choose a mask as you’re hovering over it. You can see where it’s changing on your photograph and you’ll see this area is highlighting by this luminosity mask and you can move around and select the areas that you want. Then you can do specific edits on that mask.
They have also added a radial masking tool, which is a simple thing but it’s something that I really enjoy, just for times when you are trying to go ahead and draw somebody’s eye to a certain spot.
They’ve got a feather and density brush for your layer mask. In other words, how much is that little radial gradient changing? Is it fading in and out rapidly or is it going to be a sudden drop?
The top and bottom lighting adjustment doesn’t actually say lighting; it just says top and bottom adjustment. It’s changed. It is not just a matter of your exposure that you can change on the top and bottom though, kind of like a gradient. You have also got controls in there now for both the top and the bottom where you can control the contrast, the vibrance and the warmth for each section. Of course, blending those together, you’ve got a slider for the blend mode, you can shift them around, you can rotate them around. You’ve got controls over how that top and bottom looks, so it actually could be left and right if you really want to change the rotation around or maybe do it diagonally from one side to the other.
But you’ve got wonderful controls of the top and bottom. It’s really a nice thing and I also really like having the idea of the warmth and the contrast associated with that because it just makes it easier. Sometimes you want something to be bold in one area and fade off to another; or you want to show the contrast between maybe a cool side and a warm side. That is a nice little change and upgrade.
And of course, you’ve got a couple of new layer type options. You’ve got an option for texture, so if you like to put textures on your HDR, this makes it very easy. You can select the source, put it in there … You can do another original source.
Of course you can also bring in HDR brackets and then kind of brush things in. It’s kind of an old school way and the way I used to do things. I haven’t had a need to do that, but playing with the layer for texture adds a little bit of creativity to this, depending upon the textures you get.
They have improved a few tools.
The gradient masking tool is much better. As far as the blend modes, they have added Darken, Color Burn and Lighten blend modes. The tone mapping is better. One of the things that they are mentioning here is that they have got a better recovery of washed highlights.
I am just finding that overall it seems that I don’t really need to push the tone mapping controls very far. It is kind of like being a pilot: small moves have big results. So you don’t necessarily need to just drag the slider all the way over. In fact if you do, you are probably going to end up with that kind of Elvis on velvet effect. The controls are really very powerful. There is a lot of room to manoeuvre so from my case, I tend to like my HDR photos to be a bit more realistic rather than some of the older style that were kind of really raw and in your face. I want my photograph to look the way I saw it. I want those little details – the highlights and shadows – to blend the way my eyes would see them.
I am really getting that kind of control out of this program. So for me, small moves are much better with these controls, but I like the fact that if I’ve got a scene that just needs a bit more, there is a lot of room on the slider to keep pushing it out and get more results.
They have added over seventy more HDR presets from a number of photographers; they have kind of changed the structure and clarity technology for better sharpening. What I am finding out is that you’ve got plenty of options in here. Of course that means that you can, if you turn them all on and turn them all the way up, you’re going to end up with some really crunchy and grungy results. But again, small moves. I am liking the fact that the structure is there, the clarity is there and you can separate those by highlights, midtones and shadows and you’ve also got room for each one of them to kind of adjust and tweak to either bring them up or tone them down a bit.
You can get the result you want, so if you want, like I do, a very realistic photograph, you can get that with nice detail in it. If you really want to go for the crunchy thing, you’ve got a lot of room to do that as well.
They’ve also got a better way of exporting your photos and you can resize your image on export, you can sharpen it on the way out and one of the things I’m told is probably one of the most requested features that you have and that is batch processing.
I’ve always done mine one set of brackets at a time when I was doing HDR. You don’t have to wait now. If you’ve got a number of sets of brackets, you can drag them all in and it will batch them all and go ahead. And particularly if you’ve got some presets or sub folders that you want to use, you can batch them, put them in sub folders and you’re gone. It’s really a good way to speed up your work if you’ve got a number of brackets that you want to put in.
They’ve got noise control in here. It is just really reduced color noise overall and I mentioned before that there was raw support and I forgot to mention they also have DNG support. Apparently they weren’t happy with the way it happened in the first version, so if you are someone who likes to use DNG they have got better DNG handling.
So here is what we have. Price is a pre order for retail price and it’s $89.00 plus bonuses, and those are available between September 14th and 29th, so you’ve got a bit of a time frame there to work. This podcast is coming out on September 14th. If you get to September 30th, you’ve missed the opportunity there for the $89.00 price and the bonuses and then the retail pricing is going to be $99.00.
If you have a previous version, Version 1, upgrade price is $49.00. If you are upgrading from the standard HDR version, it is $69.00.
Enough talking about the little facts. They gave me a wonderful little sheet with all the new features and upgrades and items like that. Here is my impression.
I’ve been working on a few images like this and one of the things I like is I can go back to images that I processed before, some of them in the previous version of Aurora HDR, some of them in Photomatix, some of them in Lightroom and Photoshop, and my overall impression is this is the place where I want to work!
It is fast. It is much faster doing my processing here than it was in any of the other tools. I am shooting with 36 mega pixel files. I have a Nikon D800; we are talking large files with a lot of detail and a lot of quality to them. You don’t really need to bring in – I typically shoot a bracket of five – you don’t need to bring in all five, but I’ll pick the zero, the plus two and the minus two and bring those in and that gives me all the exposure range that I need. I’ve got a lot of exposure range.
When I first bring these in I don’t really do it with any presets. Everything goes flat. And that is exactly what I want my HDR processing software to do. I want it to give me a flat image, much like if you were taking the photograph and you load it up in Lightroom. You see it is kind of flat because that gives you room to go ahead and tweak things the way you like. The very first thing I do is I go to the tone curve and I know a lot of people have probably forgotten about curves, but I haven’t. I like doing a simple little S-curve and that just gives me a starting place.
That shows me that I’ve got my blacks where I want them, I’ve got my whites where I want them and it just gives me a nice contrast to my overall image. Then I can start working through the panel. And I don’t necessarily work this one top to bottom, the way some of the other applications work. In Lightroom I’ll work the panels from the bottom up, but here I am kind of bouncing around a bit.
So the first thing I’m doing is I’ll go in and adjust this for the RGB or you can break it out to do curves on red, green or blue channels. I am just doing RGB simple little S-curve.
That may change later on during my post processing, but that is my starting point.
At the top of your tools you’ve got your HDR tone mapping and they have got HDR look, exposure, contrast and then they’ve got a section called smart tone, highlights and shadows and whites and blacks. I tell you what: I tried playing with the HDR tone. It’s an interesting little look over there, particularly if you want to take it a bit further than what you would normally do. I find if I bring it to the left in the negative area, it gives me a deeper, richer look; if I take it over to the right it’s going to be a brighter, more of what I would expect from older HDR programs. But for the most part I leave HDR look off unless I’ve got a specific look in mind.
And I rarely have had to deal with the exposure channel because, since I’m working on brackets that I’ve already shot, the exposure is nailed right away the first time. But I will add a little tweak or contrast in there. Sometimes just doing the level curve or contrast thing – OK, good. I’m done. But not always.
You can go down and play with the smart tone a little bit and smart tone, again, if you move that to the right it really gives you a bright washed out look. You bring it over to the left and you get deeper, richer colors and that is kind of what I’m looking for. I want photographs that look realistic and I want something that has deep, rich colors and contrast with it. And of course, highlights and shadows are the same that you work with in Lightroom and other tools, so we won’t go over that and the same with whites and blacks. The colors is the next section down.
I find that I am not really having to do too much with that, but they do have a couple of sliders. I prefer vibrance over saturation, as I think most of us do and I’ll give vibrance maybe about a plus fifteen. That is usually enough to get a subtle little highlight on there.
The color contrast, depending on what you want to do, if you drag that all the way over, let’s just say that you’ll take your yellow sunset to orange and purple. So small moves are better.
Color contrast is, again, something that if you’ve got a photograph … well let’s go back to the sunset I was talking about. If you’ve got blue skies and then the warmth at the bottom, color contrast can kind of enhance that. Sometimes the sunset doesn’t look as dramatic on your shot as it did in your mind, so you can fix that with a color contrast and again, you don’t need much; fifteen, twenty and I think that will do a good job for realistic. And if you really want to push it up to seventy five or a hundred, well, happy Halloween! You can get quite a look out of it, but I think small moves are probably going to work best for you.
The next section down is called structure and the first thing you see there is your friend, clarity. Clarity, this is kind of a global adjustment – all of these are going to be global adjustments here – but if you want to start playing with layers and the luminosity mask, you can really control where the adjustments go. And there is also an adjustment brush here, so you can make another layer and it’s got a mask on it and you can start brushing things in where you want them to be. So you’ve got a choice of how things happy; you can do selective edits just inside of Aurora HDR 2017.
I like to do a little bit of clarity and again, not too much. I’m hitting it at about plus fifteen.
The structure depends on the photograph. Do I need that or not? So your HDR structure, you’ve got sliders for amount, softness and boost and then beneath that you’ve got HDR detail. Again, it’s amount and softness.
These aren’t things that you really recognize. When you recognize structure, you recognize detail, but softness and boost you kind of almost have to play with them to take a look and see what they are doing for you.
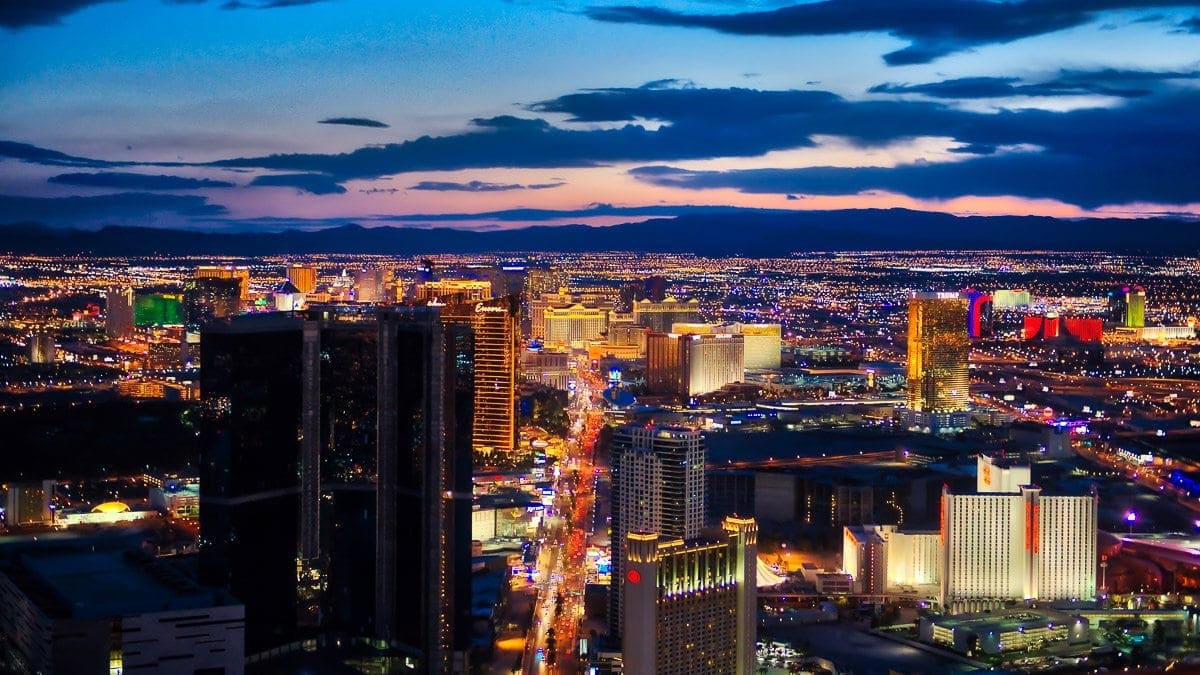
I found that, for example, if I hit the amount back and the softness back but then I hit the boost, it gives me an interesting look of detail in a shot. I am actually kind of working on a photograph of Las Vegas as we are talking here and I’ve done this. I can just see on the buildings, going down the strip, how the boost really amplifies the lines and textures. So it kind of sharpens up the image a bit for me.
Further down, HDR denoise: this one is really nice to have built into the program because, let’s face it, you may not have gone through and done denoise on your brackets before you brought them in. It might be another step that you would have to do with a different tool on your way to export them out.
The nice part about the HDR denoise is there are sometimes little artefacts that you get within HDR as you are processing. This one understands what those artefacts are like and it really helps you isolate where they are going to be.
Keep in mind you’ve got an amount that you can denoise, but there is like a smooth and super smooth and then opacity, where you can back these off. The reason you have that is again, you can put this on another layer. So for example, I am looking at a cityscape and I have a sunset and sky above it. I don’t want my clouds to have the same kind of detail that I have on the city and buildings below. So I may crank up some clarity and have that working on the buildings and hotels and resorts there. But I don’t want my clouds to end up crunchy, so I’m going to split this off in different layers and then I’m going to run the denoise and smooth out the clouds a lot more, whereas it doesn’t matter so much on the buildings.
Image radius: this is one of those things that just gives you a kind of glow. So imagine again I am looking at a photograph of the Las Vegas Strip at sunset. All the lights are on. You turn on image radiance and suddenly those buildings just – it’s not quite the same thing as a glow. And I say that because they have got a panel further down called a glow and boy, is this a hard one to do on an audio podcast!
What I would say is when you bring in image radiance, it darkens the sky a little bit and it amplifies the lights a little bit, but it also kind of spreads the light out a little bit. So it’s almost like it’s radiating, which is why it’s image radius, of course! The light is radiating out as you would expect it to. So it kind of brings your lighting to life and you can change that with the warmth of the radiation. You can add brightness to certain areas. I’m still hesitant. I’m a guy with small moves.
There is a polarizing filter and I’ve tried this out on a few things and again, it really affects the sky, so if I want to make that sky deep blue, I can bring up that polarizing filter then pull it back or just leave it the way it was. I’ve enjoyed using it. It’s not affecting the rest of my image; it’s just kind of hitting the areas that will give you that kind of deep blue.
Now what it won’t do for you is if you’ve taken a photograph, this is where you would typically use a polarizer like shooting rocks that are just under the water line and the polarizer cuts out that glare on the water and allows you to see the rocks very clearly. You are not going to get that with this kind of polarizing filter. It will give you the effect of deepening the sky and so forth, but it can’t change the image that you have.
So if you didn’t capture the rocks with a polarizing filter on your camera, you are not going to be able to suddenly change that inside of post processing. But as far as giving an appearance on the skyline, I think it does a really good job.
The details – this is one of the things I like. You not only have global, but you’ve also got tabs for highlights and shadows and again, you can tweak the sliders for small, medium and large. It gives you a lot of room to really tweak how your sharpening is going to go, where you are going to bring up the details and also, how you can mask them to see if you want to leave your details just at the larger items in your photograph.
The glow. This one is interesting. It starts off at zero and as you bring it up, I don’t want to say haze, but it is different to the radiance and it kind of adds a little bit of whites to your overall image. It really does make it seem like the buildings are glowing from inside.
I don’t use this one as much. I really enjoy the image radiance. The glow, I kind of leave off because I’m afraid as it’s adding that information, it also is kind of obscuring some of the buildings in this photograph I’m working on. So it’s like putting a little bit of a white haze in front of it. That’s something I would like if maybe I was shooting something like a fog scene, having a little glow coming from behind. To me, the glow is something that you would use in very specific cases. In this one I’m not going to use it at all, but it is a handy tool to have there. I think the image radiance is one that I really prefer more.
Top and bottom adjustment: this one is just really how you can draw someone’s eye where you want it to go. That’s not to say that you have to use that you have to use that to create your vignette. You have also got a vignetting tool further down, but for this one, you have exposure, contrast, vibrance and warmth on both the top and bottom. And of course, you can change that little gradient tool that is running right in the center and you can move that position around, you can change the blend mode and you can rotate it around. So you’ve got a lot of flexibility to work with the gradient inside of here and that’s really what your top and bottom adjustment is.
The tone curve is the next one on the list and of course I’ve already gone ahead and done that.
Now you are getting down to hue, saturation and luminance variables. They also have color toning. So if you like to do little tone sets, they have got a number of them here like a purple and blue, or orange and light blue or cyan … If you want to change your highlights and your shadows to have a bit of color grading in them, they’ve got a number of tools. There are a few presets right off the top and you can kind of change your tint and saturation for the highlights and shadows and you can change the balance and the amount for those. So it gives you a good way to do a little bit of color gradation right inside of the application here.
Alright, the vignette. This is one of those things that starts off right in the middle. You’ve got a vignette of zero. You drag it to the right and you’ve got a frosty white vignette. I don’t know anybody outside of the glamour shot store that uses the frosty white vignette. But I find again, it is the same thing: small moves. I just took this thing and started at zero. If I drag it all the way over to the left it goes to a hundred and that gives me virtually black on my edges and just kind of looking through a black frame; almost looks like a porthole on an airplane. That is a lot.
I back it off and I’m only using about a minus fifteen to just kind of shape the eye that I want there. You can change the roundness, you can change the feather of it, but of course one of the things that it had before was something called inner light, which kind of gives you a little bit of an exposure boost inside the center. And of course there is a little section here where you can place the center. You don’t always want your vignette to go exactly on the center. Sometimes your subject, most of the time – your subject is probably going to be off to the left or right. So you can have your vignette work with the center that you place and then you can bring up the inner light just a little bit and just kind of highlight that subject and it really draws the viewer’s eye right in to where you want it to be.
And down at the bottom, of course, there are layers so you can change the opacity, you can change blend modes and you can change images. You can scale things to fit.
One of the things I like about the layers is you add one on and you’ve got options now. You can add adjustment layers. You’ve got a custom texture. So for example, if you’ve got a photograph of something that’s got a nice interesting texture on it, you can put it in there as a layer and then change the blend mode on it and then you can drag the opacity slider over to make sure it fits just the way you want it to.
And of course you can bring in original images and you can bring in HDR brackets.
You’ve got options here to bring in other images and mask them into places that I used to spend hours doing in Photoshop and now it’s actually really fast to go ahead and create a great image here.
Things that I used to spend an hour or two hours or more in Photoshop, I can do here in five to ten minutes. It is just that good of a tool.
One of the other things I like, I’ve mentioned the luminance masks, it is giving you a simple way of isolating an area that has got a certain light range. It’s not about the color. It’s all about the light and darkness. So you can select something and you can affect just that range; just add another layer, choose the luminance mask that you want and make your adjustments that way.
And last, simple but a very handy tool to have, is the pair of scissors at the top for your crop tool. You can do free range. They have also got some presets in here. If you want to do a 16:9 or square 1:1 and a couple of others in there, it’s actually pretty handy.
When it comes time to save your work, you can go ahead and do that of course, but you’ve also got a number of export options. So you can share this directly off your Mac tools as far as if you want to send the Apple Mail in messages, you can send it to social media, Twitter or Facebook, you can send it to 500px, SmugMug or Flickr, just right inside of the user interface.
And of course you can also open it in other applications.
If you’ve got the Creative Kit from MacPhun, which I do, it’s got that in there; you’ve got Apple Photos, Aperture, Photoshop and Lightroom. Once you’ve finished your work here, it’s very easy to transfer it to another application.
Alright, that’s all I’ve got to share with you about the new product. It’s something I’ve been playing with for a while now. I really do enjoy it. I think you are going to like it too. If you’ve got a Mac and you are doing HDR photography, this is a really nice step not only above all the other competition, but even above their previous product.
And of course, if you get in on the ordering period between September 14th and 29th you get a few bonus items in there. First, starting off there is a deep dive video by Trey Ratcliff. You get a one year basic subscription to SmugMug; you get sixty days with KelbyOne membership – that’s actually pretty cool – and twenty-five square prints from Parabo. There’s something I don’t know.
It says free global shipping. So I don’t know that company name, but I’ll put this in the show notes. You can find this at williambeem.com/episode42
And again, just so you know, I am an affiliate for MacPhun. You can get there with my code at williambeem.com/macphun And if you are specifically interested in this product, go to williambeem.com/aurorahdr2017
And when you check out, put in my coupon code. It’s just like my last name: BEEM and that is usually good for ten per cent off, so hopefully it will save you a little bit of money too. Thank you very much. It’s always a pleasure and if you’ve got any questions or comments on this episode, let me know and I’ll be happy to answer you.
Thank you for listening to the Photo Flunky Show. As usual, you can find a free transcript of this show at williambeem.com/episode42
My thanks to the folks at MacPhun for letting me take an early look at this product. I really do enjoy it. I’m happy to recommend it. If you’ve got any questions about it or if you need any help with it, let me know. I’ll be happy to help you out.
Thanks everybody. I appreciate you and we’ll see you again next week.
Want to learn more about Photography software? Click below to check out articles about Adobe, ON1, Skylum, and more.
Photography Software Articles

