Affiliate Disclosure: We earn a commission if you purchase through one of our links at no additional cost to you.
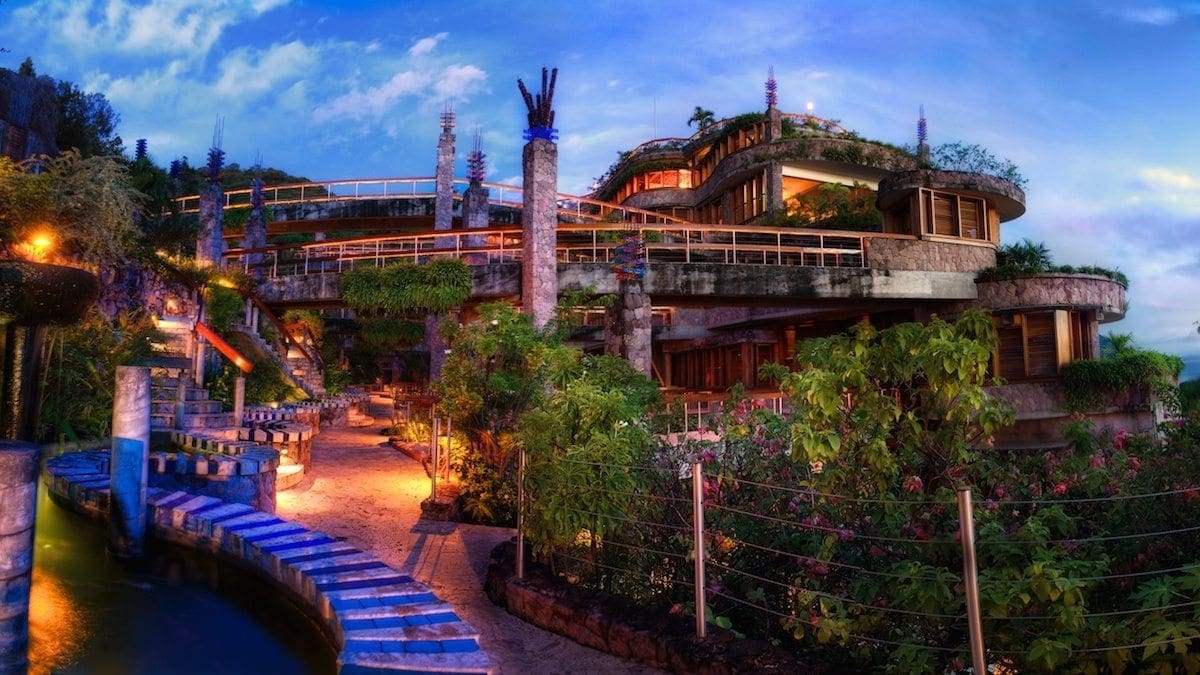
I spent time over the weekend processing my Jade Mountain HDR panorama and it reminded me of something I said about the workshop Joe McNally hosted in St. Lucia. It’s a good place to fail. This was my first time trying to process HDR panorama photos, so I made some mistakes along the way. That’s how I learn, so I’ll share it with you.
What Goes Into HDR Panorama?
Why is this a panorama in the first place? My objective was to try and capture the scale of the resort. Typically, my Nikon 14-24mm lens does this kind of job for me. While I love that lens, it has a tendency to introduce some distortion in the image that I didn’t want to have in this scene.
The only reason I made this shot using a panorama process was to solve that lens distortion issue.
I used my Nikon 24-70mm lens on my tripod and took the shot as a vertical panorama. Each block had a bracket of seven exposures on my Nikon D800 camera. That’s the one with 36-megapixel files. The final image is seriously obese with megapixels, despite the fact that I cropped it as a 16:9 frame.
That gives me 28 photos at 36 megapixels each. If you’re going to try something similar, have patience. I have an iMac with 16 GB RAM to process the images and it did OK, but it still takes time.
My HDR Panorama Process
There may be a better way to do this kind of image. Since this was my first time, I decided to overshoot with resources that I may not need. I’m one of those people who would rather have and not need than need and not have.
1: Match White Balance
I shot this scene around sunset with changing lighting conditions from one side to another. Sometimes that screws with a camera’s auto white balance, so I decided to even the score. I set the white balance using the grey stone in the building and stamped it in Aperture to all of the other images in the series.
2: Starting the Photomerge
I wanted to process these in Photomatix 5. In order to do that, I decided to export the full resolution files by auto-exposure bracket and load them into Photomerge in Photoshop CC. There were four photos in each block, so I ended up doing a photo merge for each exposure.
Here’s where I went into overkill mode. I saved each exposure as a Photoshop file. Then I exported each one as a TIFF file to use in Photomatix. Finally, I also exported each exposure as a JPEG to use later in Photoshop for layer masking.
To keep my images straight, I named each series by the exposure. This bracket was a bit odd, ranging from -2, -1.33, -0.67, 0, +0.67, +1.33, and +2. I just tacked the exposure value onto the end of each file, starting with Jade Panorama -2, etc.
3: Tonemapping in Photomatix 5
I prefer Photomatix for my HDR. Sometimes I’ll create a 32-bit TIFF in Photoshop, but 90% of my HDR uses Photomatix. I realized that my version was behind the curve, so this is my first HDR with the current release.
The first issue I had in Photomatix was to manually adjust the Setting of Exposure values. If you look at the range above where I named the files, you can see the values I used here.
Alignment and deghosting have improved in Photomatix 5. I’m happy with the features I saw here, but I don’t worry about them too much because I generally use original exposures to mask into the final result. That’s typically how I clear up ghosting issues as well as other problems.
Despite the numerous presets in Photomatix, I’m not a preset kind of guy. It’s fine for a place to start, but I think each image needs it’s own adjustments. So where do I start?
That’s my starting place. Everything else is where it would be if you clicked the Default preset.
One of the first things I do is start playing with Detail Contrast. Since it’s all the way to the right, and that’s often a bit harsh, there’s only one direction to go. While I’m tweaking that setting, I’m also using the White Point and Black Point sliders to set those according to taste.
RC described these three sliders as cantilevers. Move this one, compensate with that one, now tweak the other. You’re basically adjusting them to your own taste. I think the final position of these sliders really depends upon your subject. Sometimes you may want more detail and grit, other times you need something a bit smoother. I don’t believe in “one size fits all” solutions.
Also, remember that these sliders are affecting your image globally. Maybe you want some detail on the texture of the building, but you hate what it does to the sky. This is Photomatix, not Photoshop. It’s also why I created those JPEGs to blend in later to compensate for areas that I want to have a different look.
Once I’m satisfied with the tone mapping process, I hit apply. Photomatix does its crunching and blending, then gives you some finishing options. The only thing I do here is adding some Medium Sharpness, hit Done, and save the file.
4: Finishing in Photoshop
There are a few reasons why your HDR photos need to go into Photoshop. I already mentioned one in the last section. Sometimes you need local adjustments that Photomatix just cannot make. I don’t want a crunchy sky just because I decided to add detail to the stone on the building, for example.
You can correct ghosting issues in Photoshop by blending portions of an original exposure. Sometimes. It depends upon what you captured.
For this image, I really needed to try and do something with the sky. The left half of the sky had a very surreal and unnatural blue cast that just didn’t match the right half of the sky. It was a glaring error, so it took a bit of time with Hue/Saturation sliders in Photoshop to try and balance the two sides. I may still go back and try to tweak this a bit more.
As discussed earlier, I loaded the original exposures into Photoshop as layers and blended parts of them into the tone mapped image to make some corrections. I did a bit of selective sharpening, added a bit of glow, and here we are.
Lessons From My Jade Mountain HDR Panorama
Since this is my first HDR panorama, I decided there are some things I like and some things I wish I could improve. On the positive side, I’m glad I decided to opt for making a vertical panorama instead of using an ultra-wide-angle lens like the Nikon 14-24mm. Although there’s always some lens distortion, I find it acceptable for my purpose with this scene.
One thing I wish I could change is another photographic issue. I set my aperture for f/5.6 and thought that would strike the balance I wanted between light for my exposure and enough depth of field. However, there’s a small spot that I missed and it’s just like an itch in my brain. That little tower thing on the top of the right side of the building is fuzzy and there’s no way to correct that, except to take another photo. Maybe that’s an excuse to go back!
Before leaving on the trip, I considered buying a panorama head from Really Right Stuff to correct some issues that occur in shots like these. Then I decided I’d better actually try a panorama first before dropping money on a tool. Who knows if I’d use it much? I decided that it could be nice to have, but I’m not concerned that I didn’t get a panorama head.
Part of the lower bridge was missing a section of lighting. I debated whether or not to take a section from another part of the bridge, but I decided to leave it alone. It is what it is.
Jade Mountain makes a lovely test environment for a first effort at creating an HDR panorama. The process solved a problem for me photographically, and I learned a few things to improve my next HDR panorama shot. Let me know in the comments if you have any questions, or share a link to show some of your HDR panorama work. I’d love to see it.
Want to learn more about Travel Photography? Click below to check out more Travel Photography articles.
Travel Photography Articles


Great in depth explanation William! As you know I use a PC with 12gb RAM and it too slows with D800 files and panos or HDR, I’m upgrading in Feb to a 64gb X800 PC, hope that speeds things up! The biggest struggle for me with HDR from any of the processors is the WB. Photomatix 5 with Details Enhancer seems to do a better job. I have found that getting the WB set first is critical, if not I’m doomed from the beginning. Great post, hope u make Atlanta!