Affiliate Disclosure: We earn a commission if you purchase through one of our links at no additional cost to you.
We all make mistakes. Failure is part of the process of learning. The good news is that you can learn from the mistakes of others. So I’m doing my part to help by sharing 10 portrait photography mistakes I made when I got started in the field.
I can’t say that any one of these mistakes is more important than the others unless it’s #2. Yeah, that’s a bad one.
My Top 10 Portrait Photography Mistakes
I can sum up most of these mistakes with one word – ignorance.
Don’t be afraid or embarrassed by ignorance. Photography is a complex endeavor and it takes time to learn the things you need to know. Also, don’t be afraid of failure. Instead, start identifying the issues you don’t like in your photos and work to correct them.
My hope with this list is that it will give you some topics to keep in mind. Watch out for them and give them some thought. With any luck, you won’t make the mistakes I made, for as long as I made them.
Portrait photography mistakes are inevitable. Even experienced portrait photographers still screw up now and then. They’re just smart enough to not show you the mistakes they made. Just show your best work and leave the rest on your computer.
1: Not Knowing Which Genre I Preferred
Portrait photography is like any other genre. It’s pretty broad. You can narrow it down to niches, which is something I think that truly helps you improve. There are a handful of niches of portrait photography.
However, I didn’t think about that before getting started. I was genuinely happy to start clicking photos of people. Mindless clicking, hoping something would come out right.
A few did. Most didn’t.
Get Started Using the Community Approach
One of the best ways to get started is to find your local community of photographers, models, makeup artists and others who are all interested in the same thing – collaborating to get interesting photos.
If you live within driving distance of a reasonably large town, like-minded people gather regularly to network and shoot with each other. I’m near Orlando and we have a few groups like this that meet quarterly.
I used to attend regularly, until the events got so large that it became a bit of a nightmare to attend. That’s why other groups sprung up and helped divide the load.
The new groups developed a bit of a theme. Many of them go for the glamour approach, which I realized isn’t what I want. However, there are groups that specialize on Lifestyle, Fashion and Boudoir.
Try Using the Workshop Approach
Another great way to find out what you like is to attend portrait photography workshops. These vary a bit between technical issues and creative ideas. Some are just put on by people who want to make a buck by organizing events with a location and models.
Workshops typically have a theme for each session, so you know what you’re getting into before you attend. While the community approach may be free, expect to pay for a workshop. In return, you should have a manageable group of people, some instruction, a location and reasonably capable models to photograph.
Discover Your Genre
There’s no rule that says you can only photograph one genre of photography. However, I found that I’m naturally drawn to interesting people more than just beautiful people. Having taken my share of portraits with scantily clad women, I find that it makes me a bit uncomfortable. After all, I’m a married man with a daughter. I don’t hang out with scantily clad women.
I hang out with regular people.
Those are the people I want to photograph. Those are people who make portraits that I’m comfortable sharing, also. That’s how I found my genre of portrait photography.
2: Avoid Ugly backgrounds
This is one of the easiest portrait photography mistakes to correct, yet many people ignore it. I think more portraits get ruined by ugly, distracting backgrounds than for any other reason. Let’s also include foreground clutter. Stuff that doesn’t belong in the photo and distracts from the portrait subject should be eliminated.
You want to distill your photos down to the essential elements, and nothing more.
Let me add some clarity to what I mean by ugly backgrounds. An ugly background is anything behind your subject that distracts from your subject.
It could be just because the background is very busy with lots of items, or it could be just a few items. Let me show you an example.
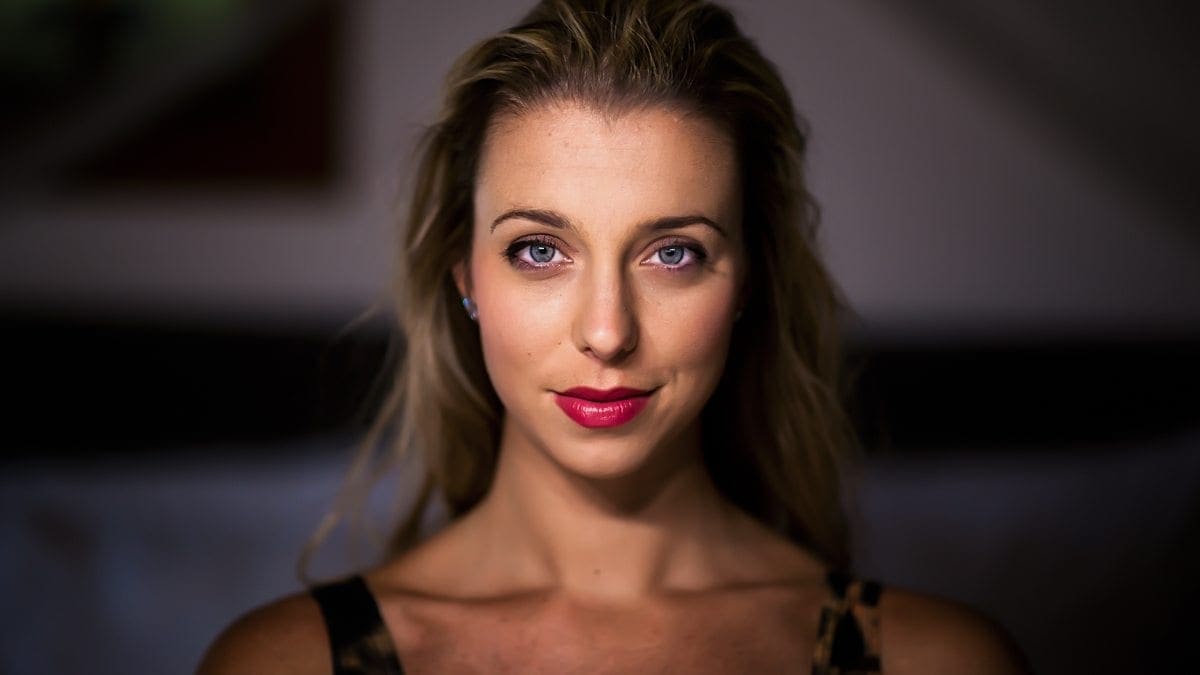
In many ways, I really like this portrait of Erica. However, those dark lines and shapes in the background just kill me. This was a shot in a bedroom at an AirBNB location in Orlando.
Some people think that you can eliminate distractions with a shallow depth of field. Well, this photo has a shallow depth of field and the distractions are still there. I shot this with a Nikon 85mm f/1.4 lens. It’s a lens famous for its bokeh.
Bokeh isn’t enough to break up this distracting background because of the high contrast on the wall behind her.
If you're in the market for a high-quality portrait lens, the Nikon AF-S FX NIKKOR 85mm f/1.4G should be on your list. Part of Nikon's Holy Trinity of Prime Lenses, this lens is beloved by professional and amateur photographers for its ability to create beautiful bokeh. Whether you're shooting indoors or out, the AF-S NIKKOR 85mm f/1.4G will help you capture stunning portraits that your subjects will treasure for a lifetime.
With a maximum aperture of f/1.4, this lens provides ample light gathering capabilities, making it ideal for low-light photography. The fast aperture also easily isolates your subject from the background, resulting in photos with beautiful foreground details and softly blurred backgrounds. And thanks to Nikon's Silent Wave Motor technology, autofocusing is fast, quiet, and precise - perfect for capturing those precious moments.
With its stunning image quality and fast autofocusing performance, it's sure to become one of your favorite lenses.
Now let’s try another photo.

The background here also has a shallow depth of field, but I don’t find it as distracting. You can tell that she’s on a bed and the environment supports the portrait. In other words, there isn’t anything in the photo that doesn’t seem to belong in the photo.
The elements in your photograph need to belong there. They need to support your portrait subject, not steal attention from it.
Distractions may come from lighting hot spots, clutter, color clash, or just anything that takes your eye away from your subject.
Otherwise, it isn’t really a portrait. It’s a snapshot.
3: Not Using Flash Sooner
Let’s start off with a simple premise. All light is natural light. There is no such thing as artificial light. You may now stop avoiding flash photography.
That’s not to say I want to bash ambient or available light photography. I have a few favorite portraits taken without using any flash.

However, adding off-camera flash to your portraits gives you another range of capabilities with your portraits.
Think of off-camera flash as an adjustment brush in Lightroom or a selective layer in Photoshop. Instead of dealing with global lighting, you can selectively light and feature different parts of your composition using off-camera flash.
That’s a potent tool to wield in your portrait photography.
However, some people are afraid of flash. They’re afraid that it will make their portraits look like this:
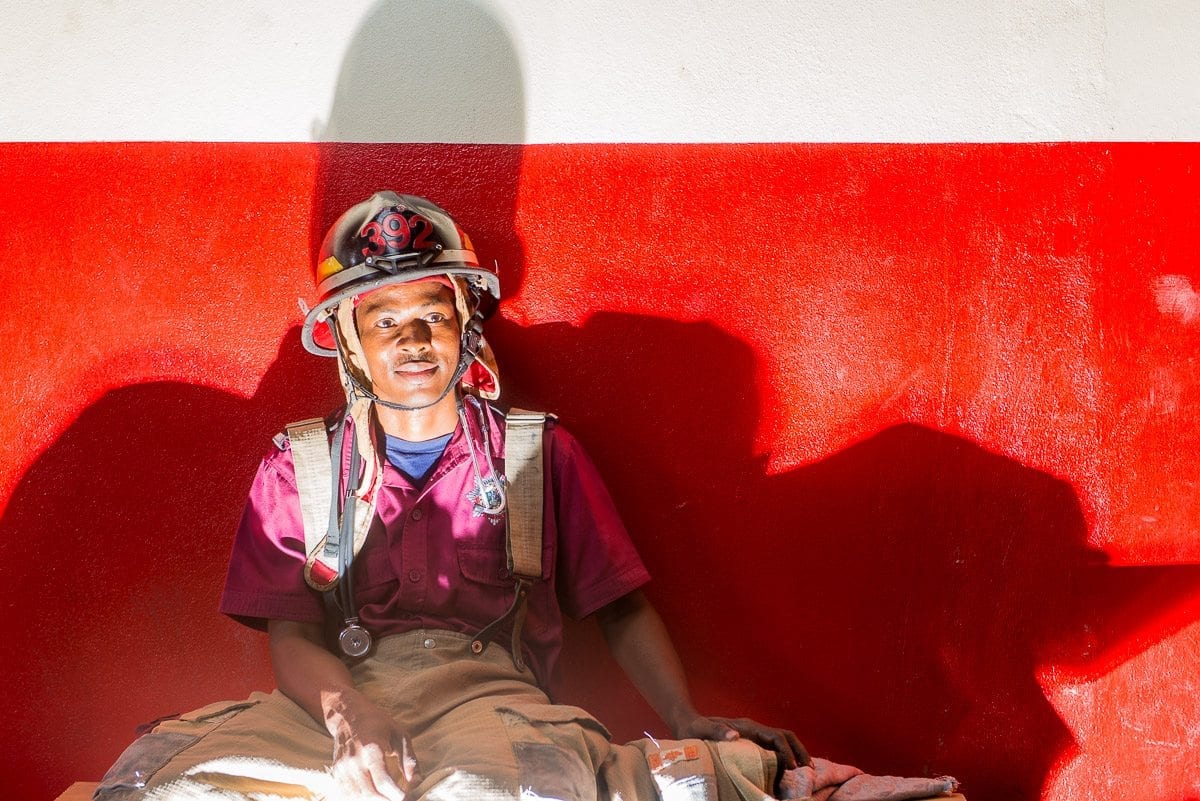
Well, it does happen. Your first flash photo may well look like this one. It doesn’t mean that your next photo can’t look like this one, though.
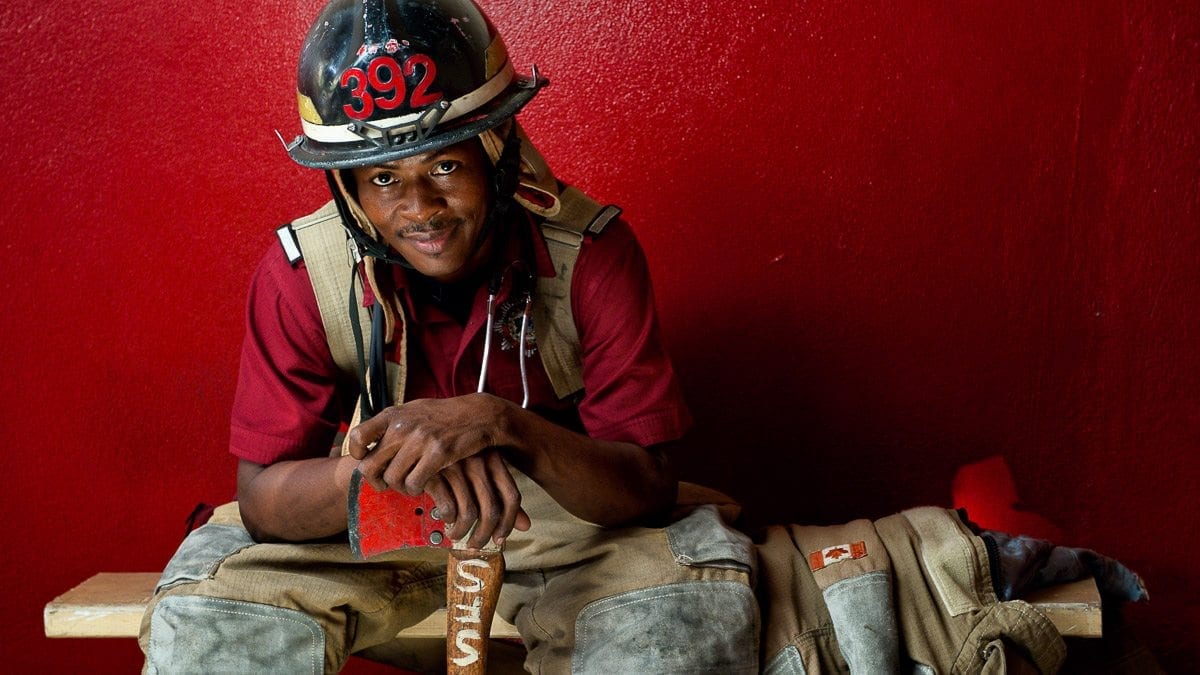
Both photos were taken with off-camera flash. One was wild, the other controlled. Learning how to control your flash and shape the light coming out of it adds new capabilities and dimensions to your portraits.
Don’t be afraid of your flash. Fear is a portrait photography mistake. Get flashing.
The Flash Book helps beginners understand the concepts of applying flash photography, and it does a great job of getting you up to speed. You don't just follow instructions.
Scott helps you understand why things work so you can make independent decisions with your unique photos. Some readers complain about Scott's style of humor used in his books, but his information is solid and reliable.
Each page covers a single topic, so you can find what you’re looking for fast, and Scott’s casual style makes it easy to understand and apply his techniques.
- Scott makes it insanely easy to understand and use flash
- It doesn't include theoretical discussions about light
- Includes plenty of tips for different flash techniques
- Some may not like the humor
- It doesn't include theoretical discussions about light
4: Thinking the Gear Would Create Better Photos
When I started photography (at least seriously), I spent a lot of time reading books, magazines and online forum discussions trying to learn as much as possible.
One lesson was clear. The quality of your photography depends upon the quality of your gear. Newbies with cheap cameras and lenses were inferior to the photography Gods who wielded fast glass and big cameras.
Well, it turns out that was all just crap.
You can take a beautiful photograph with just about any camera. People did that decades ago with far inferior equipment. I think the magazines were out to sell advertisements, the people who wrote books already had this stuff, and the folks on the forum perpetuated this myth to rationalize their own purchase of expensive gear.
Just look at a couple of my examples above where I pointed out some mistakes. I took those portraits with very expensive photography gear and they still sucked.
The day before I wrote this post, I took some portraits of Lee and completely missed the focus on her face. Still don’t know why. I locked focus on her closest eye and the expensive gear should’ve done the rest. However, the photos I took with her much less expensive camera worked perfectly.
When you go out to buy new photography gear, remember that you need it to solve a problem. There is no correlation between price and quality of your results. Though I’ve never taken a photograph with an $8,000 Leica camera, I’m sure that it doesn’t deliver superior results to the gear I own.
What matters is the person taking the photo, and that person needs to understand how to use the gear available.
5: Over-processing My Photos
All photos need post-processing. That means some sharpening at the least. Portraits deserve a bit more attention.
That’s because portraits, particularly with flash, show people in a way that we typically aren’t used to seeing them. In person, people move and you really don’t study their imperfections.
Still portraits give you a chance to find all the little faults and flaws with someone’s face, though. Things that you wouldn’t notice face to face, but are glaringly obvious when frozen in place.
Add flash to that portrait and it really reveals those imperfections. They’re brighter and have shadows to make the edges in your pores look deeper.
That’s why we add some post-processing to portraits. It’s only fair to give people a fair shake and present them as you would remember them face to face.
The problem is that it takes a bit of practice to do it right. When you start smoothing skin or enhancing eyes, there’s a natural tendency to overdo the processing.
Skin has pores. Some people have wrinkles or bags under their eyes. The goal isn’t to eliminate these features. Instead, you want to compensate for the flash and the still image by reducing the features so they don’t overwhelm your perception of the person in the portrait.
One of my biggest mistakes was when it came to processing eyes. I used to make the whites of the eyes pure white from one side to the other. It was garish.
When you process something round, don’t treat it as if it were flat. That means the whites of the eyes should appear a bit less bright on the edges compared to the area closer to the iris. You use a bit of shading to ensure the eyes retain their depth and dimension.
So go easy on the portrait retouching. Try using a tool like Luminar Neo to get started.
6: Inadvertently Changing Camera Settings
Having someone in front of your camera completely changes your energy. When you deal with a still subject, you spend more time thinking about your settings and composition. That’s because the subject isn’t a person.
It’s completely different when you add a human in front of your camera. Now you’re interacting with someone and it takes your mind away from the technical details. That’s particularly true if the person lacks confidence as a portrait subject. You deal with their insecurities and build their trust in you to craft a good portrait.
That’s a perfect time to avoid accidentally changing a setting on your camera with a wayward thumb.
It’s an honest mistake. You’re talking with your subject while holding your camera, not paying attention to the device. A finger moves a wheel, flips a switch or presses the wrong button. Next thing you know, you’re back to shooting and unaware that you just changed your files from RAW to the smallest JPEG format on your camera.
Portrait photography can be very exciting and distracting. My advice is to slow down. When you talk to your subject, put your camera down. That’s why I now use a tripod that supports both my camera and a laptop for tethering.
When I’m not taking photos, the camera goes on the ballhead to rest. That keeps me from accidentally changing something while I talk to the subject, move a light, or do anything else.
Tethering to the laptop lets me see things in larger display, so I can spot if something goes wrong. Like yesterday when I missed focus. I didn’t setup the tether, so I didn’t catch the error. Something went wrong and could’ve been corrected on the spot.
So beware of distractions and changes.
7: Bad Posing
When I started portrait photography, I thought it was the model or subject’s job to pose. Boy, that was a dumb portrait photography mistake.
Many of the people you may photograph locally have as little experience modeling as a new photographer has at capturing portraits. They haven’t yet learned what angles work for them.
Even if they have, it’s up to the photographer to also understand how posing and perspective can flatter or ruin your portraits. You get a bad result if you shoot from the wrong perspective, even if the subject has a great pose.
I learned this lesson from sitting as a subject for another photographer. He’s a very good photographer, so I trusted him. Unfortunately for me, he wasn’t a good portrait photographer.
I allowed him to adjust my pose and hated the result. Being a big man, I’m a bit sensitive to how heavy I look in photos. Well, the result I got from this shot was worse than anything I expected.
His posing may have worked well for a young and fit model, but it didn’t work for me. Would anything work? Sure, I’ve taken enough self portraits to know what poses and angles have a flattering result for me, and which ones don’t.
Rather than try to tell you how to do it here (because it’s a deep topic), I’d like to refer you to a great book on posing by Lindsay Adler.
The Photographer’s Guide to Posing: Techniques to Flatter Everyone by Lindsay Adler is a book that lives up to its title.
If you're a photographer, you know that posing is essential to getting a great photo. But sometimes, knowing how to pose your subjects to flatter them and create an excellent composition can be challenging. That's where this book comes in.
In "The Photographer's Guide to Posing: Techniques to Flatter Everyone," Lindsay Adler covers everything you need to know about posing your subjects for photos. She discusses how the camera sees and how different camera angles, lenses, and perspectives affect your subject's looks. She also covers the five most important things that can ruin a pose, such as poor hand placement or an unflattering facial expression.
Then Lindsay dives into "posing essentials," outlining her approach to start with a base pose and then build on it to create endless posing possibilities. She also discusses posing the face, with specific sections dedicated to the chin, jaw, eyes, and forehead, as well as posing hands.
Finally, Lindsay discusses posing specific subjects, such as women, men, couples, curvy women, families and small groups, and large groups. In each chapter, she addresses the challenges specific to that subject matter.
Lindsey does a great job of explaining how posing and perspective impact your portrait results. I highly recommend this book if you’re into portrait photography and looking for insight for better posing.
If you are a visual learner, you can find Lindsay Adler courses on Creative Live, where she has several courses on posing.
Lindsay Adler has 47 courses on CreativeLive. She's one of my favorite instructors with a gift for posing, creative lighting, and imaginative scenes. She has several courses on posing, lighting, and different photography techniques.
If you're interested in learning portrait photography, she's at the top of her game and a great resource for education.
8: Snapshot Mentality
Here’s an example of snapshot mentality.
I think a lot of people believe this is how a portrait session works. Hey, maybe it does for some. I used to be like Austin, but I’m better now. I tend to spend more time planning and setting up for a good portrait than just spraying and praying for a portrait.
Please don’t think I’m against spontaneity because that isn’t true. I’ve learned that I get my best results when I slow down, think of a concept and execute it. An excellent time for spontaneous shots is after you bank your concepts. You never know what else you could get if you don’t try.
My advice is to start with a concept and then see what works.
9: Poor Composition
Composition basically means putting things together. When we talk about composite photography, it’s very clear. You’re taking things from different photo sources and arranging them into one image.
This episode and blog post are part of a series we’re creating to expand upon this blog post.
As a list of 10 elements of composition, I thought the post touched on some useful ideas. However, I decide that it may help if we expand more on each of those elements. I hope this gives you some ideas to use in your compositions.
Portrait composition is pretty much the same thing, except that you’re arranging things around your subject to capture the final result in one frame. The trick is how you arrange things, because some things just don’t move.
That means it’s up to you to move yourself, your subject, and whatever else is necessary to get a good portrait. If you want to include things that don’t move (buildings, mountains, heavy stuff), then you have a decision.
Is the immovable object so important that it must be in the photo, or is the portrait better served without it?
Poor composition is displeasing to the eye. So you’ll know it when you see it. There are some common pitfalls of poor composition, though.
Go study some photos you like, and study some that you think aren’t very well executed. Find out what you like and dislike. Then create your own compositions to choose the best and avoid the worst.
10: Shooting from the Wrong Perspective
Perspective is the sense of depth and dimension in your photograph. Generally, you want a foreground, a middle and a background. However, there’s another concept of perspective. It describes how things look from where you stand.
If you take all of your portraits from eye level, you’re shooting everything from the same perspective that most people see daily. Many people enjoy drone photography these days to get a bird’s eye perspective. Think how that changes your view of a subject.
Instead of seeing a model standing on the beach, why not shoot your subject from above as they lie on the beach?
To become more creative, vary your perspective. Move up, move down. Find out the results that work for your subject. Put your camera someplace interesting and get your photo.
Of course, not all perspectives work as well as others. Just because it’s different doesn’t mean it’s good, at least for portraits. Depending upon your focal length and how it distorts the subject, your result could range from flattering to fattening.
The book I referenced above from Lindsay Adler describes perspective issues very well.







Thanks for sharing the idea. Better learn from other’s mistakes.