Affiliate Disclosure: We earn a commission if you purchase through one of our links at no additional cost to you.
Editing travel photos requires a lot of different filters and tools to get the right look for your photo. When you think of the conditions you encounter with travel photography, you end up with plenty of different subjects. You need a tool like Luminar Neo (Luminar Neo replaced Luminar AI) to quickly, yet professionally, enhance those photos to share with your audience.
Travel photography really covers most of the photo experiences!
Why Edit Travel Photos with Luminar Neo?
Luminar Neo has a collection of tools for nearly every kind of photography, making it the perfect tool to edit travel photos.
1: How to Edit Architectural Photos
 Before
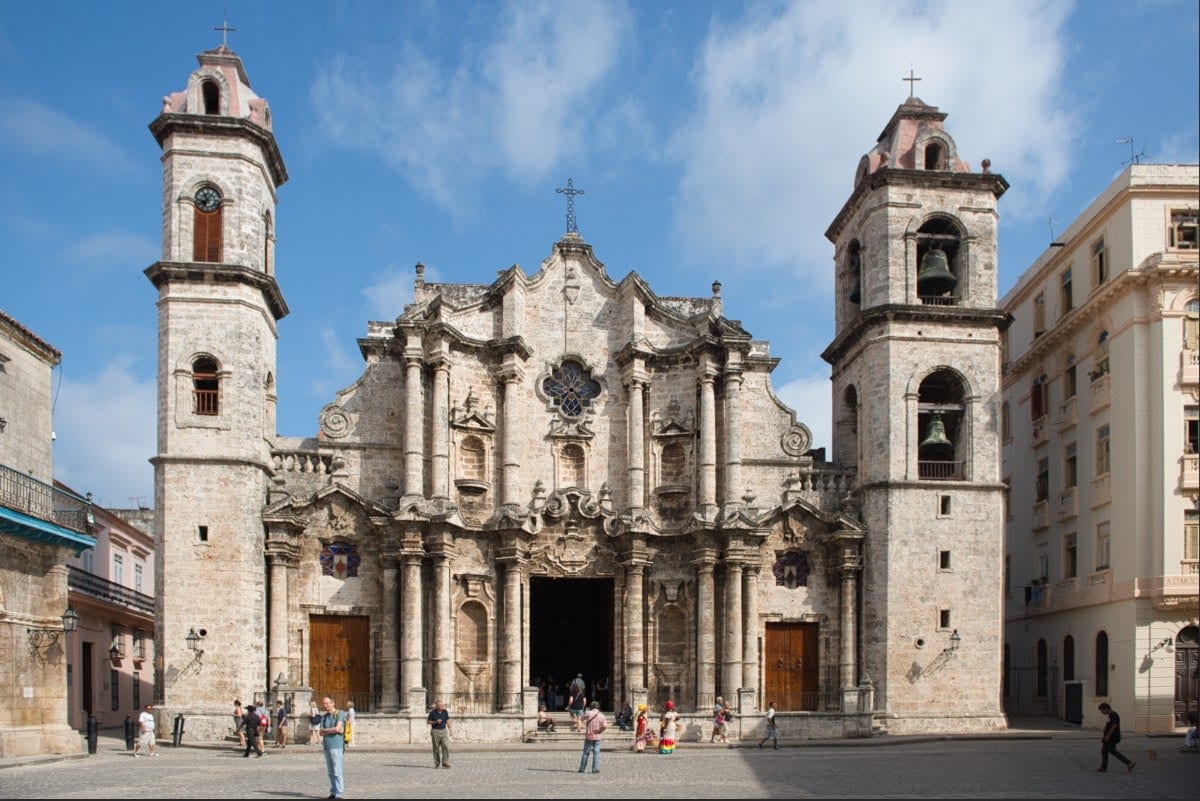 After
After
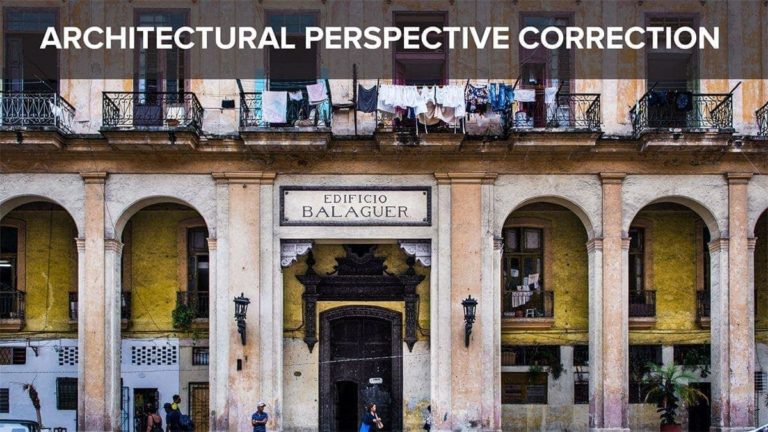
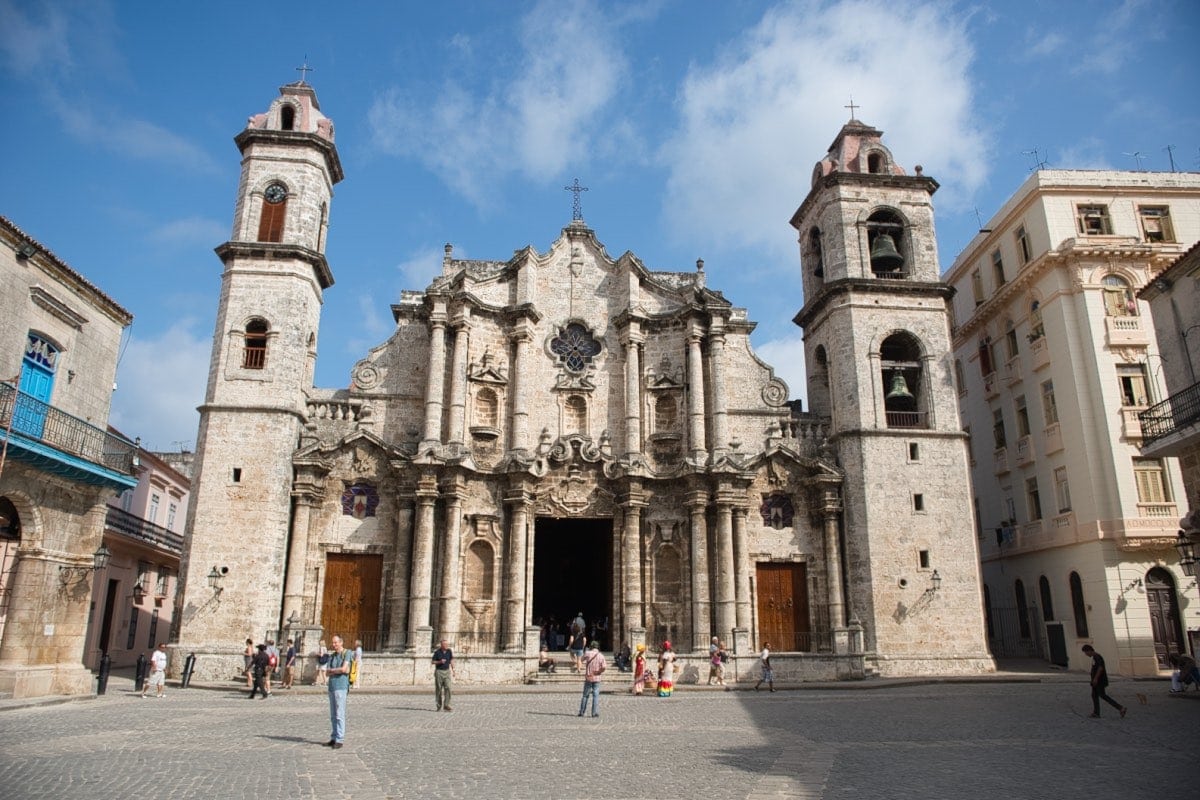
The Before photo above is a typical travel photo featuring architecture. Notice how the towers lean inward?
Without a perspective lens, there’s not much you can do. This is typical distortion from a wide-angle lens. The problem is you can only move so far backward, which limits your lens choice. You can take the chance to get the photo while you’re at a destination and then deal with the consequences when you get home.
Fortunately, Luminar Neo has perspective correction features in Composition AI to help you deal with this issue.
You can do a much better job of correcting perspective issues with only two buttons to click. There is a trade-off. Notice how much of the foreground gets taken away with the corrected photo.
That’s because perspective correction software needs to warp the photo, and then you crop away the excess. If you keep that in mind while taking your travel photos with architecture, shoot a bit wider so you have room to crop out the stuff you don’t need.
2: How to Edit Portraits
When we travel, we meet people and want to remember them. Why not enhance those photos to fit our memories rather than document them with what the camera sees? It’s never the best view of the interesting people we encounter.
Here’s a Before and After view of a simple portrait.
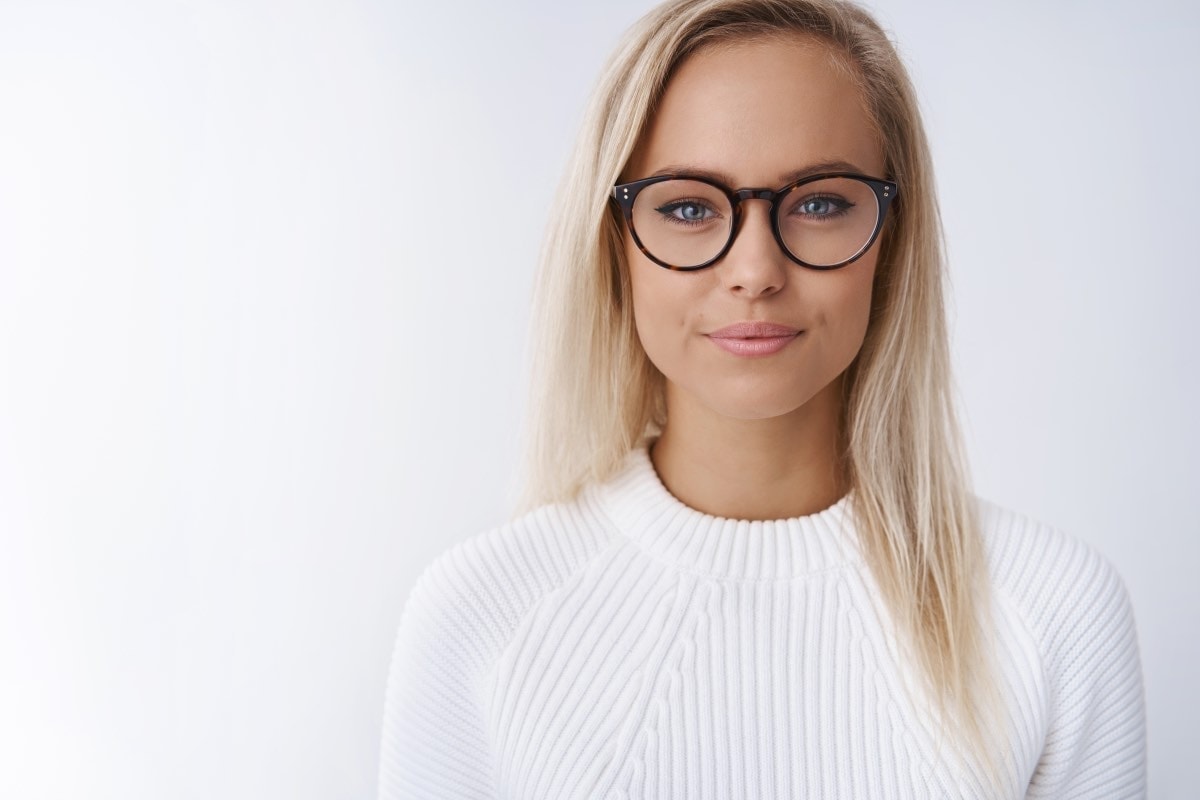 Before
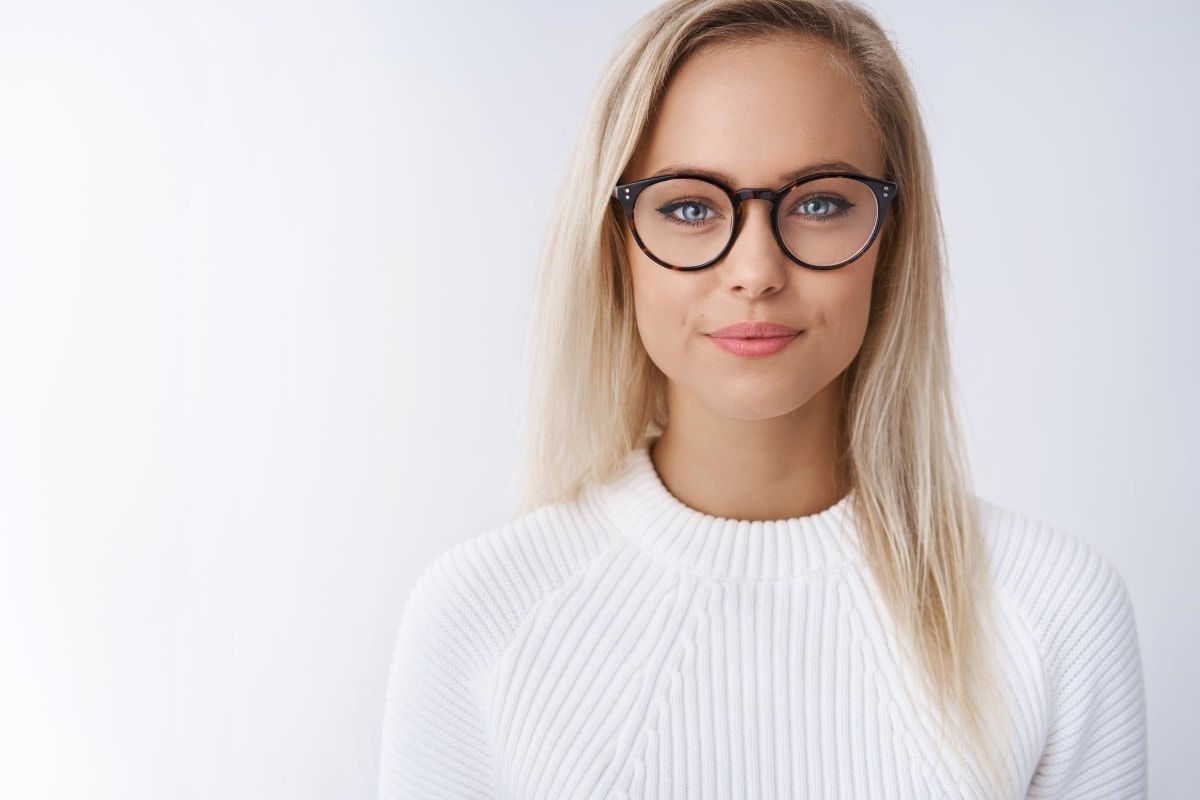 After
After
We’re starting off with a very nice portrait. You wouldn’t think that we need to do anything. The idea here is to enhance her features, not fix problems.
It only took a few seconds to make some simple changes.
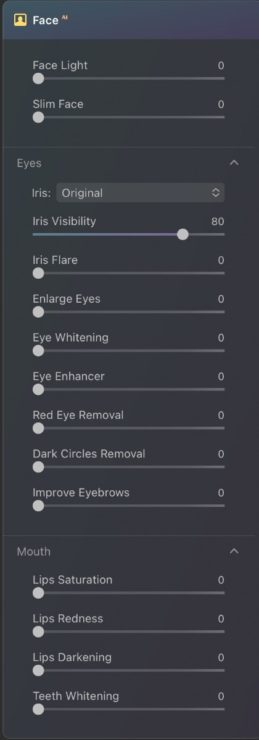
I started off by adding a little Face Light to brighten her face. Not a lot, just enough to help draw the eye. After all, your eye gets drawn to the brightest thing.
Next, I added a bit of Slim Face. Not because she needs it, but to provide an example of how it looks. Use this sparingly. People know how they look. A little makes your portrait subject feel good. A lot makes them think you believe they needed to lose weight.
Moving on to the Eyes section, I moved the Iris Flare up to about 50 to give some nice highlights in her eyes.
I also slightly enlarged her eyes. If you flip between the two photos, you may notice the difference. We engage with a person’s eyes, so making them slightly larger gives more feedback and helps you relate to the portrait.
A bit of eye whitening helps. Funny thing, eye whites aren’t white. So don’t drag this too far over to give electric eyes.
In the Mouth section, I added a little bit of Saturation, Redness, and Darkening to her lips. It’s something you do to taste, so there’s no real right or wrong here.
Since we don’t see her teeth, I didn’t add any Teeth Whitening. However, the same issue as Eye Whites applies here. Teeth aren’t really white, so don’t go too far with this slider.
As a result, you can take a portrait and enhance your subject quickly and easily with a few simple sliders. No complex knowledge of tools or processes required.
3: How to Edit Landscape Photos
No matter where you travel, we take photos of those locations and share them to help others see and understand what we felt there.
When I take travel photos, I want people to want to go there. Drop everything, get on a plane, and go somewhere interesting and beautiful.
If you shoot in RAW (and you should), then every photo needs post-processing. RAW is just a database. The photo comes from how you edit the information in that database.
Here’s an example of the difference.
 Before
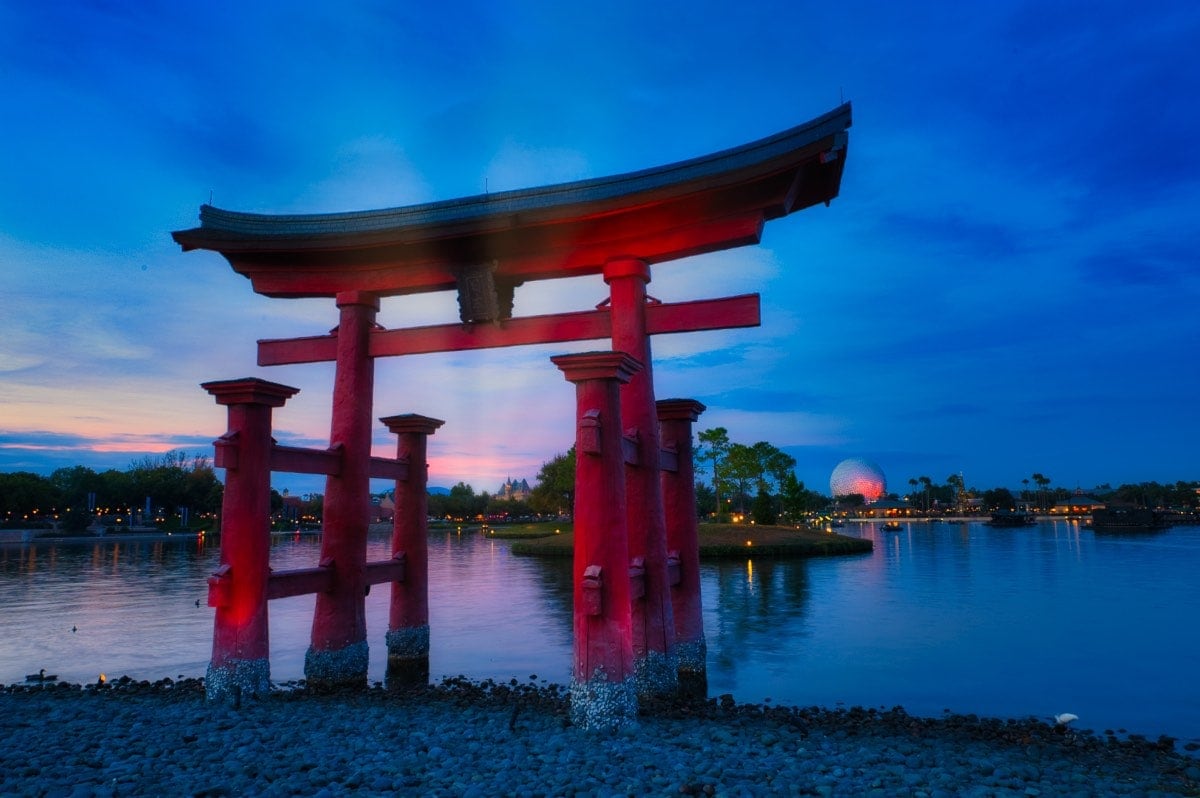 After
After
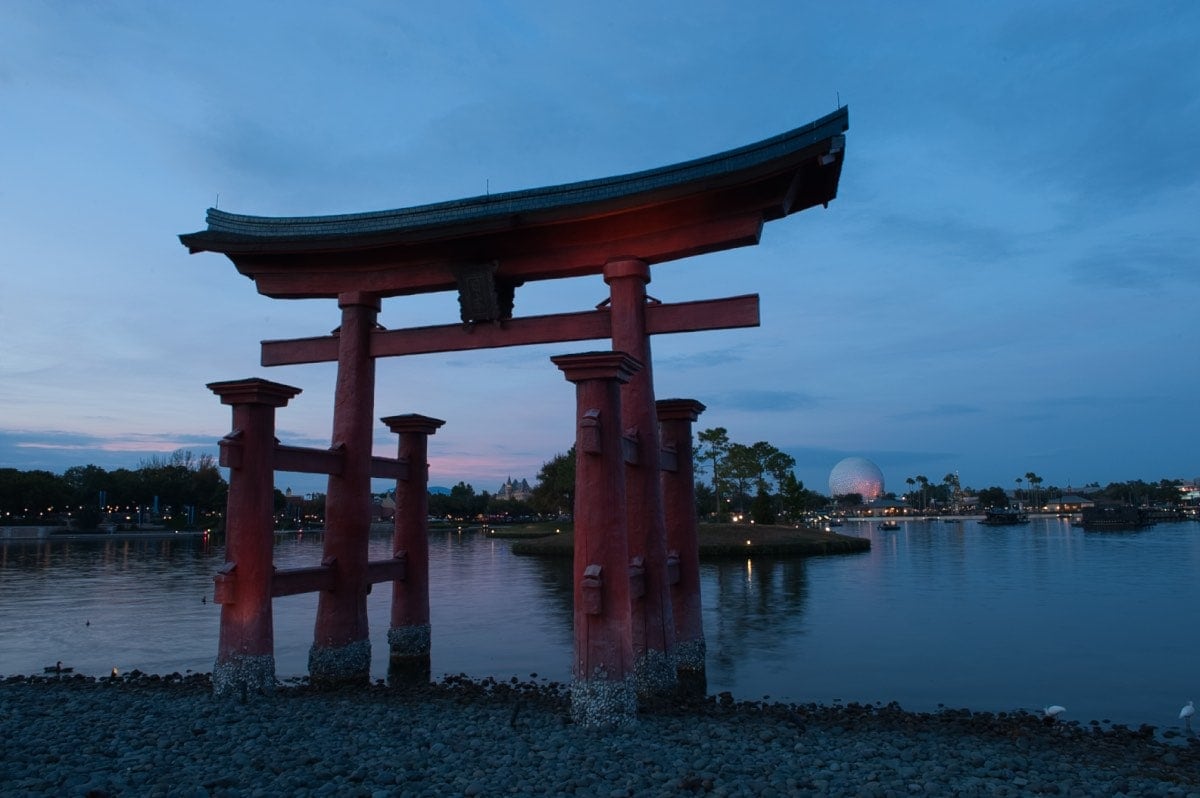
The before photo came from the RAW file without any processing. It looks dull and lifeless, but that isn’t what I experienced when I took the photo.
Less than a minute in Luminar Neo, I created the After photo. That reveals the colors, contrast, and experience I want to share with my viewers.
Most of the heavy lifting to edit my travel photos comes from the Enhance AI tools. I moved Accent AI to bring color and contrast to the photo overall. Then I used the Sky Enhancer AI tool to bring out the drama in the sky.
Just moving two sliders handled 80% of the work needed to transform the RAW image to the final result.
I decided to use the SunRays tool across the lake between the legs of the Tori gate. A little glow, a little warmth, and some sun rays added a bit of light and color to the final result.
The Landscape tool also allowed me to add some Golden Hour warmth and color to the photo overall.
Video: See How to Enhance Travel Photos with Luminar AI
Save Money with my Luminar Promo Code
Luminar Neo is an AI-powered photo editor that turns any portrait into a stunning masterpiece. With FaceAI and SkinAI, you can easily retouch portraits, removing blemishes and highlighting facial features. And with the Portrait BokehAI tool, you can create a beautiful bokeh effect in any light. Plus, the Background Removal tool makes it easy to remove backgrounds without spending hours masking.
Skylum now offers Luminar Neo as either a stand-alone tool or part of a membership with extensions to offer more valuable tools like:
- HDR Merge
- Noiseless AI
- Upscale AI
- AI Background Removal
- GenErase
- GenExpand
- GenRemove
Additional extensions are coming.
Luminar Neo's exposure correction and color vibrancy features for all your travel memories will keep your photos looking natural and beautiful.
Finally, Luminar Neo's SkinAI and FaceAI provide the perfect finishing touches for your portraits, ensuring stunning results every time.
You can get everything with different pricing plans. Monthly, Annual or even Lifetime plans are available.
SAVE: You can save $10 using my coupon code - Beem10off
- Promo Code: Beem10off
- Easy to use
- Get great results fast
- Plenty of post-processing features
- Professional extensions are available
- May be slow on older computers
- File management is rudimentary
Why pay full price when you can save a bit of money using my Luminar promo code? In addition to saving money using my code, I also have a course called Luminar Neo Elements that describes every tool inside of Luminar Neo.
It normally sells for $47, but I’ll give it to you for free if you decide to purchase Luminar Neo using my promo code. Just click the big green button below to check out the course details and find out how to redeem it for free when you buy Luminar Neo using my promo code.
Video Transcript
In this video, we're going to take a look at processing travel photography in Luminar AI beta. So why don't we go ahead. Get started with that. Hi, my name is William Beem. I'm a portrait photographer in central Florida, but I've also done a lot of travel photography in my background. So I've got a number of my travel photos that I want to see how they turn out inside of Luminar AI.
If you haven't gotten an order in for Luminar AI, this video is coming out just before black Friday. Please go ahead. Check the description below. There'll be a link to my black Friday page. I know that Skylum is going to have a discount for Luminar for black Friday. So please go ahead and take a look. Delivery date they've announced is going to be December 15th.
If you order in advance, you will get your copy before general availability. You'll also get a couple of bonuses that Scott is providing access to a members club and some other resources for Luminar AI. So please go ahead and check that out. Or you can just go to Williambeem.com/luminarAI, and we'll get you to going there. All right, let me go ahead and grab a couple of photos and we'll start seeing what we can do with them.
All right. I wanted to start with this one. It say a church in Havana and you can see we've got some perspective problems. Luminar our AI does have some perspective controls, so let's go ahead and go straight to edit. And when we look inside of the composition AI, not only does it try to tell you what is the best composition available for your photograph,
but also the perspective controls are there. I think you'll be pleased that we can get this corrected very quick and easily. If you come down here to this section, you'll see where it says perspective and we're kind of tilting inward. So I'm just going to go ahead and click this button right here and just like that, we've got our perspective issues corrected.
You can still go ahead and click on composition and then Luminar will tell you what it thinks is the best composition and you have control. So if you don't like the composition it recommends, you can still go ahead and bring this back up. You can change the aspect ratio to something different over here, and you can also go ahead and do some rotation.
If you need to, you can flip things. Actually might have to get rid of the composition in AI. So I'm just going ahead and hit enter on that. And we'll go back in here. And so you can flip things sideways, or you can flip them upside down, back and forth, or you can rotate your photos as you need to. So that was just a quick look at how to do perspective corrections inside of composition AI.
Okay. On this photo, we've got a kind of a darkened torii gate. This one of you can tell by the little spaceship earth back here, this was taken at Epcot in Walt Disney World. I'm gonna go ahead and click on edit and I'm going to leave the composition as it was. And we'll go start looking at some other tools. I'm going to begin here since usually I start with composition first,
then I go off to enhance and I want to see what happens if we bring up the accent AI and I, you typically start about halfway. On this one. I think I'm going to take it all the way over and you can see how the light is kind of coming at us, really brought up, brought the shadows out of here. So let's take a look at sky enhancer and I start getting things down.
Don't be afraid to move these sliders way, way over to see if you like the Results. Usually they're going to be over the top, but that gives you an idea what kind of result you're going to get. So let's take a quick look at our before and after. So we started off with a photograph like this, and we've kind of brought it around here.
That's not the end of what I want to do. I'm not sure if I want this quite as bright as it is. I like the color contrast between the red here and the blue in the sky. I also like the warmth that we see in the background. So I want to see if we can play with that just a little bit. So I'm going to head down here to landscape and on a bring up golden hour at about halfway.
That's interesting. So let me turn this off and then turn it back on. There's a little bit of warmth that's come back here and there's some foliage back here. I don't, and I don't know if I want to bring this out or not. So I'm going to bring up the foliage enhancer and we'll take a look. This is a very powerful tool.
If you bring foliage enhancer up too much, I'm going to take it all the way over. You see how you get this electric green look. And I don't want anything like that. I think I'm going to bring this around 10 and I'm happy with that. Under advanced settings, you have an option to change the foilage hue. I don't think that's necessary in this case.
And that comes up sometimes. Let's say maybe you want to give something a look that it's autumn or you want to change the overall appeal of what your photograph is. I think that that's not something that we want to do in this one. So that's all I'm going to do with landscape. I could go ahead and hit a Dehaze. I'll bring that up about halfway and it gives it an interesting change.
I'm going to turn this whole section on and off and see what I think. So there's without the two, Oh, the changes we made in landscape and there's with. And honesty, I didn't plan on bringing up Dehaze, but I'm liking the warmth that I get in here. And overall, I'm kind of happy with that photo. I think there's one other thing that I want to do.
And that's going to come over here to creative and I want to take a look at glow and there's a soft focus and glow. I'm going to say, I'm going to go with glow and bring this up. I'm gonna start again halfway. It might be a little bit more than I want. I think about 25, 27. And that's the finished look that I'm after for this photo.
So again, let's take a look at, this is where we started off before and after. Okay. This one is another view of spaceship earth. And I'm going to try and play around with this one a little bit. So I click on edit. I want to go back up to our usual stuff here. I'm going to go into light and I want to go into curves.
I want to do something really stupid. I'm going to bring this way up. I'm going to bring this way down. And that's what I'm looking for. It's a very dramatic and drastic change. And what it's done is it's kind of give us a little bit of blue at the top and a lot of yellow towards the bottom, but look at what it's done to this particular,
the metal that was on here, we'll show you before and after. So this is where we started. It was kind of a dull looking metal. So now it almost looks like it's been chromed. What doesn't fit is this part down here. So what I'm going to do is I'm going to go to composition AI, and I want to change this little bit to kind of just clip off those trees.
I'm going to bring this down and that's it. All I wanted to do was just kind of make a geometric abstract sort of looking photograph out of this. And we did that with just some curves and a little bit of change in the composition. All right, this is the scene that I think a lot of us have seen as travelers. You know,
you want to get a shot of your plane before you head onto it. I'm going to take a look at templates and see what it recommends for us. So for this photo, we see a little bit of filmatic, blockbuster, artistic. I don't think I want to go with artistic. I'm curious what we see in blockbuster. So let's choose a couple of these.
I like what it's done with the sky here. Let's choose the teal and orange, and this is kind of interesting because it's playing off this yellow and darkened the sky a little bit. And I think that might be the one that I ended up going with, but we'll take a look at a couple of others. Shanghai is interesting. Let's see the cyberpunk has little too bright for me.
Speedway. I discussed some grain up there that I'm not a big fan of grain. I think I really liked the teal and orange. So let's take that, but also I want to do a little bit of editing. So now we've got that. I'm going to click down here and say edit. I think what I may want to do is brighten up the airplane itself a little bit.
Let's come down here to local masking, going to add a mask basic, I'm gonna choose a radial brush, and I want to bring this right over here. Kind of on the front of this plane, make this just a little bit bigger and right about there. So let's bring the exposure up just a little bit. Yeah. So about point 65 is good.
I'm going to add a little bit of contrast. I'll play with the highlights up and down. I think I want a little bit more highlight. I'm gonna open the shadows up a bed and on a play with structure. So I'm going to bring that up just a bit more. Okay. Enough of that one. I'm going to go ahead and add a, another brush.
So I'm going to go back up here and a basic, and this one I'm going to paint. So I've got this one brought in here and I just kind of want to brighten up this area right here where the United sign is. I'm going to add just a little bit of exposure and maybe not that much. I just want it to stand out a little bit.
Okay. That's good for me. I'm coming over here to color harmony and I'm just going to play a little bit with the brilliance and warmth. So I'm going to cool it off a little bit and add up a little bit of brilliance and see what we get. That's probably just a little too much. I like the blue and I like the yellow,
so I'm trying to amp up that sky. And that was if we warm this up to it. Yeah. That's not the look I'm going for. I think I kind of like this cooler look, so I'm going to leave it right here. Just very subtle enhancements on the brilliance. I'm not going to pull down the warmth at all. Take a look at color balance and my shadows are kind of cool.
And it's when you can see that they're very dark over here. So let's go ahead and double down on that a little bit. So I'm gonna make it just as a little bit cooler and maybe add some cyans. I want to come over to my mid-tones and add a little bit of coolness there. Actually just pull this way over. See what happens.
Know what? I've changed my mind. I'm liking the warmth that I got out of that in the mid-tones. The cyans, I don't know that I really want to, I think I want to pull a little bit that away and see what happens when we get to our highlights kind of thing. I might want some warmth there as well, that I like a little bit,
and I want to see what split color warmth does for me. If I make my cool, just a little bit cooler, I don't know that I want to play with a warmth. I kind of want that yellow. There we go. So this is a matter of, I'm kind of feeling my way around. In other words, I didn't have a specific look in mind other than I knew that I liked the blues that I had up here.
I wanted to brighten up the plane a little bit, and I really liked this yellow piping and even a little bit, you know, kind of on the handrails. I wanted to get a little bit of play with those colors. And honestly, I didn't know how I was going to get there until I just messed around within the color harmony. So what I ended up doing was using just a little bit of Brilliance, doing a little bit of color balance with the highlights, mid-tones and shadows.
And then with the split color warmth, just kind of boosting the warmth a little bit and making a little bit cooler image. So let's take this just one step further back. We'll go to our essentials. Look at the enhanced AI. I had the sky enhancer on before. I don't know if I need it now. So I'm going to pull this back,
push it up. Yeah. That's way too dark. I think I'm just going to turn the sky enhancer off. And I think a little bit of overall exposure boost on this photo may help. Not too much. Just by a 0.24. And that kind of gets me where I wanted to go. So what I've done is I've brought up this sign just a little bit, I've kind of brightened up the plane.
I think the last thing I want to do though, is probably try a little bit of a vignette. So I want to place my subject right there. Pull this to, I'm going to pull this way down so you can see that's where the vignette is. I'm going to change the size because I really want to focus on that. And I don't want to leave my vignette that dark.
I don't really want people to think about a vignette being there. Okay. So let's take a quick look at before and after. So we'll do a little bit of a split. So this is thing on the photograph where we started. And as you can see, we've just really ramped out a lot of color inside of this one. And we're kind of trying,
trying to draw your eye a little bit to the nose of the plane, both with the radio mask that I used and a little bit of the vignette. Okay. We've got a nice little scene. As I said, I usually like to start with composition, AI. I don't know that I want to change its composition too much, but I want to see what the recommendation is.
This seems to like my composition. Part of me, wondered if I might want to bring it in a little closer to get rid of this column over here. I don't want to lose the bottom of it. So I don't think I really need this beam across here. And I could bring it a little tighter to get rid of that one, or I could expand it to include maybe this part of it over here.
So that way this each side matches. And I don't have a column over here. So a composition AI, I think, didn't give me the result that I wanted, but I still have the control to go in there and choose what I want. So I'm going to go ahead and accept that. Let's see what our enhanced AI tools do for us.
So we'll come up with accent AI. Interesting, not exciting. I'll bring that up a bit. It seems like a little bit of color, a little bit of contrast, but let's go ahead and go without that. I think the first thing I want to do is choose a little bit of structure. We've got some interesting details in here. I don't want them lost.
So I like enhancing the structure a little bit. Might add a little bit of vibrance. I like looking at remove color cast to see if there's something that it does and it does, but I don't, I don't like what it does. So we're not going to mess with that. Now let's take a look at our HSL tab and think about, are there colors that we want to boost? Are there colors that we want to take away?
I'm looking at kind of this orange, yellowish cast back here, and I want to work on the luminance values. So I'm just going to play and see happens is I boost this up and pull it back. And I'm liking that. Also. I see that I've got some blue in here and there's a little bit of red in there as well. So maybe some cyans back over here.
So let's see what happens. We start playing with those. I'm gonna mess with a cyans a little bit and boost those up. I don't want to give it too much because it's, it's kind of in my mind, a tertiary color. So to see what happens with the blues. Yeah. I want to give a little bit of brightness to those. I'm not seeing much purple, magenta.
I don't think I'm going to get a whole lot out of that. I'm also not seeing a lot of reds or even greens that I can mess with. So let's go back now that we changed the luminance, let's take a look at the saturation and I want to see what happens when we play with the orange and the red and yellows. That was interesting.
Let's see what the reds... I'm sliding the reds back and forth looking for changes. And there are some subtle ones, but I don't see enough. That really helps me. So I just double click the red and brings it back to where it was. I'm gonna play with the yellows now. And I'm definitely getting some interesting stuff out of the yellows. I want to be careful because I like the yellow in this light.
And I like what I'm getting over here. But if I, if I do this as much as I want with yellow, it's going to blow out this light. So for example, I take this all the way over that light starts to get a little too hot for my taste. I'm gonna bring this back and I'm going to do a little bit more with a blue to bring that out.
And I think that's going to be it for this particular one. So let's close color. I want to draw the eye in the center. So I've got an options. I can do a little bit of a vignette or I can put a radial mask in there. I'm going to see what happens. We do our radial mask and add that. Choose the radial brush.
I keep saying mask, but obviously I meant brush. I'm going to choose this button over here. Cause I want my result to be in the center. I want to bring up the exposure a little bit. There we go. That just kind of brighten that up and I'm trying to draw your eye right into that center. And I'm going to bring up the shadows a little bit.
Excuse me. I bring up the highlights a little bit and, and open the shadows somewhat. And I think this is probably a good place to go ahead and add a little bit of the AI structure because there's a lot of detail on here. Your eye is going to be drawn to things that are bright. And then after that, this will be drawn to things that are sharp.
So if I can add both a little bit of a more lighting on here and increase the sharpness over everything else, I think that's probably a good option for me. I'm going to add one more local mask on here and this one's going to be a paint mask. I want to add the little bit of exposure and I kind of want to whiten up these columns.
There's one of the brighten them up a little bit. And I was debating whether I wanted to do anything here or not, but really I want to draw your eye to this. I'm going to leave this part alone. All right. Let's think about what else can we do? I could have done some dodging and burning, but I think rather instead,
I'm going to go over here to creative and I'm going to come into, let's take a look at mystical first and just add a little bit of softening from the mystical. I like what it's doing overall, except for where I brightened this up. I'm going to smooth that out a little bit. I'm going to open up the shadows a bit. There we go.
I don't know if that's exactly where I was before, but that's kind of finally at the look that I want. And there we go. I think I'm going to leave it just kind of the way it is. Do the compare slider. So we can see what this is, what we had before. And this is what we have after. It's not a dramatic change.
It's just enough to kind of bring out the color and the highlights. Okay. So that's just a quick look at how I would manage some of my travel photos in Luminar AI. We started off with a church where we did perspective control. We have the crazy job I did on spaceship earth using curves. Also, we looked at what we could do with the Torii gate.
And I kind of liked the look that we came up with after that we had our little fountain and also of course the airplane at the docking Bay. So just a few examples. We'll probably do some more in the future, but that gave you an idea of what kind of tools we have inside of Luminar and some of the creative things that you can do with them.
You can do just a little bit to enhance it, or you can really do something wild or like, if you want to. If you like this photo, please go ahead, share it with a friend. In fact, if you really like it, I'd love it. If you would go ahead and click like, and that lets YouTube know that we're doing something right. Also most important,
please go ahead and subscribe if you like these videos. And if you want to see more of them and click the bell notification icon, and that'll give you a notice whenever I release another video. Thank you so much. I'll see you in the next video.
Want to learn more about Photography software? Click below to check out articles about Adobe, ON1, Skylum, and more.
Photography Software Articles